Yamaha YSP 4000 Owner's Manual - Page 25
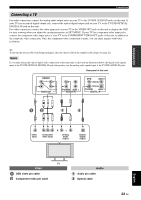
Before connecting components, Audio/Video, Video - s video
 |
UPC - 027108928760
View all Yamaha YSP 4000 manuals
Add to My Manuals
Save this manual to your list of manuals |
Page 25 highlights
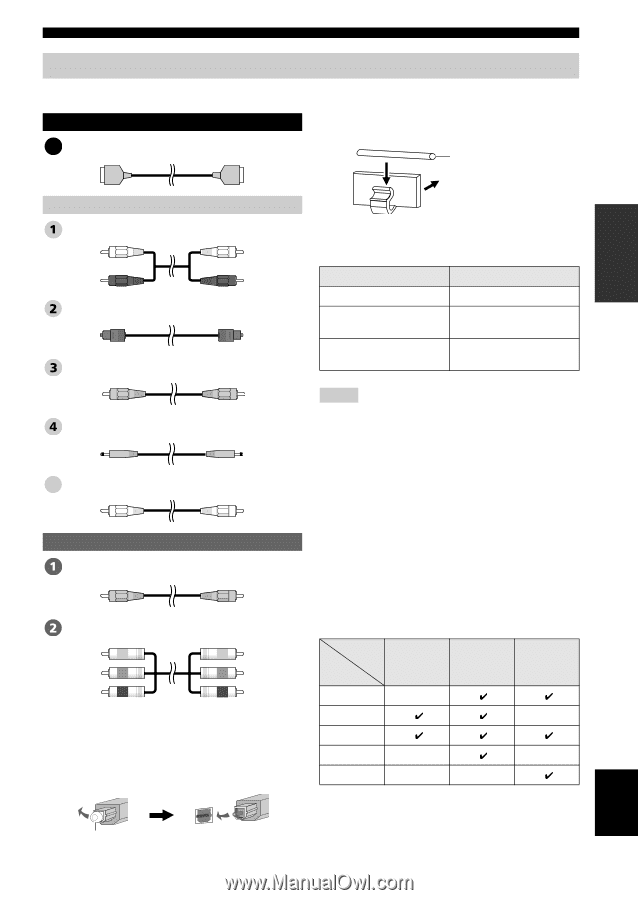
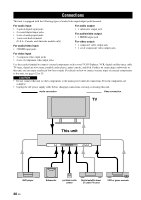
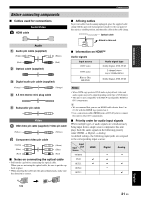
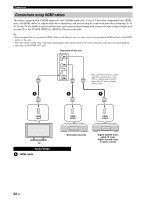
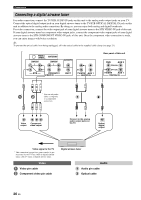
PREPARATION Connections Before connecting components ■ Cables used for connections Audio/Video A HDMI cable ■ Affixing cables To prevent cables from becoming unplugged, place the supplied cable clamp with the open side facing upward, attach it to the rear panel of this unit in a suitable position, and then affix cables in the cable clamp. Optical cable Audio Audio pin cable (supplied) (White) (Red) Optical cable (supplied) (White) (Red) Digital audio pin cable (supplied) Attach to this unit ■ Information on HDMI™ Audio signals Input source Audio signal type DVD video Dolby Digital, DTS, PCM DVD audio 2-channel stereo (up to 96 kHz/24 bit) Blu-ray Disc HD DVD Dolby Digital, DTS, PCM (Orange) (Orange) 3.5 mm stereo mini plug cable 5 Subwoofer pin cable Video OSD video pin cable (supplied) / Video pin cable (Yellow) (Yellow) Component video pin cable (Green) (Blue) (Red) (Green) (Blue) (Red) ■ Notes on connecting the optical cable • Pull out the cap before connecting the optical cable. When you are not using the optical cable, be sure to put the cap back in place. • When inserting the cable into the optical digital jack, make sure the direction is correct. Notes • When CPPM copy-protected DVD audio is played back, video and audio signals may not be output depending on the type of DVD player. • This unit is not compatible with HDCP-incompatible HDMI or DVI components. y • We recommend that you use an HDMI cable shorter than 5 m (16 ft) with the HDMI logo printed on it. • Use a conversion cable (HDMI jack ↔ DVI-D jack) to connect this unit to other DVI components. ■ Priority order for audio input signals When multiple types of audio signals are simultaneously being input from a single source component, this unit plays back the audio signals in the following priority order: HDMI → Digital → Analog As default settings, the following input jacks are assigned to the corresponding input sources: Input Input jack Source TV/STB DVD AUX 1 AUX 2 AUX 3 HDMI Digital Analog English Cap 21 En
-
 1
1 -
2
-
3
-
4
-
5
-
6
-
7
-
8
-
9
-
10
-
11
-
12
-
13
-
14
-
15
-
16
-
17
-
18
-
19
-
 20
20 -
 21
21 -
 22
22 -
 23
23 -
 24
24 -
 25
25 -
 26
26 -
 27
27 -
 28
28 -
 29
29 -
 30
30 -
31
-
32
-
33
-
34
-
35
-
36
-
37
-
38
-
39
-
40
-
41
-
42
-
43
-
44
-
45
-
46
-
47
-
48
-
49
-
50
-
51
-
52
-
53
-
54
-
55
-
56
-
57
-
58
-
59
-
60
-
61
-
62
-
63
-
64
-
65
-
66
-
67
-
68
-
69
-
70
-
71
-
72
-
73
-
74
-
75
-
76
-
77
-
78
-
79
-
80
-
81
-
82
-
83
-
84
-
85
-
86
-
87
-
88
-
89
-
90
-
91
-
92
-
93
-
94
-
95
-
96
-
97
-
98
-
99
-
100
-
101
-
102
-
103
-
104
-
105
-
106
-
107
-
108
-
109
-
110
-
111
-
112
-
113
-
114
-
115
-
116
-
117
-
118
-
119
-
120
-
121
-
122
-
123
-
124
-
125
-
126
-
127
-
128
-
129
-
130
-
131
-
132
-
133
-
134
-
135
-
136
-
137
 |
 |