3Com 3CBLSF50 User Guide - Page 26
The IP address, Appendix D, - manual switch
 |
UPC - 662705529103
View all 3Com 3CBLSF50 manuals
Add to My Manuals
Save this manual to your list of manuals |
Page 26 highlights
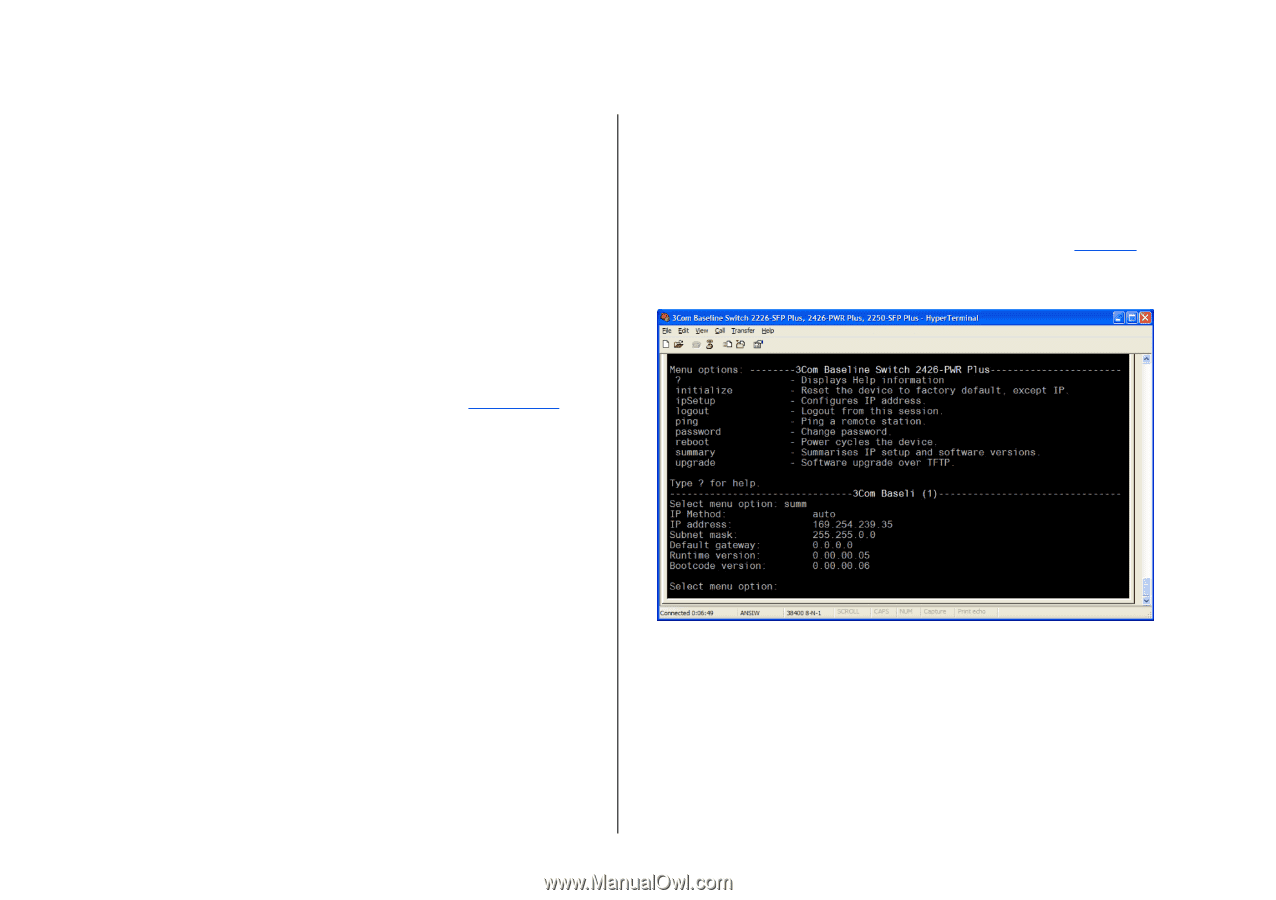
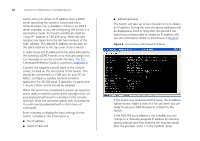
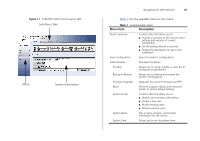
26 CHAPTER 3: CONNECTING TO THE WEB INTERFACE switch will try to obtain an IP address from a DHCP server (assuming the Switch is connected into a network where one is available). If there is no DHCP server available, or you are configuring the Switch in a stand-alone mode, the Switch will allocate itself an "Auto IP" address of 169.254.xx.yy. These last two numbers are taken from the last two numbers of the MAC address. This default IP address can be seen on the label attached to the top cover of your Switch. In order to see the IP address that has been allocated to the Switch by a DHCP server, or to manually assign one, it is necessary to use the console interface. The CLI Command Reference Guide is covered in Appendix D. Connect the supplied console cable to the console socket, located on the front panel of the Switch. This should be connected to a COM port on your PC (or MAC). Configure a suitable terminal emulator application for 38,400 baud, 8 data bits, no parity and 1 stop bit. Flow control should be disabled. When the Switch has completed its power up sequence and is ready to operate, pressing the carridge return on your keyboard will result in a prompt on the console interface. Enter the username admin with no password. You will now be presented with a short menu of commands. Enter summary to display the basic settings for the Switch. Included in this information is: ■ The IP address, ■ Subnet mask and ■ Default gateway The Switch will take up to two minutes to try to obtain an IP address. During this time the above addresses will be displayed as 0.0.0.0. Only after this period if the Switch has not been able to obtain an IP address, will you see information similar to that shown in Figure 6. Figure 6 CLI Summary with Default IP Address If the Switch has obtained a DHCP lease, the IP address will be shown. Make a note of it for use when you are ready to use your Web browser to connect to the Switch. If the 169.254.xx.yy address is not suitable, you can change to a manually assigned IP address by entering ipsetup manual and then entering the required values after the prompts. Enter 1 in the VLAN ID. Enter
-
 1
1 -
2
-
3
-
4
-
5
-
6
-
7
-
8
-
9
-
10
-
11
-
12
-
13
-
14
-
15
-
16
-
17
-
18
-
19
-
20
-
 21
21 -
 22
22 -
 23
23 -
 24
24 -
 25
25 -
 26
26 -
 27
27 -
 28
28 -
 29
29 -
 30
30 -
 31
31 -
32
-
33
-
34
-
35
-
36
-
37
-
38
-
39
-
40
-
41
-
42
-
43
-
44
-
45
-
46
-
47
-
48
-
49
-
50
-
51
-
52
-
53
-
54
-
55
-
56
-
57
-
58
-
59
-
60
-
61
-
62
-
63
-
64
-
65
-
66
-
67
-
68
-
69
-
70
-
71
-
72
-
73
-
74
-
75
-
76
-
77
-
78
-
79
-
80
-
81
-
82
-
83
-
84
-
85
-
86
-
87
-
88
-
89
-
90
-
91
-
92
-
93
-
94
-
95
-
96
-
97
-
98
-
99
-
100
-
101
-
102
-
103
-
104
-
105
-
106
-
107
-
108
 |
 |