Adobe 22011292 User Manual - Page 101
Reverb effect, Decay Time, Pre-Delay Time, Diffusion, Perception, Sum Inputs
 |
UPC - 883919139081
View all Adobe 22011292 manuals
Add to My Manuals
Save this manual to your list of manuals |
Page 101 highlights
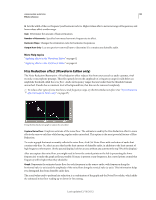
USING ADOBE AUDITION 97 Effects reference Reverb effect The Reverb > Reverb effect simulates acoustic spaces with convolution-based processing. It can reproduce acoustic or ambient environments such as a coat closet, a tiled bathroom shower, a concert hall, or a grand amphitheater. The echoes can be spaced so closely together that a signal's reverberated tail decays smoothly over time, creating a warm and natural sound. Alternatively, Pre-Delay Time can be adjusted to give a sense of room size. Relative to the Reverb effect, the Full Reverb effect provides more options and better audio rendering. For quick adjustments, however, you may prefer the reduced options set of the Reverb effect. Important: The Reverb effect demands significant processing; for real-time, multitrack use, either pre-render this effect or replace it with Studio Reverb. (See "Pre-render track effects to improve performance" on page 64.) Decay Time Sets how many milliseconds it takes for reverb to tail off to infinity (about -96 dB). Use values below 400 for small rooms, values between 400 and 800 for medium-sized rooms, and values above 800 for very large rooms, such as concert halls. For example, enter 3000 milliseconds to create reverb tails for a giant amphitheater. To simulate rooms that have both echoes and reverb, first use the Echo effect to establish the size of the room, and then use the Reverb effect to make the sound more natural. A Decay Time as little as 300 milliseconds can add perceived spaciousness to dry sound. Pre-Delay Time Specifies how many milliseconds reverb takes to build to its maximum amplitude. For a short Decay Time, the Pre-Delay Time time should also be smaller. In general, a value about 10% as long as the Decay Time sounds most realistic. However, you can create interesting effects by using a longer Pre-Delay Time with a shorter Decay Time. Diffusion Simulates natural absorption, reducing high frequencies as the reverb decays. Faster absorption times simulate rooms full of people, furniture, and carpeting, such as nightclubs and theaters. Slower times (over 1000 milliseconds) simulate empty rooms such as auditoriums, where high frequency reflections are more prevalent. Perception Changes the characteristics of reflections within a room. Lower values create smoother reverb without as many distinct echoes. Higher values simulate larger rooms, cause more variation in reverb amplitude, and add spaciousness by creating distinct reflections over time. A Perception setting of 100 and a Decay Time of 2000 milliseconds or more creates interesting canyon effects. Dry Sets the percentage of source audio to output. In most cases, 90% works well. To add subtle spaciousness, set the Dry percentage higher; to achieve a special effect, set the Dry percentage lower. Wet Sets the percentage of reverb to output. To add subtle spaciousness to a track, keep the Wet percentage lower than the Dry percentage. Increase the Wet percentage to simulate greater distance from the audio source. Sum Inputs Combines the channels of a stereo or surround waveform before processing occurs. Select this option for faster processing, but deselect it for fuller, richer reverb. More Help topics "Applying effects in the Waveform Editor" on page 62 "Applying effects in the Multitrack Editor" on page 63 "Use effect presets" on page 61 Last updated 2/16/2012
-
 1
1 -
2
-
3
-
4
-
5
-
6
-
7
-
8
-
9
-
10
-
11
-
12
-
13
-
14
-
15
-
16
-
17
-
18
-
19
-
20
-
21
-
22
-
23
-
24
-
25
-
26
-
27
-
28
-
29
-
30
-
31
-
32
-
33
-
34
-
35
-
36
-
37
-
38
-
39
-
40
-
41
-
42
-
43
-
44
-
45
-
46
-
47
-
48
-
49
-
50
-
51
-
52
-
53
-
54
-
55
-
56
-
57
-
58
-
59
-
60
-
61
-
62
-
63
-
64
-
65
-
66
-
67
-
68
-
69
-
70
-
71
-
72
-
73
-
74
-
75
-
76
-
77
-
78
-
79
-
80
-
81
-
82
-
83
-
84
-
85
-
86
-
87
-
88
-
89
-
90
-
91
-
92
-
93
-
94
-
95
-
 96
96 -
 97
97 -
 98
98 -
 99
99 -
 100
100 -
 101
101 -
 102
102 -
 103
103 -
 104
104 -
 105
105 -
 106
106 -
107
-
108
-
109
-
110
-
111
-
112
-
113
-
114
-
115
-
116
-
117
-
118
-
119
-
120
-
121
-
122
-
123
-
124
-
125
-
126
-
127
-
128
-
129
-
130
-
131
-
132
-
133
-
134
-
135
-
136
-
137
-
138
-
139
-
140
-
141
-
142
-
143
-
144
-
145
-
146
-
147
 |
 |
