Adobe 22011292 User Manual - Page 82
Diagnostics effects (Waveform Editor only), Diagnose and repair, delete, or mark audio
 |
UPC - 883919139081
View all Adobe 22011292 manuals
Add to My Manuals
Save this manual to your list of manuals |
Page 82 highlights
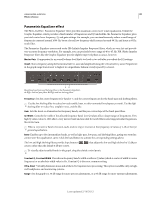
USING ADOBE AUDITION 78 Effects reference Successive Echo Equalization Passes each successive echo through an eight-band equalizer, letting you simulate the natural sound absorption of a room. A setting of 0 leaves the frequency band unchanged, while a maximum setting of -15 decreases that frequency by 15 dB. And, because -15 dB is the difference of each successive echo, some frequencies will die out much faster than others. Delay Time Units Specifies milliseconds, beats, or samples for the Delay Time setting. More Help topics "Applying effects in the Waveform Editor" on page 62 "Applying effects in the Multitrack Editor" on page 63 "Use effect presets" on page 61 Diagnostics effects (Waveform Editor only) Diagnostics are available either via the Effects menu or directly from the Diagnostics panel (Window > Diagnostics). These tools let you quickly remove clicks, distortion, or silence from audio, as well as add markers where silence occurs. For maximum audio restoration control, use diagnostics together with Spectral Display tools and Noise Reduction effects. See "Techniques for restoring audio" on page 86. More Help topics "About process effects" on page 63 "Apply individual effects in the Waveform Editor" on page 62 "Use effect presets" on page 61 Diagnose and repair, delete, or mark audio Unlike conventional noise reduction effects, which process all selected audio, diagnostics scan for problematic or silent areas, and then let you choose which to address. 1 In the Diagnostics panel, choose an option from the Effect menu. 2 Click Scan. 3 At the bottom of the panel, do any of the following: • Select one or more detected items in the list, and click Repair, Delete, or Mark. (The available options depend upon the chosen diagnostic effect.) To mark detected clicks or clipping, right-click selected items in the list, and choose Create Markers from the pop-up menu. (See "Working with markers" on page 45.) • Click Repair All, Delete All, or Mark All to address all detected items. • Click the magnifying glass to zoom in on a selected problem in the Editor panel. Click the icon again to zoom out. • Click Clear Repaired, Deleted, or Marked to remove previously addressed items from the list. Last updated 2/16/2012
-
 1
1 -
2
-
3
-
4
-
5
-
6
-
7
-
8
-
9
-
10
-
11
-
12
-
13
-
14
-
15
-
16
-
17
-
18
-
19
-
20
-
21
-
22
-
23
-
24
-
25
-
26
-
27
-
28
-
29
-
30
-
31
-
32
-
33
-
34
-
35
-
36
-
37
-
38
-
39
-
40
-
41
-
42
-
43
-
44
-
45
-
46
-
47
-
48
-
49
-
50
-
51
-
52
-
53
-
54
-
55
-
56
-
57
-
58
-
59
-
60
-
61
-
62
-
63
-
64
-
65
-
66
-
67
-
68
-
69
-
70
-
71
-
72
-
73
-
74
-
75
-
76
-
 77
77 -
 78
78 -
 79
79 -
 80
80 -
 81
81 -
 82
82 -
 83
83 -
 84
84 -
 85
85 -
 86
86 -
 87
87 -
88
-
89
-
90
-
91
-
92
-
93
-
94
-
95
-
96
-
97
-
98
-
99
-
100
-
101
-
102
-
103
-
104
-
105
-
106
-
107
-
108
-
109
-
110
-
111
-
112
-
113
-
114
-
115
-
116
-
117
-
118
-
119
-
120
-
121
-
122
-
123
-
124
-
125
-
126
-
127
-
128
-
129
-
130
-
131
-
132
-
133
-
134
-
135
-
136
-
137
-
138
-
139
-
140
-
141
-
142
-
143
-
144
-
145
-
146
-
147
 |
 |