Adobe 22011292 User Manual - Page 73
Settings tab, Level Detector
 |
UPC - 883919139081
View all Adobe 22011292 manuals
Add to My Manuals
Save this manual to your list of manuals |
Page 73 highlights
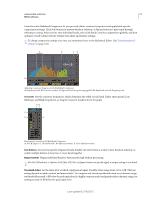
USING ADOBE AUDITION 69 Effects reference For example, if a desirable sonic element occurs around -20 dB, you can boost the input signal at that level, but leave everything else unchanged. You can also draw an inverse line (from the upper left to the lower right) that will dramatically boost quiet sounds and suppress loud ones. Add point Adds control point in graph using numerical input and output levels you specify. This method is more precise than clicking the graph to add points. To numerically adjust an existing control point, right-click it, and choose Edit Point. Delete point Removes selected point from the graph. Invert Flips the graph, converting compression into expansion, or vice versa. Note: You can invert a graph only if it has points in the two default corners (-100, -100 and 0, 0) and if its output level increases from left to right (that is, each control point must be higher than the one to its left). Reset Resets the graph to its default state. Spline Curves creates smoother, curved transitions between control points, rather than more abrupt, linear transitions. (See "About spline curves for graphs" on page 61.) Make-Up Gain Boosts the processed signal. Settings tab General Provides overall settings. • Look-Ahead Time Addresses transient spikes that can occur at the onset of extremely loud signals that extend beyond the compressor's Attack Time settings. Extending Look-Ahead Time causes compression to attack before the audio gets loud, ensuring that amplitude never exceeds a certain level. Conversely, reducing Look-Ahead Time may be desirable to enhance the impact of percussive music like drum hits. • Noise Gating Completely silences signals that are expanded below a 50-to-1 ratio. Level Detector Determines the original input amplitude. • Input Gain Applies gain to the signal before it enters the Level Detector. • Attack Time Determines how many milliseconds it takes for the input signal to register a changed amplitude level. For example, if audio suddenly drops 30 dB, the specified attack time passes before the input registers an amplitude change. This avoids erroneous amplitude readings due to temporary changes. • Release Time Determines how many milliseconds the current amplitude level is maintained before another amplitude change can register. Use fast attack and release settings for audio with fast transients, and slower settings for less percussive audio. • Peak mode Determines levels based on amplitude peaks. This mode is a bit more difficult to use than RMS, because peaks aren't precisely reflected in the Dynamics graph. However, it can be helpful when audio has loud transient peaks you want to subdue. • RMS mode Determines levels based on the root-mean-square formula, an averaging method that more closely matches the way people perceive volume. This mode precisely reflects amplitudes in the Dynamics graph. For example, a limiter (flat horizontal line) at -10 dB reflects an average RMS amplitude of -10 dB. Gain Processor Amplifies or attenuates the signal depending on the amplitude detected. • Output Gain Applies gain to the output signal after all dynamics processing. Last updated 2/16/2012
-
 1
1 -
2
-
3
-
4
-
5
-
6
-
7
-
8
-
9
-
10
-
11
-
12
-
13
-
14
-
15
-
16
-
17
-
18
-
19
-
20
-
21
-
22
-
23
-
24
-
25
-
26
-
27
-
28
-
29
-
30
-
31
-
32
-
33
-
34
-
35
-
36
-
37
-
38
-
39
-
40
-
41
-
42
-
43
-
44
-
45
-
46
-
47
-
48
-
49
-
50
-
51
-
52
-
53
-
54
-
55
-
56
-
57
-
58
-
59
-
60
-
61
-
62
-
63
-
64
-
65
-
66
-
67
-
 68
68 -
 69
69 -
 70
70 -
 71
71 -
 72
72 -
 73
73 -
 74
74 -
 75
75 -
 76
76 -
 77
77 -
 78
78 -
79
-
80
-
81
-
82
-
83
-
84
-
85
-
86
-
87
-
88
-
89
-
90
-
91
-
92
-
93
-
94
-
95
-
96
-
97
-
98
-
99
-
100
-
101
-
102
-
103
-
104
-
105
-
106
-
107
-
108
-
109
-
110
-
111
-
112
-
113
-
114
-
115
-
116
-
117
-
118
-
119
-
120
-
121
-
122
-
123
-
124
-
125
-
126
-
127
-
128
-
129
-
130
-
131
-
132
-
133
-
134
-
135
-
136
-
137
-
138
-
139
-
140
-
141
-
142
-
143
-
144
-
145
-
146
-
147
 |
 |
