Adobe 22011292 User Manual - Page 74
Hard Limiter effect, Multiband Compressor effect, Attack Time, Release Time, Link Channels
 |
UPC - 883919139081
View all Adobe 22011292 manuals
Add to My Manuals
Save this manual to your list of manuals |
Page 74 highlights
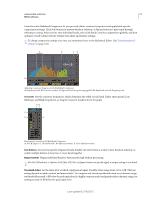
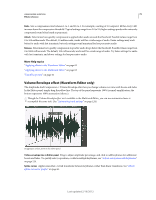
USING ADOBE AUDITION 70 Effects reference • Attack Time Determines how many milliseconds it takes for the output signal to reach the specified level. For example, if audio suddenly drops 30 dB, the specified attack time passes before the output level changes. • Release Time Determines how many milliseconds the current output level is maintained. Note: If the sum of Attack and Release times is too short (less than about 30 milliseconds), audible artifacts can be heard. To see good attack and release times for different types of audio content, choose various options from the Presets menu. • Link Channels Processes all channels equally, preserving the stereo or surround balance. For example, a compressed drum beat on the left channel will reduce the right channel level by an equal amount. Band Limiting Restricts dynamics processing to a specific frequency range. • Low Cutoff Is the lowest frequency that dynamics processing affects. • High Cutoff Is the highest frequency that dynamics processing affects. Hard Limiter effect The Amplitude And Compression > Hard Limiter effect greatly attenuates audio that rises above a specified threshold. Typically, limiting is applied with an input boost, a technique that increases overall volume while avoiding distortion. Maximum Amplitude Sets the maximum sample amplitude allowed. To avoid clipping when working with 16-bit audio, set this value to no more than -0.3 dB. If you set it even lower, to -3 dB, you'll have a little more clearance for any future edits. Input Boost Preamplifies audio before you limit it, making a selection louder without clipping it. As you increase this level, compression increases. Try extreme settings to achieve the loud, high-impact audio heard in contemporary pop music. Look-Ahead Time Sets the amount of time (in milliseconds) generally needed to attenuate the audio before the loudest peak is hit. Note: Make sure that the value is at least 5 milliseconds. If this value is too small, audible distortion effects may occur. Release Time Sets the time (in milliseconds) needed for the attenuation to rebound back 12 dB (or roughly the time needed for audio to resume normal volume if an extremely loud peak is encountered). In general, a setting of around 100 (the default) works well and preserves very low bass frequencies. Note: If this value is too large, audio may remain very quiet and not resume normal levels for a while. Link Channels Links the loudness of all channels together, preserving the stereo or surround balance. More Help topics "Applying effects in the Waveform Editor" on page 62 "Applying effects in the Multitrack Editor" on page 63 "Use effect presets" on page 61 Multiband Compressor effect The Amplitude And Compression > Multiband Compressor effect lets you independently compress four different frequency bands. Because each band typically contains unique dynamic content, multiband compression is a particularly powerful tool for audio mastering. Last updated 2/16/2012
-
 1
1 -
2
-
3
-
4
-
5
-
6
-
7
-
8
-
9
-
10
-
11
-
12
-
13
-
14
-
15
-
16
-
17
-
18
-
19
-
20
-
21
-
22
-
23
-
24
-
25
-
26
-
27
-
28
-
29
-
30
-
31
-
32
-
33
-
34
-
35
-
36
-
37
-
38
-
39
-
40
-
41
-
42
-
43
-
44
-
45
-
46
-
47
-
48
-
49
-
50
-
51
-
52
-
53
-
54
-
55
-
56
-
57
-
58
-
59
-
60
-
61
-
62
-
63
-
64
-
65
-
66
-
67
-
68
-
 69
69 -
 70
70 -
 71
71 -
 72
72 -
 73
73 -
 74
74 -
 75
75 -
 76
76 -
 77
77 -
 78
78 -
 79
79 -
80
-
81
-
82
-
83
-
84
-
85
-
86
-
87
-
88
-
89
-
90
-
91
-
92
-
93
-
94
-
95
-
96
-
97
-
98
-
99
-
100
-
101
-
102
-
103
-
104
-
105
-
106
-
107
-
108
-
109
-
110
-
111
-
112
-
113
-
114
-
115
-
116
-
117
-
118
-
119
-
120
-
121
-
122
-
123
-
124
-
125
-
126
-
127
-
128
-
129
-
130
-
131
-
132
-
133
-
134
-
135
-
136
-
137
-
138
-
139
-
140
-
141
-
142
-
143
-
144
-
145
-
146
-
147
 |
 |
