Adobe 22011292 User Manual - Page 75
Crossover, Solo buttons, Bypass buttons, Threshold sliders
 |
UPC - 883919139081
View all Adobe 22011292 manuals
Add to My Manuals
Save this manual to your list of manuals |
Page 75 highlights
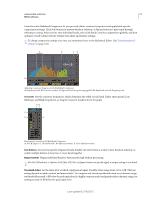
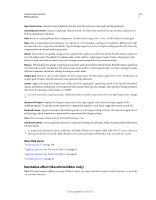
USING ADOBE AUDITION 71 Effects reference Controls in the Multiband Compressor let you precisely define crossover frequencies and apply band-specific compression settings. Click Solo buttons to preview bands in isolation, or Bypass buttons to pass bands through without processing. After you fine-tune individual bands, select Link Band Controls to adjust them globally, and then optimize overall volume with the Output Gain slider and Limiter settings. To change compression settings over time, use automation lanes in the Multitrack Editor. (See "Automating track settings" on page 124.) A B C D E Adjusting a crossover frequency in the Multiband Compressor A. Frequency bands B. Crossover markers C. Bypassed band (no processing applied) D. Amplitude scale E. Frequency scale Crossover Sets the crossover frequencies, which determine the width of each band. Either enter specific Low, Midrange, and High frequencies, or drag the crossover markers above the graph. AB C D E Band-specific controls in the Multiband Compressor A. Solo B. Bypass C. Threshold slider D. Input Level meters E. Gain Reduction meters Solo buttons Let you hear specific frequency bands. Enable one Solo button at a time to hear bands in isolation, or enable multiple buttons to hear two or more bands together. Bypass buttons Bypass individual bands so they pass through without processing. Alt-click (Windows) or Option-click (Mac OS) Solo or Bypass buttons to quickly apply a unique setting to one band. Threshold sliders Set the input level at which compression begins. Possible values range from -60 to 0 dB. The best setting depends on audio content and musical style. To compress only extreme peaks and retain more dynamic range, try thresholds around 5 dB below the peak input level; to highly compress audio and greatly reduce dynamic range, try settings around 15 dB below the peak input level. Last updated 2/16/2012
-
 1
1 -
2
-
3
-
4
-
5
-
6
-
7
-
8
-
9
-
10
-
11
-
12
-
13
-
14
-
15
-
16
-
17
-
18
-
19
-
20
-
21
-
22
-
23
-
24
-
25
-
26
-
27
-
28
-
29
-
30
-
31
-
32
-
33
-
34
-
35
-
36
-
37
-
38
-
39
-
40
-
41
-
42
-
43
-
44
-
45
-
46
-
47
-
48
-
49
-
50
-
51
-
52
-
53
-
54
-
55
-
56
-
57
-
58
-
59
-
60
-
61
-
62
-
63
-
64
-
65
-
66
-
67
-
68
-
69
-
 70
70 -
 71
71 -
 72
72 -
 73
73 -
 74
74 -
 75
75 -
 76
76 -
 77
77 -
 78
78 -
 79
79 -
 80
80 -
81
-
82
-
83
-
84
-
85
-
86
-
87
-
88
-
89
-
90
-
91
-
92
-
93
-
94
-
95
-
96
-
97
-
98
-
99
-
100
-
101
-
102
-
103
-
104
-
105
-
106
-
107
-
108
-
109
-
110
-
111
-
112
-
113
-
114
-
115
-
116
-
117
-
118
-
119
-
120
-
121
-
122
-
123
-
124
-
125
-
126
-
127
-
128
-
129
-
130
-
131
-
132
-
133
-
134
-
135
-
136
-
137
-
138
-
139
-
140
-
141
-
142
-
143
-
144
-
145
-
146
-
147
 |
 |
