Adobe 22011292 User Manual - Page 76
Normalize effect (Waveform Editor only), Input Level meters, Gain Reduction meters, Ratio, Attack
 |
UPC - 883919139081
View all Adobe 22011292 manuals
Add to My Manuals
Save this manual to your list of manuals |
Page 76 highlights
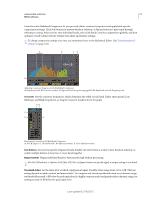
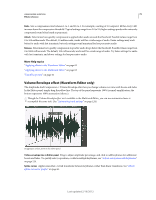
USING ADOBE AUDITION 72 Effects reference Input Level meters Measure input amplitude. Double-click the meters to reset peak and clip indicators. Gain Reduction meters Measure amplitude reduction with red meters that extend from top (minimal reduction) to bottom (maximum reduction). Gain Boosts or cuts amplitude after compression. Possible values range from -18 to +18 dB, where 0 is unity gain. Ratio Sets a compression ratio between 1-to-1 and 30-to-1. For example, a setting of 3.0 outputs 1 dB for every 3 dB increase above the compression threshold. Typical settings range from 2.0 to 5.0; higher settings produce the extremely compressed sound often heard in pop music. Attack Determines how quickly compression is applied when audio exceeds the threshold. Possible values range from 0 to 500 milliseconds. The default, 10 milliseconds, works well for a wide range of audio. Faster settings may work better for audio with fast transients, but such settings sound unnatural for less percussive audio. Release Determines how quickly compression stops after audio drops below the threshold. Possible values range from 0 to 5000 milliseconds. The default, 100 milliseconds, works well for a wide range of audio. Try faster settings for audio with fast transients, and slower settings for less percussive audio. Output Gain Boosts or cuts overall output level after compression. Possible values range from -18 to +18 dB, where 0 is unity gain. Double-click the meters to reset peak and clip indicators. Limiter Applies limiting after Output Gain, at the end of the signal path, optimizing overall levels. Specify Threshold, Attack, and Release settings that are less agressive than similar band-specific settings. Then specify a Margin setting to determine the absolute ceiling relative to 0 dBFS. To create extremely compressed audio, enable the Limiter, and then experiment with very high Output Gain settings. Spectrum On Input Displays the frequency spectrum of the input signal, rather than the output signal, in the multiband graph. To quickly see the amount of compression applied to each band, toggle this option on and off. Brickwall Limiter Applies immediate, hard limiting at the current Margin setting. (Deselect this option to apply slower soft limiting, which sounds less compressed but may exceed the Margin setting.) Note: The maximum Attack time for brickwall limiting is 5 ms. Link Band Controls Lets you globally adjust the compression settings for all bands, while retaining relative differences between bands. To temporarily link band controls, hold down Alt+Shift (Windows) or Option+Shift (Mac OS). To reset a control in all bands, hold down Ctrl+Alt+Shift (Windows) or Command+Option+Shift (Mac OS), and click the control. More Help topics "Mastering effect" on page 100 "Applying effects in the Waveform Editor" on page 62 "Applying effects in the Multitrack Editor" on page 63 "Use effect presets" on page 61 Normalize effect (Waveform Editor only) Note: This effect requires offline processing. While it is open, you cannot edit the waveform, adjust selections, or move the current-time indicator. Last updated 2/16/2012
-
 1
1 -
2
-
3
-
4
-
5
-
6
-
7
-
8
-
9
-
10
-
11
-
12
-
13
-
14
-
15
-
16
-
17
-
18
-
19
-
20
-
21
-
22
-
23
-
24
-
25
-
26
-
27
-
28
-
29
-
30
-
31
-
32
-
33
-
34
-
35
-
36
-
37
-
38
-
39
-
40
-
41
-
42
-
43
-
44
-
45
-
46
-
47
-
48
-
49
-
50
-
51
-
52
-
53
-
54
-
55
-
56
-
57
-
58
-
59
-
60
-
61
-
62
-
63
-
64
-
65
-
66
-
67
-
68
-
69
-
70
-
 71
71 -
 72
72 -
 73
73 -
 74
74 -
 75
75 -
 76
76 -
 77
77 -
 78
78 -
 79
79 -
 80
80 -
 81
81 -
82
-
83
-
84
-
85
-
86
-
87
-
88
-
89
-
90
-
91
-
92
-
93
-
94
-
95
-
96
-
97
-
98
-
99
-
100
-
101
-
102
-
103
-
104
-
105
-
106
-
107
-
108
-
109
-
110
-
111
-
112
-
113
-
114
-
115
-
116
-
117
-
118
-
119
-
120
-
121
-
122
-
123
-
124
-
125
-
126
-
127
-
128
-
129
-
130
-
131
-
132
-
133
-
134
-
135
-
136
-
137
-
138
-
139
-
140
-
141
-
142
-
143
-
144
-
145
-
146
-
147
 |
 |