Asus RAMPAGE V EXTREME User Guide - Page 78
update, utility, Flashback
 |
View all Asus RAMPAGE V EXTREME manuals
Add to My Manuals
Save this manual to your list of manuals |
Page 78 highlights
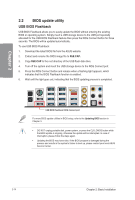
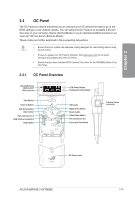
2.2 BIOS update utility USB BIOS Flashback USB BIOS Flashback allows you to easily update the BIOS without entering the existing BIOS or operating system. Simply insert a USB storage device to the USB port specially allocated for the USB BIOS Flashback feature then press the ROG Connect button for three seconds. The BIOS will be updated automatically. To use USB BIOS Flashback: 1. Download the latest BIOS file from the ASUS website 2. Extract and rename the BIOS image file to R5E.CAP. .5 rr 3. Copy R5E.CAP to the root directory of the USB flash disk drive. CD 4. Turn off the system and insert the USB storage device to the ROG Connect port. 5. Press the ROG Connect button and release when a flashing light appears, which indicates that the BIOS Flashback function is enabled. 6. Wait until the light goes out, indicating that the BIOS updating process is completed. zrN [I Ii [ MEI [I 11 l [I 11 11 1 00 0\ / I yarg MII7/ • * I \O; O USB BIOS Flashback/ ROG Connect port For more BIOS update utilities in BIOS setup, refer to the Updating BIOS section in Chapter 3. • DO NOT unplug portable disk, power system, or press the CLR_CMOS button while the BIOS update is ongoing, otherwise the update will be interrupted. In case of interruption, please follow the steps again. • Updating the BIOS may have risks. If the BIOS program is damaged during the process and results in the system's failure to boot up, please contact your local ASUS Service Center. 2-14 Chapter 2: Basic Installation
-
 1
1 -
2
-
3
-
4
-
5
-
6
-
7
-
8
-
9
-
10
-
11
-
12
-
13
-
14
-
15
-
16
-
17
-
18
-
19
-
20
-
21
-
22
-
23
-
24
-
25
-
26
-
27
-
28
-
29
-
30
-
31
-
32
-
33
-
34
-
35
-
36
-
37
-
38
-
39
-
40
-
41
-
42
-
43
-
44
-
45
-
46
-
47
-
48
-
49
-
50
-
51
-
52
-
53
-
54
-
55
-
56
-
57
-
58
-
59
-
60
-
61
-
62
-
63
-
64
-
65
-
66
-
67
-
68
-
69
-
70
-
71
-
72
-
 73
73 -
 74
74 -
 75
75 -
 76
76 -
 77
77 -
 78
78 -
 79
79 -
 80
80 -
 81
81 -
 82
82 -
 83
83 -
84
-
85
-
86
-
87
-
88
-
89
-
90
-
91
-
92
-
93
-
94
-
95
-
96
-
97
-
98
-
99
-
100
-
101
-
102
-
103
-
104
-
105
-
106
-
107
-
108
-
109
-
110
-
111
-
112
-
113
-
114
-
115
-
116
-
117
-
118
-
119
-
120
-
121
-
122
-
123
-
124
-
125
-
126
-
127
-
128
-
129
-
130
-
131
-
132
-
133
-
134
-
135
-
136
-
137
-
138
-
139
-
140
-
141
-
142
-
143
-
144
-
145
-
146
-
147
-
148
-
149
-
150
-
151
-
152
-
153
-
154
-
155
-
156
-
157
-
158
-
159
-
160
-
161
-
162
-
163
-
164
-
165
-
166
-
167
-
168
-
169
-
170
-
171
-
172
-
173
-
174
-
175
-
176
-
177
-
178
-
179
-
180
-
181
-
182
-
183
-
184
-
185
-
186
-
187
-
188
-
189
-
190
-
191
-
192
-
193
-
194
-
195
-
196
-
197
-
198
-
199
-
200
-
201
-
202
-
203
-
204
-
205
-
206
-
207
-
208
-
209
-
210
-
211
-
212
-
213
-
214
-
215
-
216
-
217
-
218
-
219
-
220
-
221
-
222
-
223
-
224
-
225
-
226
-
227
-
228
-
229
-
230
 |
 |
