Asus S82A S86A S82/S86 User Manual (English version) - Page 48
USB Floppy Disk Drive Optional
 |
View all Asus S82A S86A manuals
Add to My Manuals
Save this manual to your list of manuals |
Page 48 highlights
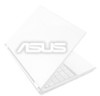
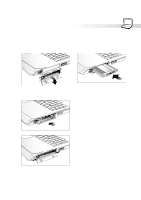
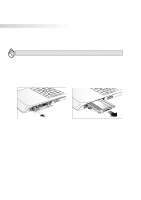
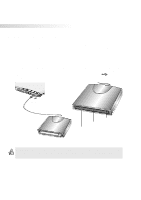
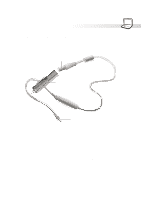
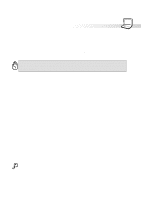
4. Using the Notebook PC USB Floppy Disk Drive (Optional) The Notebook PC features an optional USB-interface disk drive that accepts a standard 1.44MB (or 720KB) 3.5-inch floppy diskette. The eject button is on the top edge of the floppy disk drive for easy access, unlike desktop PCs with the eject button on the bottom of the floppy disk drive. Floppy access activity can be monitored through the LED on the front of the floppy disk drive. Connection Connection is very easy because of USB technology. The USB floppy disk drive is compatible with existing USB standards and will work on all computers with the proper drivers installed. Simply plug in the floppy disk drive cable to one of the two USB ports on the rear-left end of the Notebook PC. The USB connector is designed such that there is only one correct orientation. The symbol faces upwards. USB Connector Floppy Bay Activity LED Floppy Eject Button WARNING! Because the eject button protrudes out when a floppy diskette is inserted, you must remove the floppy diskette during transport to prevent breakage of the eject button. 48
-
 1
1 -
2
-
3
-
4
-
5
-
6
-
7
-
8
-
9
-
10
-
11
-
12
-
13
-
14
-
15
-
16
-
17
-
18
-
19
-
20
-
21
-
22
-
23
-
24
-
25
-
26
-
27
-
28
-
29
-
30
-
31
-
32
-
33
-
34
-
35
-
36
-
37
-
38
-
39
-
40
-
41
-
42
-
 43
43 -
 44
44 -
 45
45 -
 46
46 -
 47
47 -
 48
48 -
 49
49 -
 50
50 -
 51
51 -
 52
52 -
 53
53 -
54
-
55
-
56
-
57
-
58
-
59
-
60
-
61
-
62
-
63
-
64
-
65
-
66
-
67
-
68
-
69
-
70
-
71
-
72
-
73
-
74
-
75
-
76
-
77
-
78
-
79
-
80
-
81
-
82
-
83
-
84
-
85
-
86
-
87
-
88
-
89
-
90
-
91
-
92
 |
 |