Behringer DEEPMIND 12D Manual - Page 39
below: PROG, FX, GLOBAL, COMPARE and WRITE.
 |
View all Behringer DEEPMIND 12D manuals
Add to My Manuals
Save this manual to your list of manuals |
Page 39 highlights
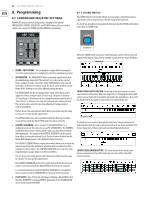
39 DeepMind 12D User Manual PEG MODES - Above and below the keyboard illustration are small "pegs" that show the keys that are notes (N) of an existing poly chord, and the keys that are triggers (T). • N - An "N" in the top left indicates that the last key pressed has a poly chord bound to it (trigger key). The notes of that poly chord will be shown with pegs above and below the keyboard: TRIGGER TYPES • T - This is shown printed on all trigger keys. • E - This indicates that the poly chord is assigned from your external keyboard. • The display below shows external keyboard trigger on C2 with notes on A1, C2, and E2. The small dots on the keys show the notes in the selected chord: • T - A "T" in the top left indicates that the last key pressed was a blank (non-trigger) key. The currently-assigned trigger keys in this bank will be shown with pegs above and below the keyboard as shown: POLY CHORD DISPLAY (LOWER SECTION) - The lower half of the poly chord screen represents a two-octave wide section of the keyboard, centered about the last key pressed (and represented by the brackets on the top section). The last key pressed (or triggered externally) is shown with a highlighted box showing the current note name and OCT number (such as F2 in this example). STATUS SECTION - The status section at the bottom of the poly chord page shows a variety of information about the recording state, the current soft switch status, and information about either the selected chord (if the last key pressed was a trigger), or the current bank and the total used space. • The example below shows a Major chord (Ma) with a modifier of "Spread2" and composed of notes C2, C3, E3, and G3, with the external trigger at C3. KEYBOARD NAVIGATION • Pressing the -/NO or +/YES physical switches to the right of the display, will move the display backwards and forwards through all available keys. If a trigger is available in the direction of navigation, the displayed keyboard will jump straight to that key (with a T on it). If no trigger is available, it will scroll by, one key at a time. • The rotary knob will also move backwards and forwards through all available keys, jumping to a trigger key if available, in the direction of travel. • Use the DATA ENTRY fader to move the view of the keyboard without jumping to the next available trigger. As a guide, watch the brackets above the top keyboard move as you move the fader, rotary knob, or -/NO or +/YES switches. • The example below shows the status section of a non-trigger key: POLY CHORD SCREEN SOFT KEYS - At the bottom of the poly chord page are five labels which indicate the software function of the five illuminated switches just below: PROG, FX, GLOBAL, COMPARE and WRITE. • This example shows the soft switches when a key with a trigger is selected. Note that DEL allows you to delete the current trigger, and VIEW shows more details.
-
 1
1 -
2
-
3
-
4
-
5
-
6
-
7
-
8
-
9
-
10
-
11
-
12
-
13
-
14
-
15
-
16
-
17
-
18
-
19
-
20
-
21
-
22
-
23
-
24
-
25
-
26
-
27
-
28
-
29
-
30
-
31
-
32
-
33
-
 34
34 -
 35
35 -
 36
36 -
 37
37 -
 38
38 -
 39
39 -
 40
40 -
 41
41 -
 42
42 -
 43
43 -
 44
44 -
45
-
46
-
47
-
48
-
49
-
50
-
51
-
52
-
53
-
54
-
55
-
56
-
57
-
58
-
59
-
60
-
61
-
62
-
63
-
64
-
65
-
66
-
67
-
68
-
69
-
70
-
71
-
72
-
73
-
74
-
75
-
76
-
77
-
78
-
79
-
80
-
81
-
82
-
83
-
84
-
85
-
86
-
87
-
88
-
89
-
90
-
91
-
92
-
93
-
94
-
95
-
96
-
97
-
98
-
99
-
100
-
101
-
102
-
103
-
104
-
105
-
106
-
107
-
108
-
109
-
110
-
111
-
112
-
113
-
114
-
115
-
116
-
117
-
118
-
119
-
120
-
121
-
122
-
123
-
124
-
125
-
126
-
127
-
128
-
129
-
130
-
131
-
132
-
133
-
134
-
135
-
136
-
137
-
138
-
139
-
140
-
141
-
142
-
143
-
144
-
145
-
146
-
147
-
148
-
149
-
150
-
151
-
152
-
153
-
154
-
155
-
156
-
157
-
158
-
159
-
160
-
161
-
162
 |
 |
