Belkin F1PI210ENau User Guide - Page 17
enable the DHCP Dynamic Host Configuration Protocol Server
 |
View all Belkin F1PI210ENau manuals
Add to My Manuals
Save this manual to your list of manuals |
Page 17 highlights
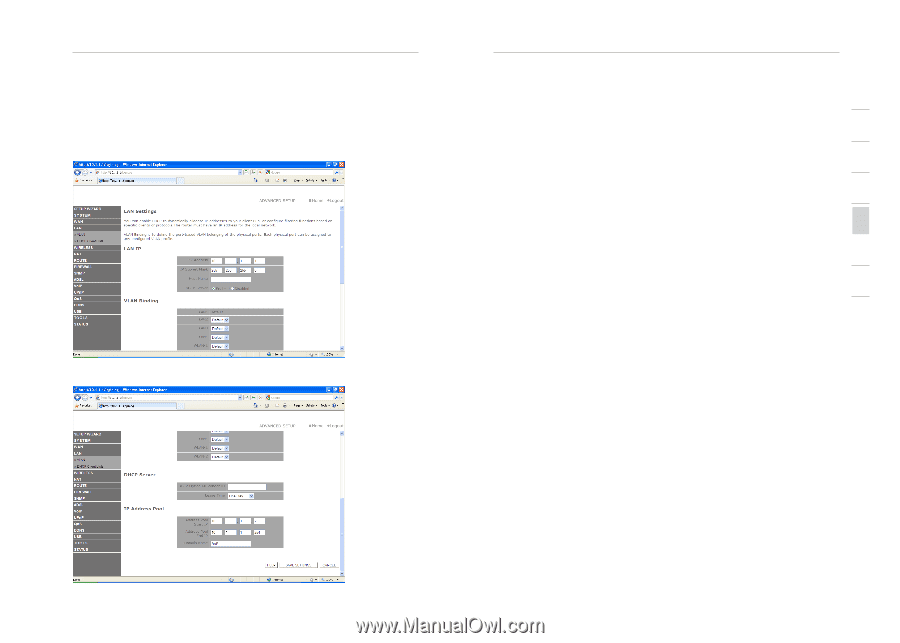
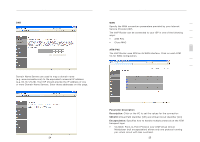
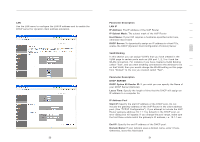
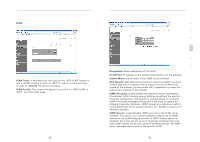
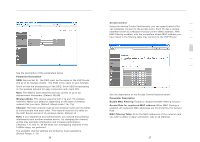
Advanced Setup Method LAN Use the LAN menu to configure the LAN IP address and to enable the DHCP server for dynamic client address allocation. 30 Advanced Setup Method 1 Parameter Description LAN IP 2 IP Address: The IP address of the VoIP Router IP Subnet Mask: The subnet mask of the VoIP Router 3 Host Name: If your ISP requires a hostname specified enter here, otherwise leave blank 4 DHCP Server: To dynamically assign an IP address to client PCs, enable the DHCP (Dynamic Host Configuration Protocol) Server 5 VLAN Binding In this section you can assign VLAN's that you have created in the 6 VLAN page to certain ports such as LAN port 1, 2, 3 or 4 and the WLAN connection. For instance if you have created a VLAN Binding 7 called "Test", and you want anything connected to the wireless to be on that VLAN, then you would change the WLAN setting on this page from "Default" to the one you created called "Test". Parameter Description DHCP SERVER DHCP Option 60 Vendor ID: If you wish you can specify the Name of your DHCP Server (Optional) Lease Time: Specify the length of time that the DHCP will assign an IP address to a computer for IP Address Pool Start IP: Specify the start IP address of the DHCP pool. Do not include the gateway address of the VoIP Router in the client address pool. (See "TCP/IP Configuration"). If you attempt to include the VoIP Router gateway address (10.1.1.1 by default) in the DHCP pool, an error dialog box will appear. If you change the pool range, make sure the first three octets match the gateway's IP address, i.e. 10.1.1.xxx End IP: Specify the end IP address of the DHCP pool. Domain Name: If your network uses a domain name, enter it here. Otherwise, leave this field blank 31 section
-
 1
1 -
2
-
3
-
4
-
5
-
6
-
7
-
8
-
9
-
10
-
11
-
 12
12 -
 13
13 -
 14
14 -
 15
15 -
 16
16 -
 17
17 -
 18
18 -
 19
19 -
 20
20 -
 21
21 -
 22
22 -
23
-
24
-
25
-
26
-
27
-
28
-
29
-
30
-
31
-
32
-
33
-
34
-
35
-
36
-
37
-
38
-
39
-
40
-
41
-
42
-
43
-
44
-
45
-
46
-
47
-
48
-
49
-
50
-
51
-
52
-
53
 |
 |