Belkin F1PI210ENau User Guide - Page 6
Knowing your VoIP Router
 |
View all Belkin F1PI210ENau manuals
Add to My Manuals
Save this manual to your list of manuals |
Page 6 highlights
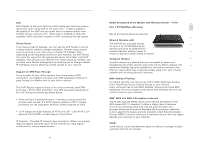
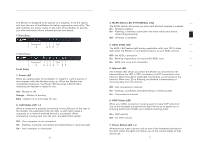
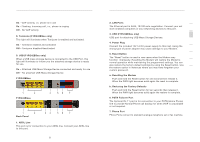
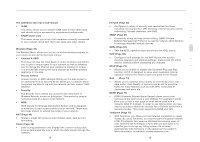
Knowing your VoIP Router On - VoIP activity, i.e. phone is in use On - Flashing, Incoming call, i.e., phone is ringing Off - No VoIP activity 8. Tomizone (F1PI242EGau only) This light will illuminate when Tomizone is enabled and activated. On - Tomizone enabled and activated Off - Tomizone disabled/deactivated 9. USB (F1PI242EGau only) When a USB mass storage device is connected to the USB Port, this light will illuminate to inform you the attached storage device is ready for use. On - Attached USB Mass Storage Device connected and ready for use Off - No attached USB Mass Storage Device F1PI242ENau 1 2 F1PI242EGau 4 56 7 1 2 Back Panel 34 56 7 1. ADSL Line This port is for connection to your ADSL line. Connect your ADSL line to this port. 8 Knowing your VoIP Router 1 2. LAN Ports The Ethernet port is RJ45, 10/100 auto-negotiation. Connect your net work-enabled computers or any networking devices to this port. 2 3. USB (F1PI242EGau only) 3 USB port for attaching USB Mass Storage Devices. 4. Power Plug 4 Connect the included 12V 1A DC power supply to this inlet. Using the wrong type of power adapter may cause damage to your Modem. 5 5. Reset Button 6 The "Reset" button is used in rare cases when the Modem may function improperly. Resetting the Modem will restore the Modem's normal operation while maintaining the programmed settings. You can 7 also restore the factory default settings by using the Reset button. Use the restore option in instances where you may have forgotten your custom password. a. Resetting the Modem Push and hold the Reset button for one second then release it. When the PWR light becomes solid again the reset is complete. b. Restoring the Factory Defaults Push and hold the Reset button for ten seconds then release it. When the PWR light becomes solid again the restore is complete. 6. PSTN Failover Port The Optional RJ-11 port is for connection to your PSTN (Home Phone) line to provide Normal Phone call backup for when VOIP is unavailable or not required. 7. Phone Port Phone Ports connect to standard analogue telephone set or fax machine. 9 section
-
 1
1 -
 2
2 -
 3
3 -
 4
4 -
 5
5 -
 6
6 -
 7
7 -
 8
8 -
 9
9 -
 10
10 -
 11
11 -
 12
12 -
13
-
14
-
15
-
16
-
17
-
18
-
19
-
20
-
21
-
22
-
23
-
24
-
25
-
26
-
27
-
28
-
29
-
30
-
31
-
32
-
33
-
34
-
35
-
36
-
37
-
38
-
39
-
40
-
41
-
42
-
43
-
44
-
45
-
46
-
47
-
48
-
49
-
50
-
51
-
52
-
53
 |
 |
