Bernina 830LE Manual - Page 108
Sewing in Different Directions, Sewing Pin Tucks
 |
View all Bernina 830LE manuals
Add to My Manuals
Save this manual to your list of manuals |
Page 108 highlights
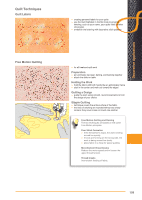
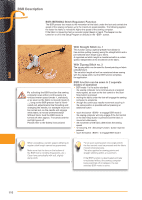
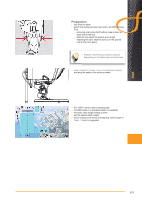
Decorative Applications Sewing in Different Directions Highly attractive designs can be sewn using the Directional-Sewing function and practical or decorative stitches. Test-sew first on a piece of the fabric you intend to use for the sewing project. Sewing Pin Tucks Sew delicate and decorative pin tucks easily with the cording attachment. The tube on the attachment provides ample room for a cord to be inserted for sewing raised pin tucks. Attach it simply by screwing it to the stitch plate with the screw provided. 108 To help with even flow of cording, put the cord spool on the Free Hand System, so it doesn't fall on the floor or tangle while you're sewing. Sewing ► place the fabric under the foot ► begin sewing, the cording is automatically sewn into the pin tucks creating a raised effect ► you can also use the pin tuck attachment for a beautiful scallop off the edge finish on collars, cuffs and tucks
-
 1
1 -
2
-
3
-
4
-
5
-
6
-
7
-
8
-
9
-
10
-
11
-
12
-
13
-
14
-
15
-
16
-
17
-
18
-
19
-
20
-
21
-
22
-
23
-
24
-
25
-
26
-
27
-
28
-
29
-
30
-
31
-
32
-
33
-
34
-
35
-
36
-
37
-
38
-
39
-
40
-
41
-
42
-
43
-
44
-
45
-
46
-
47
-
48
-
49
-
50
-
51
-
52
-
53
-
54
-
55
-
56
-
57
-
58
-
59
-
60
-
61
-
62
-
63
-
64
-
65
-
66
-
67
-
68
-
69
-
70
-
71
-
72
-
73
-
74
-
75
-
76
-
77
-
78
-
79
-
80
-
81
-
82
-
83
-
84
-
85
-
86
-
87
-
88
-
89
-
90
-
91
-
92
-
93
-
94
-
95
-
96
-
97
-
98
-
99
-
100
-
101
-
102
-
 103
103 -
 104
104 -
 105
105 -
 106
106 -
 107
107 -
 108
108 -
 109
109 -
 110
110 -
 111
111 -
 112
112 -
 113
113 -
114
-
115
-
116
-
117
-
118
-
119
-
120
-
121
-
122
-
123
-
124
-
125
-
126
-
127
-
128
-
129
-
130
-
131
-
132
-
133
-
134
-
135
-
136
-
137
-
138
-
139
-
140
-
141
-
142
-
143
-
144
-
145
-
146
-
147
-
148
-
149
-
150
-
151
-
152
-
153
-
154
-
155
-
156
-
157
-
158
-
159
-
160
-
161
-
162
-
163
-
164
-
165
-
166
-
167
-
168
-
169
-
170
-
171
-
172
-
173
-
174
-
175
-
176
-
177
-
178
-
179
-
180
-
181
-
182
-
183
-
184
-
185
-
186
-
187
-
188
-
189
-
190
-
191
-
192
-
193
-
194
-
195
-
196
-
197
-
198
-
199
-
200
-
201
-
202
-
203
-
204
-
205
-
206
-
207
-
208
-
209
-
210
-
211
-
212
 |
 |
