Bernina 830LE Manual - Page 147
Further Text Lines, Motifs and Lettering
 |
View all Bernina 830LE manuals
Add to My Manuals
Save this manual to your list of manuals |
Page 147 highlights
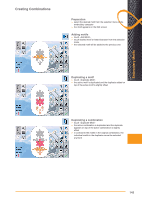
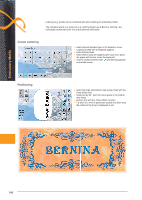
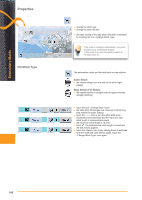
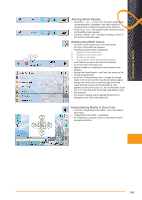
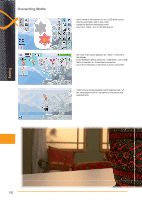
Embroidery Motifs Further Text Lines Motifs and Lettering ► in the Edit screen touch the «Add Motif» icon ► combine and position individually the rest of the text ► ensure the distance between the lines is the same - when positioning the lettering pay attention to the numbers in the Information Areas of the «Move Motif» icon and activate the «Show Grid» function Depending on the application, the characters are added after an embroidery motif is selected or the characters are combined first and then added to the motif (e.g. embellished lettering). Example: ► select desired embroidery motif in the embroidery computer ► the embroidery motif appears in the Edit screen ► touch the «Add Motif» icon ► select the desired alphabet type in the Selection menu of the embroidery computer ► a special screen with keyboard appears ► enter lettering (e.g. Flowers) ► select characters with help of the Lower/Upper Case icon ► confirm combined lettering with and lettering appears in the Edit screen above the motif Altering Text to Suit Motif ► alter text size to suit motif with the function «Rescale motif proportionally» ► position the text as desired with the function «Move motif» 147
-
 1
1 -
2
-
3
-
4
-
5
-
6
-
7
-
8
-
9
-
10
-
11
-
12
-
13
-
14
-
15
-
16
-
17
-
18
-
19
-
20
-
21
-
22
-
23
-
24
-
25
-
26
-
27
-
28
-
29
-
30
-
31
-
32
-
33
-
34
-
35
-
36
-
37
-
38
-
39
-
40
-
41
-
42
-
43
-
44
-
45
-
46
-
47
-
48
-
49
-
50
-
51
-
52
-
53
-
54
-
55
-
56
-
57
-
58
-
59
-
60
-
61
-
62
-
63
-
64
-
65
-
66
-
67
-
68
-
69
-
70
-
71
-
72
-
73
-
74
-
75
-
76
-
77
-
78
-
79
-
80
-
81
-
82
-
83
-
84
-
85
-
86
-
87
-
88
-
89
-
90
-
91
-
92
-
93
-
94
-
95
-
96
-
97
-
98
-
99
-
100
-
101
-
102
-
103
-
104
-
105
-
106
-
107
-
108
-
109
-
110
-
111
-
112
-
113
-
114
-
115
-
116
-
117
-
118
-
119
-
120
-
121
-
122
-
123
-
124
-
125
-
126
-
127
-
128
-
129
-
130
-
131
-
132
-
133
-
134
-
135
-
136
-
137
-
138
-
139
-
140
-
141
-
 142
142 -
 143
143 -
 144
144 -
 145
145 -
 146
146 -
 147
147 -
 148
148 -
 149
149 -
 150
150 -
 151
151 -
 152
152 -
153
-
154
-
155
-
156
-
157
-
158
-
159
-
160
-
161
-
162
-
163
-
164
-
165
-
166
-
167
-
168
-
169
-
170
-
171
-
172
-
173
-
174
-
175
-
176
-
177
-
178
-
179
-
180
-
181
-
182
-
183
-
184
-
185
-
186
-
187
-
188
-
189
-
190
-
191
-
192
-
193
-
194
-
195
-
196
-
197
-
198
-
199
-
200
-
201
-
202
-
203
-
204
-
205
-
206
-
207
-
208
-
209
-
210
-
211
-
212
 |
 |
