Bernina 830LE Manual - Page 38
Embroidery, Adjusting Embroidery Settings, Fabric Thickness
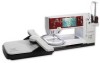 |
View all Bernina 830LE manuals
Add to My Manuals
Save this manual to your list of manuals |
Page 38 highlights
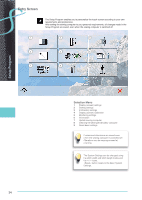
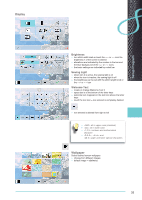
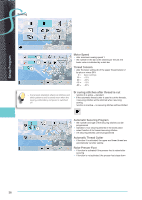
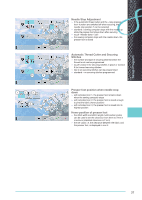
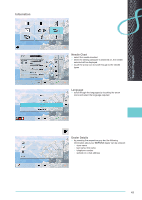
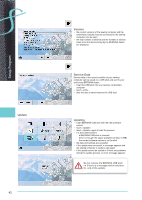
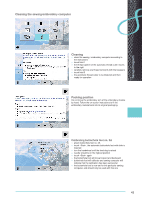
Setup Program Embroidery 1 38 Adjusting Embroidery Settings ► the motor speed and thread tension can be adjusted and the automatic thread cutter activated or deactivated Fabric Thickness ► if the fabric 1 is more than 4mm thick, e.g. toweling, select the 7.5mm icon ► this ensures that the embroidery hoop is only moved when the needle is no longer in the material To calibrate the hoop, select «Next Page». Calibrating the Hoop «Adjust Reference Position» calibrates the needle to the center of the hoop. Adjustments can only be done if the embroidery module is attached. ► select the required hoop and follow the instructions on the screen ► place embroidery template into the embroidery hoop ► the hoop position is detected and the needle positioned in the center ► if the needle is not positioned exactly in the center of the embroidery template, use the arrow icons to position it accurately ► touch until the selection menu appears ► the adjustment is saved
-
 1
1 -
2
-
3
-
4
-
5
-
6
-
7
-
8
-
9
-
10
-
11
-
12
-
13
-
14
-
15
-
16
-
17
-
18
-
19
-
20
-
21
-
22
-
23
-
24
-
25
-
26
-
27
-
28
-
29
-
30
-
31
-
32
-
 33
33 -
 34
34 -
 35
35 -
 36
36 -
 37
37 -
 38
38 -
 39
39 -
 40
40 -
 41
41 -
 42
42 -
 43
43 -
44
-
45
-
46
-
47
-
48
-
49
-
50
-
51
-
52
-
53
-
54
-
55
-
56
-
57
-
58
-
59
-
60
-
61
-
62
-
63
-
64
-
65
-
66
-
67
-
68
-
69
-
70
-
71
-
72
-
73
-
74
-
75
-
76
-
77
-
78
-
79
-
80
-
81
-
82
-
83
-
84
-
85
-
86
-
87
-
88
-
89
-
90
-
91
-
92
-
93
-
94
-
95
-
96
-
97
-
98
-
99
-
100
-
101
-
102
-
103
-
104
-
105
-
106
-
107
-
108
-
109
-
110
-
111
-
112
-
113
-
114
-
115
-
116
-
117
-
118
-
119
-
120
-
121
-
122
-
123
-
124
-
125
-
126
-
127
-
128
-
129
-
130
-
131
-
132
-
133
-
134
-
135
-
136
-
137
-
138
-
139
-
140
-
141
-
142
-
143
-
144
-
145
-
146
-
147
-
148
-
149
-
150
-
151
-
152
-
153
-
154
-
155
-
156
-
157
-
158
-
159
-
160
-
161
-
162
-
163
-
164
-
165
-
166
-
167
-
168
-
169
-
170
-
171
-
172
-
173
-
174
-
175
-
176
-
177
-
178
-
179
-
180
-
181
-
182
-
183
-
184
-
185
-
186
-
187
-
188
-
189
-
190
-
191
-
192
-
193
-
194
-
195
-
196
-
197
-
198
-
199
-
200
-
201
-
202
-
203
-
204
-
205
-
206
-
207
-
208
-
209
-
210
-
211
-
212
 |
 |
