Bose Lifestyle 48 Series IV Owner's guide - Page 24
power outlet, but do NOT plug it in at this time., Place the other end of the power cord near an AC
 |
View all Bose Lifestyle 48 Series IV manuals
Add to My Manuals
Save this manual to your list of manuals |
Page 24 highlights
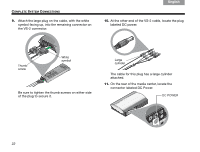
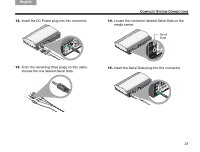
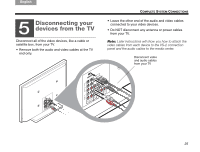
TAB 8 TAB 7 TAB 6 TAB 5 COMPLETE SYSTEM CONNECTIONS 2. Plug the small end of the AC power cord into the connector on the end of the DC power supply. TAB 4 TAB 3 TAB 2 English 4. Locate the connector labeled DC POWER In on one end of the VS-2 video enhancer. Power supply cable If you have a dual-voltage power supply: MAKE SURE the voltage selection switch on the bottom of the power supply is set properly for the local power rating. Check with local electrical authorities if you are not sure of the appropriate power rating. 3. Place the other end of the power cord near an AC power outlet, but do NOT plug it in at this time. 5. Insert the power supply cable plug into the VS-2 connector. 20
-
 1
1 -
2
-
3
-
4
-
5
-
6
-
7
-
8
-
9
-
10
-
11
-
12
-
13
-
14
-
15
-
16
-
17
-
18
-
 19
19 -
 20
20 -
 21
21 -
 22
22 -
 23
23 -
 24
24 -
 25
25 -
 26
26 -
 27
27 -
 28
28 -
 29
29 -
30
-
31
-
32
-
33
-
34
-
35
-
36
-
37
-
38
-
39
-
40
-
41
-
42
-
43
-
44
-
45
-
46
-
47
-
48
-
49
-
50
-
51
-
52
-
53
-
54
-
55
-
56
-
57
-
58
-
59
-
60
-
61
-
62
-
63
-
64
-
65
-
66
-
67
-
68
-
69
-
70
-
71
-
72
-
73
-
74
-
75
-
76
-
77
-
78
-
79
-
80
-
81
-
82
-
83
-
84
-
85
-
86
-
87
-
88
-
89
-
90
-
91
-
92
-
93
-
94
-
95
-
96
-
97
-
98
-
99
-
100
-
101
-
102
-
103
-
104
-
105
-
106
-
107
-
108
-
109
-
110
-
111
-
112
-
113
-
114
-
115
-
116
-
117
-
118
-
119
-
120
-
121
-
122
-
123
-
124
-
125
-
126
-
127
-
128
-
129
-
130
-
131
-
132
-
133
-
134
-
135
-
136
-
137
-
138
-
139
-
140
-
141
-
142
-
143
-
144
-
145
-
146
-
147
-
148
-
149
-
150
-
151
-
152
-
153
-
154
-
155
-
156
-
157
-
158
-
159
-
160
-
161
-
162
-
163
-
164
-
165
-
166
-
167
-
168
-
169
-
170
-
171
-
172
-
173
-
174
-
175
-
176
-
177
-
178
-
179
-
180
-
181
-
182
-
183
-
184
-
185
-
186
-
187
-
188
-
189
-
190
-
191
-
192
-
193
-
194
-
195
-
196
-
197
-
198
-
199
-
200
-
201
-
202
-
203
-
204
-
205
-
206
-
207
-
208
-
209
-
210
-
211
-
212
-
213
-
214
-
215
-
216
-
217
-
218
-
219
-
220
-
221
-
222
-
223
-
224
-
225
-
226
-
227
-
228
-
229
-
230
-
231
-
232
-
233
-
234
-
235
-
236
-
237
-
238
-
239
-
240
-
241
-
242
-
243
-
244
-
245
-
246
-
247
-
248
-
249
-
250
-
251
-
252
-
253
-
254
-
255
-
256
-
257
-
258
-
259
-
260
 |
 |

20
C
OMPLETE
S
YSTEM
C
ONNECTIONS
English
TAB 6
TAB 8
TAB 7
TAB 3
TAB 5
TAB 2
TAB 4
2.
Plug the small end of the AC power cord into the
connector on the end of the DC power supply.
If you have a dual-voltage power supply:
MAKE SURE the voltage selection switch on the
bottom of the power supply is set properly for the
local power rating.
Check with local electrical authorities if you are not
sure of the appropriate power rating.
3.
Place the other end of the power cord near an AC
power outlet, but do NOT plug it in at this time.
4.
Locate the connector labeled DC POWER In on
one end of the VS-2 video enhancer.
5.
Insert the power supply cable plug into the VS-2
connector.
Power
supply
cable