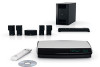
Bose Lifestyle 48 Series IV Owner's guide - Page 38
Adding more devices, All cables are now connected to the VS-2 video
 |
View all Bose Lifestyle 48 Series IV manuals
Add to My Manuals
Save this manual to your list of manuals |
Page 38 highlights
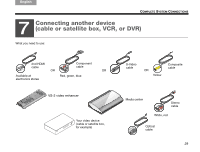
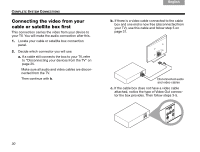
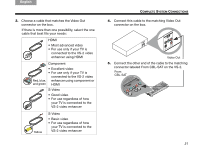
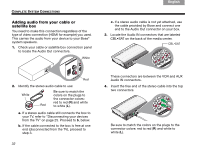
TAB 8 TAB 7 TAB 6 TAB 5 COMPLETE SYSTEM CONNECTIONS Adding more devices You may want to have another device like a VCR or DVR work with this system. This is basically a repeat of the process for adding a cable or satellite box. Simply substitute this other device as you follow instructions beginning with "Connecting the video from your cable or satellite box first" on page 30. 1. Consider these points. • For each device, you need to use a video cable and a stereo audio cable. • The video cable you use must be compatible with the cable that connects the VS-2 to your TV. For details on compatible video cable, refer to page 31. 2. Use a video cable and connect it to Video Out on your device. Connect the other end to the Video In for either VCR (for video recording) or AUX on the VS-2. 3. Use a stereo audio cable and connect it to Audio Out on your device. White Be sure to match the colors on the plugs to the connector colors: Red red to red (R) and white to white (L). 34 TAB 4 TAB 3 TAB 2 English 4. On the media center, locate the AUX or VCR Audio IN connector. • If you use the AUX connector, the button labeled AUX on the LIFESTYLE® remote controls your device. • If you use the VCR connector, the button labeled VCR controls this device. The VCR button includes an On/Off control. 5. Connect the other end of the stereo audio cable to the Audio IN connector on your media center. Note: All cables are now connected to the VS-2 video enhancer. This is a good opportunity to move the VS-2 into place, behind or very near the media center. 6. Continue with 8 on the next page for further connections.
-
 1
1 -
2
-
3
-
4
-
5
-
6
-
7
-
8
-
9
-
10
-
11
-
12
-
13
-
14
-
15
-
16
-
17
-
18
-
19
-
20
-
21
-
22
-
23
-
24
-
25
-
26
-
27
-
28
-
29
-
30
-
31
-
32
-
 33
33 -
 34
34 -
 35
35 -
 36
36 -
 37
37 -
 38
38 -
 39
39 -
 40
40 -
 41
41 -
 42
42 -
 43
43 -
44
-
45
-
46
-
47
-
48
-
49
-
50
-
51
-
52
-
53
-
54
-
55
-
56
-
57
-
58
-
59
-
60
-
61
-
62
-
63
-
64
-
65
-
66
-
67
-
68
-
69
-
70
-
71
-
72
-
73
-
74
-
75
-
76
-
77
-
78
-
79
-
80
-
81
-
82
-
83
-
84
-
85
-
86
-
87
-
88
-
89
-
90
-
91
-
92
-
93
-
94
-
95
-
96
-
97
-
98
-
99
-
100
-
101
-
102
-
103
-
104
-
105
-
106
-
107
-
108
-
109
-
110
-
111
-
112
-
113
-
114
-
115
-
116
-
117
-
118
-
119
-
120
-
121
-
122
-
123
-
124
-
125
-
126
-
127
-
128
-
129
-
130
-
131
-
132
-
133
-
134
-
135
-
136
-
137
-
138
-
139
-
140
-
141
-
142
-
143
-
144
-
145
-
146
-
147
-
148
-
149
-
150
-
151
-
152
-
153
-
154
-
155
-
156
-
157
-
158
-
159
-
160
-
161
-
162
-
163
-
164
-
165
-
166
-
167
-
168
-
169
-
170
-
171
-
172
-
173
-
174
-
175
-
176
-
177
-
178
-
179
-
180
-
181
-
182
-
183
-
184
-
185
-
186
-
187
-
188
-
189
-
190
-
191
-
192
-
193
-
194
-
195
-
196
-
197
-
198
-
199
-
200
-
201
-
202
-
203
-
204
-
205
-
206
-
207
-
208
-
209
-
210
-
211
-
212
-
213
-
214
-
215
-
216
-
217
-
218
-
219
-
220
-
221
-
222
-
223
-
224
-
225
-
226
-
227
-
228
-
229
-
230
-
231
-
232
-
233
-
234
-
235
-
236
-
237
-
238
-
239
-
240
-
241
-
242
-
243
-
244
-
245
-
246
-
247
-
248
-
249
-
250
-
251
-
252
-
253
-
254
-
255
-
256
-
257
-
258
-
259
-
260
 |
 |
