Bose Lifestyle 48 Series IV Owner's guide - Page 28
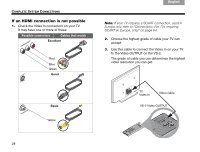
NOT into Video IN., Video OUT connectors.
 |
View all Bose Lifestyle 48 Series IV manuals
Add to My Manuals
Save this manual to your list of manuals |
Page 28 highlights
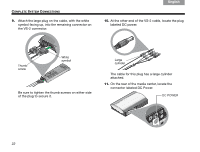
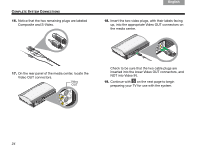
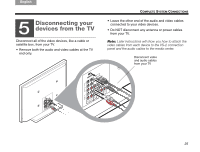
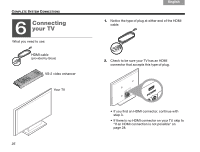
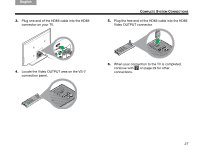
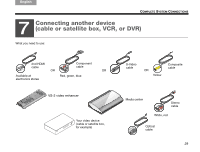
TAB 8 TAB 7 TAB 6 TAB 5 COMPLETE SYSTEM CONNECTIONS 16. Notice that the two remaining plugs are labeled Composite and S-Video. TAB 4 TAB 3 TAB 2 English 18. Insert the two video plugs, with their labels facing up, into the appropriate Video OUT connectors on the media center. 17. On the rear panel of the media center, locate the Video OUT connectors. Check to be sure that the two cable plugs are inserted into the lower Video OUT connectors, and NOT into Video IN. 19. Continue with 5 on the next page to begin preparing your TV for use with the system. 24
-
 1
1 -
2
-
3
-
4
-
5
-
6
-
7
-
8
-
9
-
10
-
11
-
12
-
13
-
14
-
15
-
16
-
17
-
18
-
19
-
20
-
21
-
22
-
 23
23 -
 24
24 -
 25
25 -
 26
26 -
 27
27 -
 28
28 -
 29
29 -
 30
30 -
 31
31 -
 32
32 -
 33
33 -
34
-
35
-
36
-
37
-
38
-
39
-
40
-
41
-
42
-
43
-
44
-
45
-
46
-
47
-
48
-
49
-
50
-
51
-
52
-
53
-
54
-
55
-
56
-
57
-
58
-
59
-
60
-
61
-
62
-
63
-
64
-
65
-
66
-
67
-
68
-
69
-
70
-
71
-
72
-
73
-
74
-
75
-
76
-
77
-
78
-
79
-
80
-
81
-
82
-
83
-
84
-
85
-
86
-
87
-
88
-
89
-
90
-
91
-
92
-
93
-
94
-
95
-
96
-
97
-
98
-
99
-
100
-
101
-
102
-
103
-
104
-
105
-
106
-
107
-
108
-
109
-
110
-
111
-
112
-
113
-
114
-
115
-
116
-
117
-
118
-
119
-
120
-
121
-
122
-
123
-
124
-
125
-
126
-
127
-
128
-
129
-
130
-
131
-
132
-
133
-
134
-
135
-
136
-
137
-
138
-
139
-
140
-
141
-
142
-
143
-
144
-
145
-
146
-
147
-
148
-
149
-
150
-
151
-
152
-
153
-
154
-
155
-
156
-
157
-
158
-
159
-
160
-
161
-
162
-
163
-
164
-
165
-
166
-
167
-
168
-
169
-
170
-
171
-
172
-
173
-
174
-
175
-
176
-
177
-
178
-
179
-
180
-
181
-
182
-
183
-
184
-
185
-
186
-
187
-
188
-
189
-
190
-
191
-
192
-
193
-
194
-
195
-
196
-
197
-
198
-
199
-
200
-
201
-
202
-
203
-
204
-
205
-
206
-
207
-
208
-
209
-
210
-
211
-
212
-
213
-
214
-
215
-
216
-
217
-
218
-
219
-
220
-
221
-
222
-
223
-
224
-
225
-
226
-
227
-
228
-
229
-
230
-
231
-
232
-
233
-
234
-
235
-
236
-
237
-
238
-
239
-
240
-
241
-
242
-
243
-
244
-
245
-
246
-
247
-
248
-
249
-
250
-
251
-
252
-
253
-
254
-
255
-
256
-
257
-
258
-
259
-
260
 |
 |

24
C
OMPLETE
S
YSTEM
C
ONNECTIONS
English
TAB 6
TAB 8
TAB 7
TAB 3
TAB 5
TAB 2
TAB 4
16.
Notice that the two remaining plugs are labeled
Composite and S-Video.
17.
On the rear panel of the media center, locate the
Video OUT connectors.
18.
Insert the two video plugs, with their labels facing
up, into the appropriate Video OUT connectors on
the media center.
Check to be sure that the two cable plugs are
inserted into the lower Video OUT connectors, and
NOT into Video IN.
19.
Continue with
on the next page to begin
preparing your TV for use with the system.
5