Brother International ™ QL-720NW Software Users Manual - English - Page 24
Click [OK]., assigned to transfer data within the folder
 |
View all Brother International ™ QL-720NW manuals
Add to My Manuals
Save this manual to your list of manuals |
Page 24 highlights
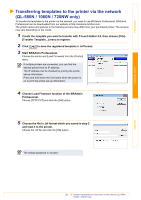
Introduction Creating Labels 3 Drag the transfer data to the folder you just made. Drag the transfer data from All Contents, Layouts or another folder under Filter. When transferring multiple sets of data, move all the transfer data to the folder you made. 4 Key Assign numbers are automatically assigned to transfer data within the folder you made in the previous step. To change a number, right click the data name in the list view, then select a key assign number. • Key Assign is necessary for transfer of data other than message texts. • If you change the Key Assign number used for data already transferred to the printer main unit, it is overwritten. You can check the Key Assign number used for data already transferred to the printer by backing up the data as explained in "Backing up label templates" (page 24). • You can click the data name for transfer data to change it to a new name. Depending on your printer model, there may be restrictions on the number of characters that can be used for a data name. 5 Select the data or folder you want to transfer, then click . The transfer confirmation message is displayed. Appendix 6 Click [OK]. The data in the folder selected in the folder view is transferred to the printer. If you have selected specific data in the list view, only the selected data is transferred to the printer. 23 Transferring label templates from the PC to the printer via USB
-
 1
1 -
2
-
3
-
4
-
5
-
6
-
7
-
8
-
9
-
10
-
11
-
12
-
13
-
14
-
15
-
16
-
17
-
18
-
 19
19 -
 20
20 -
 21
21 -
 22
22 -
 23
23 -
 24
24 -
 25
25 -
 26
26 -
 27
27 -
 28
28 -
 29
29 -
30
-
31
-
32
-
33
-
34
-
35
-
36
-
37
-
38
-
39
-
40
-
41
-
42
-
43
-
44
-
45
-
46
-
47
-
48
 |
 |
