Brother International ™ QL-720NW Software Users Manual - English - Page 34
Introduction, Appendix, center. In the illustration to the left
 |
View all Brother International ™ QL-720NW manuals
Add to My Manuals
Save this manual to your list of manuals |
Page 34 highlights
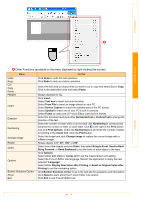
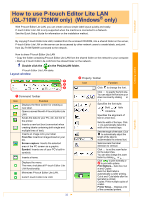
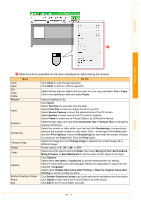
Introduction • If multiple QL printers are connected to the network, select the QL printer to print with. A list of the QL printers connected to the network can be displayed by clicking 2 and then clicking [Printer Setup...]. You can find the desired printer in the list from its IP address. • The IP address of QL printers can be checked by printing the printer set-up information. Press and hold down the Cut button when the power is on to print the printer set-up information. • We recommend that you set the printer location using BRAdmin because it enables you to view the printer in the list. Creating Labels Appendix 4 4 Label View Display Function This label view is displayed when the software is started. The width of tape currently set is displayed on the left of label image. When "Auto" is shown on the right, the length of tape is automatically adjusted to the length of text. You can drag the label border to manually change the length and width of the label. Move the pointer to the label area's border. When the blue line appears, drag to the desired length or width. You can adjust the size of the P-touch Editor Lite LAN window. Simply move the pointer over an edge of the P-touch Editor Lite LAN window and drag to adjust the size once the pointer changes to an arrow. Guidelines are sometimes displayed when moving objects. They are shown when the object is aligned at the left, right, top, or bottom edge of Printable area, or in the center. In the illustration to the left, the guidelines indicate that the object is centered at the top edge of the tape. Inserted text boxes, images, and frames are treated as objects. Objects are surrounded by handles (indicated by eight blue points). Indicates that an object is selected. The pointer changes to an arrow when moved over a handle. You can change the size of the object by dragging. You can move objects by dragging when the pointer is a crosshair. For text objects, the pointer only changes to a crosshair over the border of the object. 33
-
 1
1 -
2
-
3
-
4
-
5
-
6
-
7
-
8
-
9
-
10
-
11
-
12
-
13
-
14
-
15
-
16
-
17
-
18
-
19
-
20
-
21
-
22
-
23
-
24
-
25
-
26
-
27
-
28
-
 29
29 -
 30
30 -
 31
31 -
 32
32 -
 33
33 -
 34
34 -
 35
35 -
 36
36 -
 37
37 -
 38
38 -
 39
39 -
40
-
41
-
42
-
43
-
44
-
45
-
46
-
47
-
48
 |
 |
