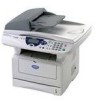
Brother International DCP 8040 Service Manual - Page 40
Brother also offers a Native Driver on the CD-ROM. The Brother Native Driver offers
 |
UPC - 012502610328
View all Brother International DCP 8040 manuals
Add to My Manuals
Save this manual to your list of manuals |
Page 40 highlights
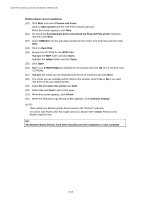
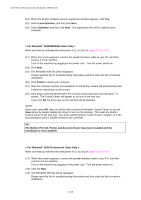
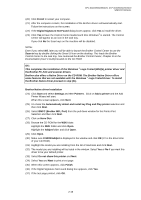
CHAPTER 2 INSTALLATION AND BASIC OPERATION < For Windows® 2000 Professional Users Only > Make sure that you followed the instructions in (1) to (16) on pages 2-8 to 2-9. (17) When this screen appears, connect the USB interface cable to your PC, and then connect it to the machine. Turn on the machine by plugging in the power cord. Turn the power switch on. It will take a few seconds for the installation screen to appear. The installation of the Brother drivers will automatically start. Follow the instructions on the screen. (18) If the Digital Signature Not Found dialog boxes appear, click Yes to install the driver. (19) The README.WRI file will be displayed. Please read this file for troubleshooting information and then close the file to continue installation. (20) Click Finish to restart your computer. (21) After the computer restarts, click Yes to have the Control Center load each time Windows ® is started. The Control Center will appear as an icon in the task tray. If you click No the Scan keys on the machine will be disabled. NOTE: Even if you select NO, later you will be able to launch the Brother Control Center to use the Scan to key by double clicking the Smart UI icon on the desktop. This loads the Brother Control Center to the task tray. See AutoLoad the Brother Control Center, Chapter 15 in the Documentation (User's Guide) located on the CD-ROM. OK: This completes the installation of the Windows® Logo Tested (WHQL) printer driver and the Brother PC-FAX and scanner drivers. Brother also offers a Native Driver on the CD-ROM. The Brother Native Driver offers some features that are not available with the Windows® Logo Tested Driver. To install the Brother Native driver proceed to step (22). Brother Native driver Installation (22) Click Start and select Settings and then Pointers. Click on Add a printer and the Add Printer Wizard will start. When this screen appears, click Next. (23) Un-check the Automatically detect and install my Plug and Play printer selection and then click Next. (24) Select USBXXX from the pull down window for the Printer Port Selection and then click Next. (25) Click on Have Disk. (26) Browse the CD-ROM for the W2K folder. Highlight the W2K folder and click Open. Highlight the Addprt folder and click Open. (27) Click Open. 2-10
-
 1
1 -
2
-
3
-
4
-
5
-
6
-
7
-
8
-
9
-
10
-
11
-
12
-
13
-
14
-
15
-
16
-
17
-
18
-
19
-
20
-
21
-
22
-
23
-
24
-
25
-
26
-
27
-
28
-
29
-
30
-
31
-
32
-
33
-
34
-
 35
35 -
 36
36 -
 37
37 -
 38
38 -
 39
39 -
 40
40 -
 41
41 -
 42
42 -
 43
43 -
 44
44 -
 45
45 -
46
-
47
-
48
-
49
-
50
-
51
-
52
-
53
-
54
-
55
-
56
-
57
-
58
-
59
-
60
-
61
-
62
-
63
-
64
-
65
-
66
-
67
-
68
-
69
-
70
-
71
-
72
-
73
-
74
-
75
-
76
-
77
-
78
-
79
-
80
-
81
-
82
-
83
-
84
-
85
-
86
-
87
-
88
-
89
-
90
-
91
-
92
-
93
-
94
-
95
-
96
-
97
-
98
-
99
-
100
-
101
-
102
-
103
-
104
-
105
-
106
-
107
-
108
-
109
-
110
-
111
-
112
-
113
-
114
-
115
-
116
-
117
-
118
-
119
-
120
-
121
-
122
-
123
-
124
-
125
-
126
-
127
-
128
-
129
-
130
-
131
-
132
-
133
-
134
-
135
-
136
-
137
-
138
-
139
-
140
-
141
-
142
-
143
-
144
-
145
-
146
-
147
-
148
-
149
-
150
-
151
-
152
-
153
-
154
-
155
-
156
-
157
-
158
-
159
-
160
-
161
-
162
-
163
-
164
-
165
-
166
-
167
-
168
-
169
-
170
-
171
-
172
-
173
-
174
-
175
-
176
-
177
-
178
-
179
-
180
-
181
-
182
-
183
-
184
-
185
-
186
-
187
-
188
-
189
-
190
-
191
-
192
-
193
-
194
-
195
-
196
-
197
-
198
-
199
-
200
-
201
-
202
-
203
-
204
-
205
-
206
-
207
-
208
-
209
-
210
-
211
-
212
-
213
-
214
-
215
-
216
-
217
-
218
-
219
-
220
-
221
-
222
-
223
-
224
-
225
-
226
-
227
-
228
-
229
-
230
-
231
-
232
-
233
-
234
-
235
-
236
-
237
-
238
-
239
-
240
-
241
-
242
-
243
-
244
-
245
-
246
-
247
-
248
-
249
-
250
-
251
-
252
-
253
-
254
-
255
-
256
-
257
-
258
-
259
-
260
-
261
-
262
-
263
-
264
-
265
-
266
-
267
-
268
-
269
-
270
-
271
-
272
-
273
-
274
-
275
-
276
-
277
-
278
-
279
-
280
-
281
-
282
-
283
-
284
-
285
-
286
-
287
-
288
-
289
-
290
-
291
-
292
-
293
-
294
-
295
-
296
-
297
-
298
-
299
-
300
-
301
-
302
-
303
-
304
-
305
-
306
-
307
-
308
-
309
-
310
-
311
-
312
-
313
-
314
-
315
-
316
-
317
-
318
-
319
-
320
-
321
-
322
-
323
-
324
-
325
-
326
-
327
-
328
-
329
-
330
-
331
-
332
-
333
-
334
-
335
-
336
-
337
-
338
-
339
-
340
-
341
-
342
-
343
-
344
-
345
-
346
-
347
-
348
-
349
-
350
-
351
-
352
-
353
-
354
-
355
-
356
-
357
-
358
-
359
-
360
-
361
-
362
 |
 |
