Brother International IntelliFax-3750 Users Manual - English - Page 123
Cleaning the Drum Unit, CAUTION
 |
View all Brother International IntelliFax-3750 manuals
Add to My Manuals
Save this manual to your list of manuals |
Page 123 highlights
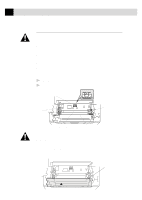
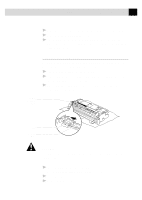
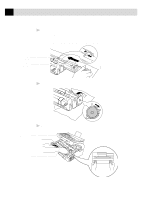
111 T R O U B L E S H O O T I N G A N D M A I N T E N A N C E 3 Wipe the electric terminals with isopropyl alcohol on a cotton swab. 4 Wipe the gears with a clean dry cloth. 5 Gently wipe the scanner window and the toner sensor with a clean soft dry cloth. Do NOT use isoproply alcohol to clean the scanner window or the toner sensor. Cleaning the Drum Unit We recommend you place the drum unit on a drop cloth or large piece of disposable paper to avoid spilling and scattering toner. 1 Carefully turn the drum unit upside down. 2 Clean the primary corona wire inside the drum unit by gently sliding the tab from right to left several times. 3 Return the tab to the home position (w mark position) before reinstalling the drum unit. Home Position (w) Tab Corona Wire CAUTION If you do not position the tab at the home position, printed pages may have vertical stripes. 4 Install the drum unit into the fax machine. See "Replacing the Drum Unit" on pages 117-121. 5 Close the top cover. 6 Plug in the power cord.
-
 1
1 -
2
-
3
-
4
-
5
-
6
-
7
-
8
-
9
-
10
-
11
-
12
-
13
-
14
-
15
-
16
-
17
-
18
-
19
-
20
-
21
-
22
-
23
-
24
-
25
-
26
-
27
-
28
-
29
-
30
-
31
-
32
-
33
-
34
-
35
-
36
-
37
-
38
-
39
-
40
-
41
-
42
-
43
-
44
-
45
-
46
-
47
-
48
-
49
-
50
-
51
-
52
-
53
-
54
-
55
-
56
-
57
-
58
-
59
-
60
-
61
-
62
-
63
-
64
-
65
-
66
-
67
-
68
-
69
-
70
-
71
-
72
-
73
-
74
-
75
-
76
-
77
-
78
-
79
-
80
-
81
-
82
-
83
-
84
-
85
-
86
-
87
-
88
-
89
-
90
-
91
-
92
-
93
-
94
-
95
-
96
-
97
-
98
-
99
-
100
-
101
-
102
-
103
-
104
-
105
-
106
-
107
-
108
-
109
-
110
-
111
-
112
-
113
-
114
-
115
-
116
-
117
-
 118
118 -
 119
119 -
 120
120 -
 121
121 -
 122
122 -
 123
123 -
 124
124 -
 125
125 -
 126
126 -
 127
127 -
 128
128 -
129
-
130
-
131
-
132
-
133
-
134
-
135
-
136
-
137
-
138
-
139
-
140
-
141
-
142
-
143
-
144
-
145
-
146
-
147
-
148
-
149
-
150
-
151
-
152
-
153
-
154
-
155
-
156
-
157
-
158
-
159
-
160
-
161
-
162
-
163
-
164
-
165
-
166
-
167
-
168
-
169
-
170
-
171
-
172
-
173
-
174
-
175
-
176
-
177
-
178
-
179
-
180
-
181
-
182
-
183
-
184
-
185
-
186
-
187
-
188
-
189
-
190
-
191
-
192
-
193
-
194
-
195
-
196
-
197
-
198
-
199
-
200
-
201
-
202
-
203
-
204
-
205
-
206
-
207
 |
 |
