Brother International MFC 640CW Software Users Manual - English - Page 151
Network User's Guide on the CD-ROM, Using the Scan key, Browse
 |
UPC - 012502614036
View all Brother International MFC 640CW manuals
Add to My Manuals
Save this manual to your list of manuals |
Page 151 highlights
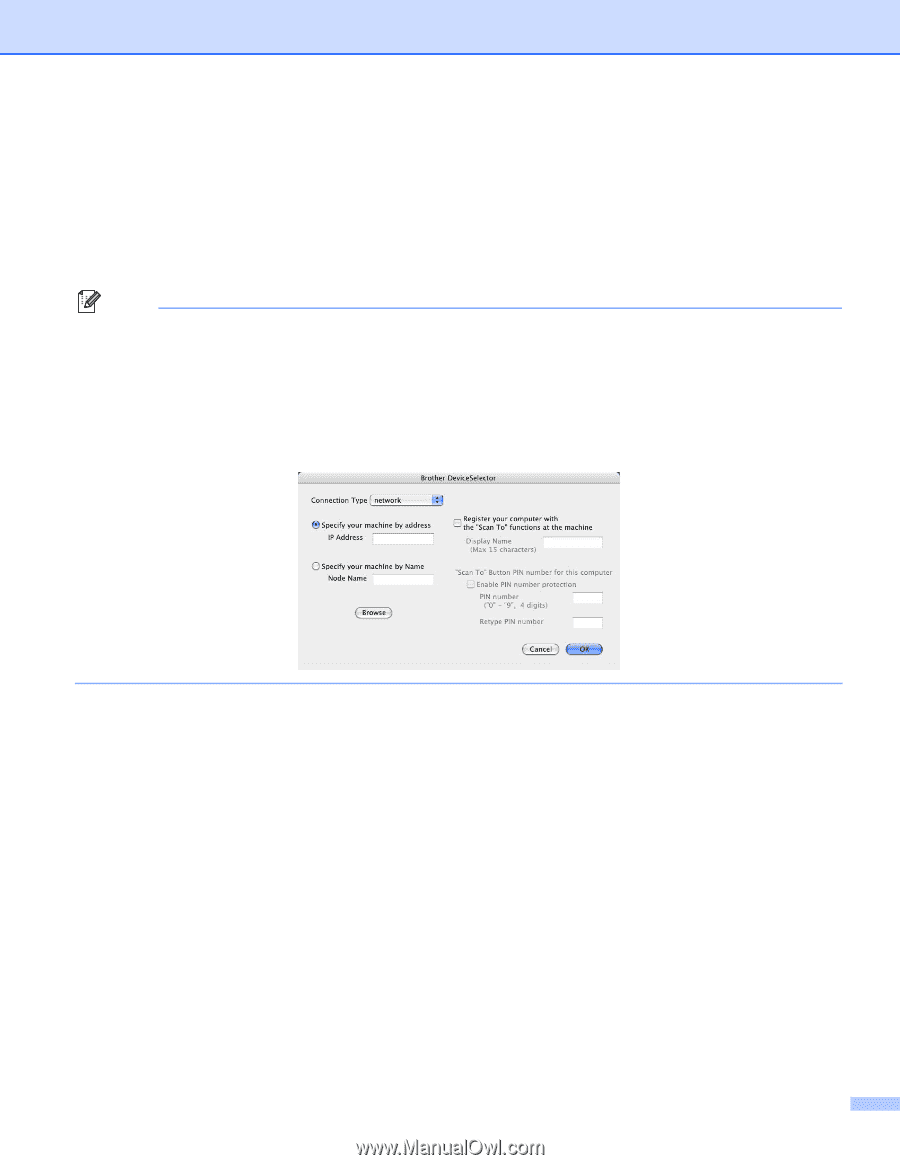
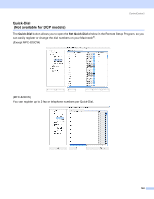
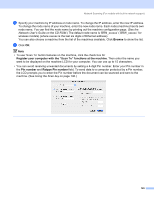
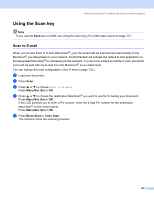
Network Scanning (For models with built-in network support) c Specify your machine by IP address or node name. To change the IP address, enter the new IP address. To change the node name of your machine, enter the new node name. Each node (machine) has its own node name. You can find the node name by printing out the machine configuration page. (See the Network User's Guide on the CD-ROM.) The default node name is 'BRN_xxxxxx' (`BRW_xxxxxx` for wireless models) (where xxxxxx is the last six digits of Ethernet address). You can also choose a machine from the list of the machines available. Click Browse to show the list. d Click OK. Note • To use 'Scan To' button features on the machine, click the check box for Register your computer with the "Scan To" functions at the machine. Then enter the name you want to be displayed on the machine LCD for your computer. You can use up to 15 characters. • You can avoid receiving unwanted documents by setting a 4-digit Pin number. Enter your Pin number in the Pin number and Retype Pin number field. To send data to a computer protected by a Pin number, the LCD prompts you to enter the Pin number before the document can be scanned and sent to the machine. (See Using the Scan key on page 146.) 145
-
 1
1 -
2
-
3
-
4
-
5
-
6
-
7
-
8
-
9
-
10
-
11
-
12
-
13
-
14
-
15
-
16
-
17
-
18
-
19
-
20
-
21
-
22
-
23
-
24
-
25
-
26
-
27
-
28
-
29
-
30
-
31
-
32
-
33
-
34
-
35
-
36
-
37
-
38
-
39
-
40
-
41
-
42
-
43
-
44
-
45
-
46
-
47
-
48
-
49
-
50
-
51
-
52
-
53
-
54
-
55
-
56
-
57
-
58
-
59
-
60
-
61
-
62
-
63
-
64
-
65
-
66
-
67
-
68
-
69
-
70
-
71
-
72
-
73
-
74
-
75
-
76
-
77
-
78
-
79
-
80
-
81
-
82
-
83
-
84
-
85
-
86
-
87
-
88
-
89
-
90
-
91
-
92
-
93
-
94
-
95
-
96
-
97
-
98
-
99
-
100
-
101
-
102
-
103
-
104
-
105
-
106
-
107
-
108
-
109
-
110
-
111
-
112
-
113
-
114
-
115
-
116
-
117
-
118
-
119
-
120
-
121
-
122
-
123
-
124
-
125
-
126
-
127
-
128
-
129
-
130
-
131
-
132
-
133
-
134
-
135
-
136
-
137
-
138
-
139
-
140
-
141
-
142
-
143
-
144
-
145
-
 146
146 -
 147
147 -
 148
148 -
 149
149 -
 150
150 -
 151
151 -
 152
152 -
 153
153 -
 154
154 -
 155
155 -
 156
156 -
157
-
158
-
159
-
160
 |
 |