Brother International PT-7500 Users Manual - English and Spanish - Page 54
Printing mirrored labels, BLOCK, START, MIRROR
 |
UPC - 012502620365
View all Brother International PT-7500 manuals
Add to My Manuals
Save this manual to your list of manuals |
Page 54 highlights
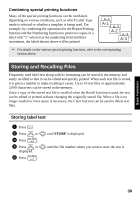
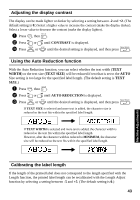
4 Press r so that the second number in the range displayed below BLOCK NO. is flashing. 5 Press u or d until the desired block number is displayed (or use the number keys to type in the desired setting). 6 Press n (or p). START appears in the Print Option menu. 7 Press n (or p) to begin printing the specified number of labels. The number of each copy is displayed while it is being printed. ☞ To specify settings for additional Print Option functions, instead of continuing with step 7, press u or d until CONTINUE is displayed in the Print Option menu, and then press n. Printing mirrored labels This function prints your label so that the text can be read from the adhesive side of the tape. If mirror-printed labels are attached to glass or some other transparent material, they can be read correctly from the opposite side. 1 Press g, then a. ABC OFF ABC ON 2 Press l or r until MIRROR is displayed. 3 Press u or d until ON is displayed. 4 Press n (or p). START appears in the Print Option menu. 5 Press n (or p) to begin printing the specified number of labels. The number of each copy is displayed while it is being printed. ☞ When using the Mirror Printing function, the text should be printed on clear tape. ☞ To specify settings for additional Print Option functions, instead of continuing with step 5, press u or d until CONTINUE is displayed in the Print Option menu, and then press n. 38
-
 1
1 -
2
-
3
-
4
-
5
-
6
-
7
-
8
-
9
-
10
-
11
-
12
-
13
-
14
-
15
-
16
-
17
-
18
-
19
-
20
-
21
-
22
-
23
-
24
-
25
-
26
-
27
-
28
-
29
-
30
-
31
-
32
-
33
-
34
-
35
-
36
-
37
-
38
-
39
-
40
-
41
-
42
-
43
-
44
-
45
-
46
-
47
-
48
-
 49
49 -
 50
50 -
 51
51 -
 52
52 -
 53
53 -
 54
54 -
 55
55 -
 56
56 -
 57
57 -
 58
58 -
 59
59 -
60
-
61
-
62
-
63
-
64
-
65
-
66
-
67
-
68
-
69
-
70
-
71
-
72
-
73
-
74
-
75
-
76
-
77
-
78
-
79
-
80
-
81
-
82
-
83
-
84
-
85
-
86
-
87
-
88
-
89
-
90
-
91
-
92
-
93
-
94
-
95
-
96
-
97
-
98
-
99
-
100
-
101
-
102
-
103
-
104
-
105
-
106
-
107
-
108
-
109
-
110
-
111
-
112
-
113
-
114
-
115
-
116
-
117
-
118
-
119
-
120
-
121
-
122
-
123
-
124
-
125
-
126
-
127
-
128
-
129
-
130
-
131
-
132
-
133
-
134
-
135
-
136
-
137
-
138
-
139
-
140
-
141
-
142
-
143
-
144
-
145
-
146
-
147
-
148
-
149
-
150
-
151
-
152
-
153
-
154
-
155
-
156
-
157
-
158
-
159
-
160
-
161
-
162
-
163
-
164
-
165
-
166
-
167
-
168
-
169
-
170
-
171
-
172
-
173
-
174
-
175
-
176
-
177
-
178
-
179
-
180
-
181
-
182
-
183
-
184
-
185
-
186
-
187
-
188
-
189
-
190
-
191
-
192
-
193
-
194
-
195
-
196
-
197
-
198
-
199
-
200
-
201
-
202
-
203
-
204
-
205
-
206
-
207
-
208
 |
 |
