Brother International RH-9820 Instruction Manual - English - Page 107
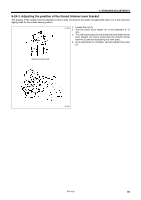
Adjusting the position of the thread trimmer lever bracket
 |
View all Brother International RH-9820 manuals
Add to My Manuals
Save this manual to your list of manuals |
Page 107 highlights
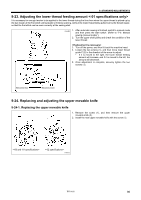
9. STANDARD ADJUSTMENTS 9-24-3. Adjusting the position of the thread trimmer lever bracket The position of the needle must be adjusted so that it does not obstruct the upper movable knife when it is at the maximum zigzag width for the outside sewing position. 0545B 1. Loosen the nut (1). 2. Turn the screw (2) to adjust in the illustration to 12 mm. 3. Turn the looper base (3) and check that the thread trimmer lever bracket (4) moves underneath the thread trimmer hammer (5) without obstructing any other parts. 4. Once adjustment is complete, securely tighten the screw (2). (Seen from the front) 0546B RH-9820 98
-
 1
1 -
2
-
3
-
4
-
5
-
6
-
7
-
8
-
9
-
10
-
11
-
12
-
13
-
14
-
15
-
16
-
17
-
18
-
19
-
20
-
21
-
22
-
23
-
24
-
25
-
26
-
27
-
28
-
29
-
30
-
31
-
32
-
33
-
34
-
35
-
36
-
37
-
38
-
39
-
40
-
41
-
42
-
43
-
44
-
45
-
46
-
47
-
48
-
49
-
50
-
51
-
52
-
53
-
54
-
55
-
56
-
57
-
58
-
59
-
60
-
61
-
62
-
63
-
64
-
65
-
66
-
67
-
68
-
69
-
70
-
71
-
72
-
73
-
74
-
75
-
76
-
77
-
78
-
79
-
80
-
81
-
82
-
83
-
84
-
85
-
86
-
87
-
88
-
89
-
90
-
91
-
92
-
93
-
94
-
95
-
96
-
97
-
98
-
99
-
100
-
101
-
 102
102 -
 103
103 -
 104
104 -
 105
105 -
 106
106 -
 107
107 -
 108
108 -
 109
109 -
 110
110 -
 111
111 -
 112
112 -
113
-
114
-
115
-
116
-
117
-
118
-
119
-
120
-
121
-
122
-
123
-
124
-
125
 |
 |

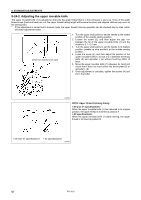
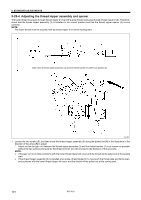
9. STANDARD ADJUSTMENTS
RH-9820
98
9-24-3. Adjusting the position of the thread trimmer lever bracket
The position of the needle must be adjusted so that it does not obstruct the upper movable knife when it is at the maximum
zigzag width for the outside sewing position.
1. Loosen the nut (1).
2. Turn the screw (2) to adjust <a> in the illustration to 12
mm.
3.
Turn the looper base (3) and check that the thread trimmer
lever bracket (4) moves underneath the thread trimmer
hammer (5) without obstructing any other parts.
4. Once adjustment is complete, securely tighten the screw
(2).
(Seen from the front)
0545B
0546B