Brother International RH-9820 Instruction Manual - English - Page 98
STANDARD ADJUSTMENTS, <Forward/back position adjustment>, <Tilt adjustment>
 |
View all Brother International RH-9820 manuals
Add to My Manuals
Save this manual to your list of manuals |
Page 98 highlights
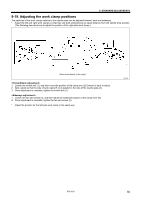
9. STANDARD ADJUSTMENTS 0557B 0556B 8. Loosen the socket bolt (4), and move the knife position forward or back to adjust. 9. Once the knife position has been determined, securely tighten the socket bolt (4). 10. Loosen the screw (5), push the block stopper plate (6) against the knife, and then tighten the screw (5). * The block stopper plate (6) is a guide for showing the current position of the knife, so be sure to move the block stopper plate (6) so that it is touching against the knife. 0558B 11. Loosen the socket bolts (7), (8) and (9). 12. Turn the eccentric pin (10) to adjust. * Fine adjustments can also be made by turning centering on the pivot (11). 13. Once adjustment is complete, tighten the socket bolts (9), (8) and (7) in that order. (Seen from directly above the knife base) 89 RH-9820
-
 1
1 -
2
-
3
-
4
-
5
-
6
-
7
-
8
-
9
-
10
-
11
-
12
-
13
-
14
-
15
-
16
-
17
-
18
-
19
-
20
-
21
-
22
-
23
-
24
-
25
-
26
-
27
-
28
-
29
-
30
-
31
-
32
-
33
-
34
-
35
-
36
-
37
-
38
-
39
-
40
-
41
-
42
-
43
-
44
-
45
-
46
-
47
-
48
-
49
-
50
-
51
-
52
-
53
-
54
-
55
-
56
-
57
-
58
-
59
-
60
-
61
-
62
-
63
-
64
-
65
-
66
-
67
-
68
-
69
-
70
-
71
-
72
-
73
-
74
-
75
-
76
-
77
-
78
-
79
-
80
-
81
-
82
-
83
-
84
-
85
-
86
-
87
-
88
-
89
-
90
-
91
-
92
-
 93
93 -
 94
94 -
 95
95 -
 96
96 -
 97
97 -
 98
98 -
 99
99 -
 100
100 -
 101
101 -
 102
102 -
 103
103 -
104
-
105
-
106
-
107
-
108
-
109
-
110
-
111
-
112
-
113
-
114
-
115
-
116
-
117
-
118
-
119
-
120
-
121
-
122
-
123
-
124
-
125
 |
 |
