Brother International RH-9820 Instruction Manual - English - Page 25
Installing the hand start switch (when using the hand start switch), INSTALLATION
 |
View all Brother International RH-9820 manuals
Add to My Manuals
Save this manual to your list of manuals |
Page 25 highlights
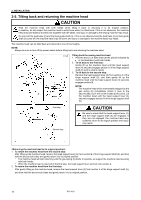
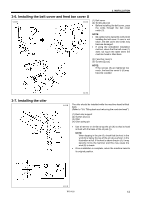
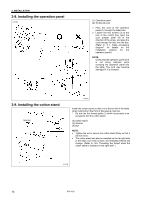
3. INSTALLATION 3-13. Installing the hand start switch (when using the hand start switch) 0362B (1) Hand start switch (2) Screws [2 pcs.] (3) Cord holders [3 pcs.] (4) Screws [3 pcs.] * When setting up on top of the table, use only two of the cord holders (3) and screws (4). [When setting up on top of the table] Pass the cord of the hand start switch (1) through the table hole (5), and pass the connector into the control box through the hole in the rear of the control box. (Refer to "3-8. Installing the operation panel".) [When setting up on top of the table] Insert the cord into the quick tube (6), and then pass it through the table hole (5). * This is to prevent damage from the cord rubbing against the table hole (5) when the machine head is tilted back and returned. When the work clamp switch (left side) is depressed, the work clamp will be lowered, and when the start switch (right side) is depressed, the sewing machine will start. [When embedding into the table] 0363B Start switch Work clamp switch 0364B 0385B RH-9820 (Continued on next page) 16
-
 1
1 -
2
-
3
-
4
-
5
-
6
-
7
-
8
-
9
-
10
-
11
-
12
-
13
-
14
-
15
-
16
-
17
-
18
-
19
-
 20
20 -
 21
21 -
 22
22 -
 23
23 -
 24
24 -
 25
25 -
 26
26 -
 27
27 -
 28
28 -
 29
29 -
 30
30 -
31
-
32
-
33
-
34
-
35
-
36
-
37
-
38
-
39
-
40
-
41
-
42
-
43
-
44
-
45
-
46
-
47
-
48
-
49
-
50
-
51
-
52
-
53
-
54
-
55
-
56
-
57
-
58
-
59
-
60
-
61
-
62
-
63
-
64
-
65
-
66
-
67
-
68
-
69
-
70
-
71
-
72
-
73
-
74
-
75
-
76
-
77
-
78
-
79
-
80
-
81
-
82
-
83
-
84
-
85
-
86
-
87
-
88
-
89
-
90
-
91
-
92
-
93
-
94
-
95
-
96
-
97
-
98
-
99
-
100
-
101
-
102
-
103
-
104
-
105
-
106
-
107
-
108
-
109
-
110
-
111
-
112
-
113
-
114
-
115
-
116
-
117
-
118
-
119
-
120
-
121
-
122
-
123
-
124
-
125
 |
 |
