Brother International RH-9820 Instruction Manual - English - Page 89
Adjusting the spreader installation positions, with the top edge of the tip of looper R 7.
 |
View all Brother International RH-9820 manuals
Add to My Manuals
Save this manual to your list of manuals |
Page 89 highlights
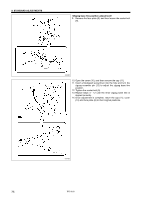
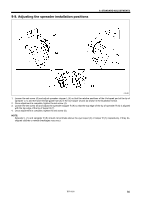
9-9. Adjusting the spreader installation positions 9. STANDARD ADJUSTMENTS 0494B 1. Loosen the set screw (4) and adjust spreader stopper L (5) so that the relative positions of the U-shaped part at the tip of spreader L (1) and the lower thread guide hole (3) in the eye looper (2) are as shown in the illustration below. 2. Once adjustment is complete, tighten the set screw (4). 3. Loosen the set screw (8) and adjust the spreader stopper R (9) so that the top edge of the tip of spreader R (6) is aligned with the top edge of the tip of looper R (7). 4. Once adjustment is complete, tighten the set screw (8). NOTE: Spreader L (1) and spreader R (6) should not protrude above the eye looper (2) or looper R (7) respectively. If they do, skipped stitches or needle breakages may occur. RH-9820 80
-
 1
1 -
2
-
3
-
4
-
5
-
6
-
7
-
8
-
9
-
10
-
11
-
12
-
13
-
14
-
15
-
16
-
17
-
18
-
19
-
20
-
21
-
22
-
23
-
24
-
25
-
26
-
27
-
28
-
29
-
30
-
31
-
32
-
33
-
34
-
35
-
36
-
37
-
38
-
39
-
40
-
41
-
42
-
43
-
44
-
45
-
46
-
47
-
48
-
49
-
50
-
51
-
52
-
53
-
54
-
55
-
56
-
57
-
58
-
59
-
60
-
61
-
62
-
63
-
64
-
65
-
66
-
67
-
68
-
69
-
70
-
71
-
72
-
73
-
74
-
75
-
76
-
77
-
78
-
79
-
80
-
81
-
82
-
83
-
 84
84 -
 85
85 -
 86
86 -
 87
87 -
 88
88 -
 89
89 -
 90
90 -
 91
91 -
 92
92 -
 93
93 -
 94
94 -
95
-
96
-
97
-
98
-
99
-
100
-
101
-
102
-
103
-
104
-
105
-
106
-
107
-
108
-
109
-
110
-
111
-
112
-
113
-
114
-
115
-
116
-
117
-
118
-
119
-
120
-
121
-
122
-
123
-
124
-
125
 |
 |
