Brother International RH-9820 Instruction Manual - English - Page 90
Adjusting the spreader timing, Loosen the two screws 2, and then loose the set screw 6.
 |
View all Brother International RH-9820 manuals
Add to My Manuals
Save this manual to your list of manuals |
Page 90 highlights
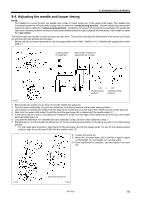
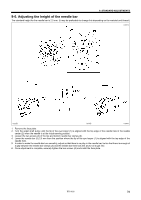
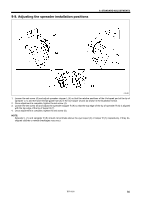
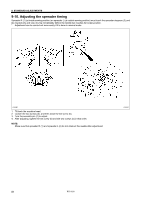
9. STANDARD ADJUSTMENTS 9-10. Adjusting the spreader timing Spreader R (1) (at inside sewing position) an spreader L (at outside sewing position) must touch the spreader stoppers (3) and (4) respectively and stop moving immediately before the needle bar reaches its lowest position. * Adjustment can be carried out more easily if it is done in manual mode. 0500B 1. Tilt back the machine head. 2. Loosen the two screws (2), and then loose the set screw (6). 3. Turn the eccentric pin (7) to adjust. 4. After adjusting, tighten the set screw (6) and the two screws (5) in that order. NOTE: Make sure that spreader R (1) and spreader L (2) do not obstruct the needle after adjustment. 0501B 81 RH-9820
-
 1
1 -
2
-
3
-
4
-
5
-
6
-
7
-
8
-
9
-
10
-
11
-
12
-
13
-
14
-
15
-
16
-
17
-
18
-
19
-
20
-
21
-
22
-
23
-
24
-
25
-
26
-
27
-
28
-
29
-
30
-
31
-
32
-
33
-
34
-
35
-
36
-
37
-
38
-
39
-
40
-
41
-
42
-
43
-
44
-
45
-
46
-
47
-
48
-
49
-
50
-
51
-
52
-
53
-
54
-
55
-
56
-
57
-
58
-
59
-
60
-
61
-
62
-
63
-
64
-
65
-
66
-
67
-
68
-
69
-
70
-
71
-
72
-
73
-
74
-
75
-
76
-
77
-
78
-
79
-
80
-
81
-
82
-
83
-
84
-
 85
85 -
 86
86 -
 87
87 -
 88
88 -
 89
89 -
 90
90 -
 91
91 -
 92
92 -
 93
93 -
 94
94 -
 95
95 -
96
-
97
-
98
-
99
-
100
-
101
-
102
-
103
-
104
-
105
-
106
-
107
-
108
-
109
-
110
-
111
-
112
-
113
-
114
-
115
-
116
-
117
-
118
-
119
-
120
-
121
-
122
-
123
-
124
-
125
 |
 |

9. STANDARD ADJUSTMENTS
RH-9820
81
9-10. Adjusting the spreader timing
Spreader R (1) (at inside sewing position) an spreader L (at outside sewing position) must touch the spreader stoppers (3) and
(4) respectively and stop moving immediately before the needle bar reaches its lowest position.
*
Adjustment can be carried out more easily if it is done in manual mode.
1. Tilt back the machine head.
2.
Loosen the two screws (2), and then loose the set screw (6).
3. Turn the eccentric pin (7) to adjust.
4.
After adjusting, tighten the set screw (6) and the two screws (5) in that order.
NOTE:
Make sure that spreader R (1) and spreader L (2) do not obstruct the needle after adjustment.
0501B
0500B