Brother International RH-9820 Instruction Manual - English - Page 26
INSTALLATION, <Adjusting the hand start switch position>, Forward/back and vertical position]
 |
View all Brother International RH-9820 manuals
Add to My Manuals
Save this manual to your list of manuals |
Page 26 highlights
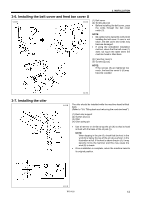
3. INSTALLATION Adjust the position of the hand start switch (1) as follows so that it is in an easy-to-use position. [Forward/back and vertical position] 1. Loosen the two screws (2), and then move the hand start switch mounting plate (7) forward, back, up or down to adjust its position. 2. Once adjustment is complete, securely tighten the screws (2). 0311B [Forward/back and sideways position] • The hand start switch mounting plate (7) has three screw holes in it. You can select the installation position from either or shown in the illustration by changing the screw holes used by the screws (8). • In addition, when the screws (8) are loosened, the hand start switch (1) can be moved forward, back and sideways to adjust its position. Once adjustment is complete, securely tighten the screws (8). 0312B 17 RH-9820
-
 1
1 -
2
-
3
-
4
-
5
-
6
-
7
-
8
-
9
-
10
-
11
-
12
-
13
-
14
-
15
-
16
-
17
-
18
-
19
-
20
-
 21
21 -
 22
22 -
 23
23 -
 24
24 -
 25
25 -
 26
26 -
 27
27 -
 28
28 -
 29
29 -
 30
30 -
 31
31 -
32
-
33
-
34
-
35
-
36
-
37
-
38
-
39
-
40
-
41
-
42
-
43
-
44
-
45
-
46
-
47
-
48
-
49
-
50
-
51
-
52
-
53
-
54
-
55
-
56
-
57
-
58
-
59
-
60
-
61
-
62
-
63
-
64
-
65
-
66
-
67
-
68
-
69
-
70
-
71
-
72
-
73
-
74
-
75
-
76
-
77
-
78
-
79
-
80
-
81
-
82
-
83
-
84
-
85
-
86
-
87
-
88
-
89
-
90
-
91
-
92
-
93
-
94
-
95
-
96
-
97
-
98
-
99
-
100
-
101
-
102
-
103
-
104
-
105
-
106
-
107
-
108
-
109
-
110
-
111
-
112
-
113
-
114
-
115
-
116
-
117
-
118
-
119
-
120
-
121
-
122
-
123
-
124
-
125
 |
 |
