Brother International RH-9820 Instruction Manual - English - Page 85

Adjusting the needle and looper timing, STANDARD ADJUSTMENTS, inside sewing position, loop stroke

Page 85 highlights

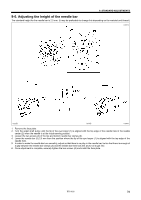
9. STANDARD ADJUSTMENTS 9-4. Adjusting the needle and looper timing NOTE: The needle bar moves through two needle drop cycles for each single turn of the upper shaft pulley. The needle drop movement toward the left side (knife cutting side) is called the "inside sewing position", and the needle drop movement toward the right is called the "outside sewing position". In addition, the amount of movement involved when the needle bar rises from its lowest position until the tip of the looper at either the left or right is aligned with the center of the needle is called the "loop stroke". The left and right loop strokes must be the same as each other. This section describes the adjustments to be carried out so that the left and right loop strokes are the same. * Before carrying out these adjustments, set the zigzag width (stitch width). (Refer to "9-2. Adjusting the zigzag width (stitch width)".) Lowest position of needle bar When center of needle is aligned with tip of looper = for the outside sewing position in the same way as for the inside sewing position. * For the inside sewing position, align the tip of the eye looper (6) with the needle center (7), and for the outside sewing position, align the tip of looper R (8) with the needle center (7). 8. Loosen the screw (9). 9. Move the LS holder base (10) to the left or right to adjust so that length and length

  • 1
  • 2
  • 3
  • 4
  • 5
  • 6
  • 7
  • 8
  • 9
  • 10
  • 11
  • 12
  • 13
  • 14
  • 15
  • 16
  • 17
  • 18
  • 19
  • 20
  • 21
  • 22
  • 23
  • 24
  • 25
  • 26
  • 27
  • 28
  • 29
  • 30
  • 31
  • 32
  • 33
  • 34
  • 35
  • 36
  • 37
  • 38
  • 39
  • 40
  • 41
  • 42
  • 43
  • 44
  • 45
  • 46
  • 47
  • 48
  • 49
  • 50
  • 51
  • 52
  • 53
  • 54
  • 55
  • 56
  • 57
  • 58
  • 59
  • 60
  • 61
  • 62
  • 63
  • 64
  • 65
  • 66
  • 67
  • 68
  • 69
  • 70
  • 71
  • 72
  • 73
  • 74
  • 75
  • 76
  • 77
  • 78
  • 79
  • 80
  • 81
  • 82
  • 83
  • 84
  • 85
  • 86
  • 87
  • 88
  • 89
  • 90
  • 91
  • 92
  • 93
  • 94
  • 95
  • 96
  • 97
  • 98
  • 99
  • 100
  • 101
  • 102
  • 103
  • 104
  • 105
  • 106
  • 107
  • 108
  • 109
  • 110
  • 111
  • 112
  • 113
  • 114
  • 115
  • 116
  • 117
  • 118
  • 119
  • 120
  • 121
  • 122
  • 123
  • 124
  • 125

9. STANDARD ADJUSTMENTS
RH-9820
76
9-4. Adjusting the needle and looper timing
NOTE:
The needle bar moves through two needle drop cycles for each single turn of the upper shaft pulley. The needle drop
movement toward the left side (knife cutting side) is called the “
inside sewing position
”, and the needle drop movement
toward the right is called the “
outside sewing position
”. In addition, the amount of movement involved when the needle bar
rises from its lowest position until the tip of the looper at either the left or right is aligned with the center of the needle is called
the “
loop stroke
”.
The left and right loop strokes must be the same as each other. This section describes the adjustments to be carried out so that
the left and right loop strokes are the same.
*
Before carrying out these adjustments, set the zigzag width (stitch width). (Refer to “9-2. Adjusting the zigzag width (stitch
width)”.)
<a>
=
<a'>
1.
Remove the two screws (1), an then remove the needle bar guard (2).
2.
Turn the upper shaft pulley (3) to set the needle bar to its lowest position at the inside sewing position.
3.
Use calipers to measure the length from the edge of the needle bar (4) to the top of the needle bar bush holder base (5).
4.
Next, turn the upper shaft pulley (3) until the tip of the eye looper (6) is aligned with the needle center (7).
5.
In the same was as in step 3, use calipers to measure the length from the edge of the needle bar (4) to the top of the needle
bar bush holder base (5).
6.
Calculate the difference <a> between the value obtained in step 5 and the value obtained in step 3.
7.
Repeat steps 2 - 6 and calculate the difference <a'> for the outside sewing position in the same way as for the inside sewing
position.
*
For the inside sewing position, align the tip of the eye looper (6) with the needle center (7), and for the outside sewing
position, align the tip of looper R (8) with the needle center (7).
8. Loosen the screw (9).
9. Move the LS holder base (10) to the left or right to adjust
so that length <a> and length <a'> are the same.
10. Once adjustment is complete, securely tighten the screw
(9).
(Seen from the front)
0484B
0487B
0488B
Lowest position
of needle bar
When center of needle is
aligned with tip of looper
(Inside sewing
position)
(Outside sewing
position)