Brother International RH-9820 Instruction Manual - English - Page 77
Cleaning And Inspection, 8-1-1. Cleaning
 |
View all Brother International RH-9820 manuals
Add to My Manuals
Save this manual to your list of manuals |
Page 77 highlights
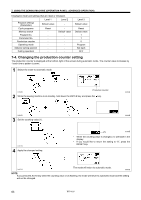
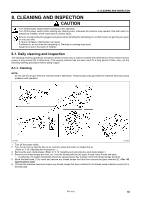
8. CLEANING AND INSPECTION 8. CLEANING AND INSPECTION CAUTION Turn off the power switch before carrying out this operation. Turn off the power switch before starting any cleaning work, otherwise the machine may operate if the start switch is pressed by mistake, which could result in serious injury. Be sure to wear protective goggles and gloves when handling the lubricating oil, so that it does not get into your eyes or onto your skin. If care is not taken, inflammation can result. Furthermore, do not drink the lubricating oil. Diarrhea or vomiting may result. Keep the oil out of the reach of children. 8-1. Daily cleaning and inspection The following cleaning operations should be carried out each day in order to maintain the performance of this machine and to ensure a long service life. Furthermore, if the sewing machine has not been used for a long period of time, carry out the following cleaning procedures before using it again. 8-1-1. Cleaning NOTE: Do not use the air gun while the machine head is tilted back. Thread scraps may get inside the machine head and cause problems with operation. 0453B 0454B 1. Turn off the power switch. 2. Turn the air cock to stop the flow of air, and then press the button to release the air. (Refer to "3-16. Adjusting the air pressure ".) 3. Remove the work clamp plates. (Refer to "3-19. Installing and removing the work clamp plates".) 4. Remove any thread scraps and dust, etc. from the thread paths for the upper thread, lower thread and gimp. * In particular, the looper thread path should be cleaned every day to keep it free from thread scraps and dust. 5. Move the feed base (1) by hand and remove any thread scraps and dust from around the gimp solenoid (2). 6. Tilt back the machine head and remove any thread scraps that have collected in the thread scrap collection pocket (3) in the bed base. RH-9820 68
-
 1
1 -
2
-
3
-
4
-
5
-
6
-
7
-
8
-
9
-
10
-
11
-
12
-
13
-
14
-
15
-
16
-
17
-
18
-
19
-
20
-
21
-
22
-
23
-
24
-
25
-
26
-
27
-
28
-
29
-
30
-
31
-
32
-
33
-
34
-
35
-
36
-
37
-
38
-
39
-
40
-
41
-
42
-
43
-
44
-
45
-
46
-
47
-
48
-
49
-
50
-
51
-
52
-
53
-
54
-
55
-
56
-
57
-
58
-
59
-
60
-
61
-
62
-
63
-
64
-
65
-
66
-
67
-
68
-
69
-
70
-
71
-
 72
72 -
 73
73 -
 74
74 -
 75
75 -
 76
76 -
 77
77 -
 78
78 -
 79
79 -
 80
80 -
 81
81 -
 82
82 -
83
-
84
-
85
-
86
-
87
-
88
-
89
-
90
-
91
-
92
-
93
-
94
-
95
-
96
-
97
-
98
-
99
-
100
-
101
-
102
-
103
-
104
-
105
-
106
-
107
-
108
-
109
-
110
-
111
-
112
-
113
-
114
-
115
-
116
-
117
-
118
-
119
-
120
-
121
-
122
-
123
-
124
-
125
 |
 |
