Brother International RH-9820 Instruction Manual - English - Page 97
Making fine adjustments to the knife position, STANDARD ADJUSTMENTS
 |
View all Brother International RH-9820 manuals
Add to My Manuals
Save this manual to your list of manuals |
Page 97 highlights
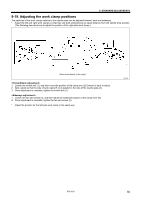
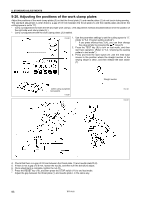
9. STANDARD ADJUSTMENTS 9-16-2. Making fine adjustments to the knife position Adjust the knife position so that it cuts the material cleanly at the inside sewing position and around the eyelet. * Before carrying out this adjustment, check that the procedure in "9-3. Adjusting the zigzag base line position" has been completed correctly. * The knife position can be adjusted independently in the forward/back direction and tilt direction. 15mm 0417B 1. Install the short customized needle (1). (Refer to "9-3. Adjusting the zigzag base line position" for details on the short customized needle (1).) 2. Set the air pressure at the hammer pressure adjustment regulator on the underside of the table to about 0.2 MPa. (Refer to "9-17. Adjusting the cutting pressure".) * This is so that the knife will not make several overlapping incisions in the hammer and so that the paper for checking the needle drop does not become pierced while adjusting the knife position. 0397B 3. Press the AFTER key (2) on the operation panel to set the cutting method to "cutting after sewing". 0431B 4. Place a piece of paper (3) underneath the work clamps. 5. Start the sewing machine and trace the needle drop position around the eyelet hole. 6. Check that the needle drop positions around the eyelet hole and the knife cutting position overlap uniformly. * Checking will be easier if the cutting position value (A) in the parameter settings is set to "0". (Refer to "5-3. Program setting method".) 7. If they do not overlap uniformly, turn off the power and carry out the adjustment in steps 8 - 13. * Once adjustment is complete, repeat steps 4 - 6 to check, and if further adjustment is needed, repeat step 7. 0555B RH-9820 (Continued on next page) 88
-
 1
1 -
2
-
3
-
4
-
5
-
6
-
7
-
8
-
9
-
10
-
11
-
12
-
13
-
14
-
15
-
16
-
17
-
18
-
19
-
20
-
21
-
22
-
23
-
24
-
25
-
26
-
27
-
28
-
29
-
30
-
31
-
32
-
33
-
34
-
35
-
36
-
37
-
38
-
39
-
40
-
41
-
42
-
43
-
44
-
45
-
46
-
47
-
48
-
49
-
50
-
51
-
52
-
53
-
54
-
55
-
56
-
57
-
58
-
59
-
60
-
61
-
62
-
63
-
64
-
65
-
66
-
67
-
68
-
69
-
70
-
71
-
72
-
73
-
74
-
75
-
76
-
77
-
78
-
79
-
80
-
81
-
82
-
83
-
84
-
85
-
86
-
87
-
88
-
89
-
90
-
91
-
 92
92 -
 93
93 -
 94
94 -
 95
95 -
 96
96 -
 97
97 -
 98
98 -
 99
99 -
 100
100 -
 101
101 -
 102
102 -
103
-
104
-
105
-
106
-
107
-
108
-
109
-
110
-
111
-
112
-
113
-
114
-
115
-
116
-
117
-
118
-
119
-
120
-
121
-
122
-
123
-
124
-
125
 |
 |
