Brother International RH-9820 Instruction Manual - English - Page 116
Adjusting the gimp trailing length <-02 specifications only>, STANDARD ADJUSTMENTS
 |
View all Brother International RH-9820 manuals
Add to My Manuals
Save this manual to your list of manuals |
Page 116 highlights
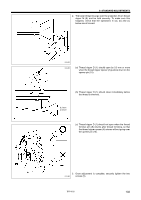
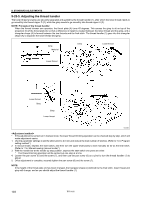
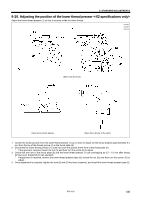
9. STANDARD ADJUSTMENTS 9-27. Adjusting the gimp trailing length The gimp is pressed against the material by means of the twisting of the first 2 - 3 stitches at the sewing start, and is then pulled out continuously. Because of this, if strong tension is applied to the gimp when the feed base is at the sewing position and the gimp trailing length ( in the illustration below) becomes extremely short, the gimp may be pulled out of the stitches. The gimp should be adjusted to as short a length as possible which will still allow the gimp to be securely wound around the stitches at the sewing start and leave a length protruding from above the stitches. NOTE: Principle of gimp pulling When the looper base (1) turns back from 180 degrees to 0 degrees after the gimp has been trimmed, gimp thread guide C-J (2) pulls the gimp to make it come out. Adjustment of the gimp trailing length is necessary in the following cases. • When the sewing length has been changed (the gimp is trimmed at the feed base home position, so the length of will change. As a result, the gimp trailing length will also change.) • When the type of gimp and the gimp tension have been changed (the gimp trailing length will change.) Gimp is trimmed When looper base is turned 180 degrees When looper base has returned to 0 degrees (Seen from directly above) 0547B 0548B 1. Loosen the screw (3). 2. Move gimp thread guide J (4) in the direction of the arrow [A] to adjust so that 2 - 4 mm of the gimp protrudes from the seam at the sewing start. 3. Once adjustment is complete, securely tighten the screw (3). The gimp trailing length at the sewing end is uniform because of thread trimming. 107 RH-9820
-
 1
1 -
2
-
3
-
4
-
5
-
6
-
7
-
8
-
9
-
10
-
11
-
12
-
13
-
14
-
15
-
16
-
17
-
18
-
19
-
20
-
21
-
22
-
23
-
24
-
25
-
26
-
27
-
28
-
29
-
30
-
31
-
32
-
33
-
34
-
35
-
36
-
37
-
38
-
39
-
40
-
41
-
42
-
43
-
44
-
45
-
46
-
47
-
48
-
49
-
50
-
51
-
52
-
53
-
54
-
55
-
56
-
57
-
58
-
59
-
60
-
61
-
62
-
63
-
64
-
65
-
66
-
67
-
68
-
69
-
70
-
71
-
72
-
73
-
74
-
75
-
76
-
77
-
78
-
79
-
80
-
81
-
82
-
83
-
84
-
85
-
86
-
87
-
88
-
89
-
90
-
91
-
92
-
93
-
94
-
95
-
96
-
97
-
98
-
99
-
100
-
101
-
102
-
103
-
104
-
105
-
106
-
107
-
108
-
109
-
110
-
 111
111 -
 112
112 -
 113
113 -
 114
114 -
 115
115 -
 116
116 -
 117
117 -
 118
118 -
 119
119 -
 120
120 -
 121
121 -
122
-
123
-
124
-
125
 |
 |
