Brother International RH-9820 Instruction Manual - English - Page 99
Adjusting the cutting pressure, STANDARD ADJUSTMENTS
 |
View all Brother International RH-9820 manuals
Add to My Manuals
Save this manual to your list of manuals |
Page 99 highlights
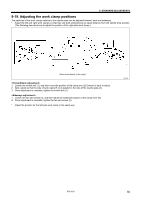
9. STANDARD ADJUSTMENTS NOTE: Relationship between needle drop position and eyelet pattern at the eyelet Eyelet pattern a x b 0559B When switching between cutting before sewing or no cutting and cutting after sewing, the needle drop position at the inside sewing position will change automatically in accordance with the eyelet pattern as shown in the illustration. Needle drop c x d Eyelet pattern Needle drop c x d Knife a x b Cutting before Cutting after No. sewing or no cutting sewing 1 2.1 x 3.2 1.7 x 2.7 2.5 x 3.8 2 2.8 x 4.3 2.4 x 3.9 3.2 x 4.9 3 3.0 x 4.6 2.6 x 4.1 3.4 x 5.2 4 3.2 x 5.4 2.8 x 4.9 3.6 x 6.0 5 Straight Straight Straight 6 3.8 x 4.3 3.4 x 3.8 4.2 x 4.9 Cutting before sewing Cutting after sewing 9-17. Adjusting the cutting pressure Set the cutting pressure to the minimum pressure that still allows the material to be cut. * Set to between 0.1 - 0.6 MPa. (It is set to 0.4 MPa at the time of shipment from the factory.) Turn the knob (1) of the hammer pressure adjustment regulator on the underside of the table to adjust the air pressure. NOTE: • Do not increase the cutting pressure more than necessary. If the pressure is too high, it will wear out the hammer and damage the knife. • If the material cannot be cut cleanly, do not increase the cutting pressure to too high a pressure. Check the timing between the knife and the hammer. (Refer to "9-13-2. Adjusting the contact between the knife and the hammer".) 0469B RH-9820 90
-
 1
1 -
2
-
3
-
4
-
5
-
6
-
7
-
8
-
9
-
10
-
11
-
12
-
13
-
14
-
15
-
16
-
17
-
18
-
19
-
20
-
21
-
22
-
23
-
24
-
25
-
26
-
27
-
28
-
29
-
30
-
31
-
32
-
33
-
34
-
35
-
36
-
37
-
38
-
39
-
40
-
41
-
42
-
43
-
44
-
45
-
46
-
47
-
48
-
49
-
50
-
51
-
52
-
53
-
54
-
55
-
56
-
57
-
58
-
59
-
60
-
61
-
62
-
63
-
64
-
65
-
66
-
67
-
68
-
69
-
70
-
71
-
72
-
73
-
74
-
75
-
76
-
77
-
78
-
79
-
80
-
81
-
82
-
83
-
84
-
85
-
86
-
87
-
88
-
89
-
90
-
91
-
92
-
93
-
 94
94 -
 95
95 -
 96
96 -
 97
97 -
 98
98 -
 99
99 -
 100
100 -
 101
101 -
 102
102 -
 103
103 -
 104
104 -
105
-
106
-
107
-
108
-
109
-
110
-
111
-
112
-
113
-
114
-
115
-
116
-
117
-
118
-
119
-
120
-
121
-
122
-
123
-
124
-
125
 |
 |
