Canon EOS Rebel T2i EOS REBEL T2i / EOS 550D Instruction Manual - Page 108
Shooting with the LCD Monitor
 |
View all Canon EOS Rebel T2i manuals
Add to My Manuals
Save this manual to your list of manuals |
Page 108 highlights
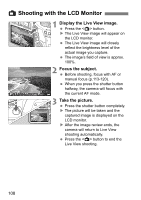
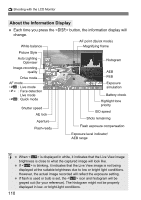
A Shooting with the LCD Monitor 1 Display the Live View image. Press the button. X The Live View image will appear on the LCD monitor. The Live View image will closely reflect the brightness level of the actual image you capture. The image's field of view is approx. 100%. 2 Focus the subject. Before shooting, focus with AF or manual focus (p.113-120). When you press the shutter button halfway, the camera will focus with the current AF mode. 3 Take the picture. Press the shutter button completely. X The picture will be taken and the captured image is displayed on the LCD monitor. X After the image review ends, the camera will return to Live View shooting automatically. Press the button to end the Live View shooting. 108
-
 1
1 -
2
-
3
-
4
-
5
-
6
-
7
-
8
-
9
-
10
-
11
-
12
-
13
-
14
-
15
-
16
-
17
-
18
-
19
-
20
-
21
-
22
-
23
-
24
-
25
-
26
-
27
-
28
-
29
-
30
-
31
-
32
-
33
-
34
-
35
-
36
-
37
-
38
-
39
-
40
-
41
-
42
-
43
-
44
-
45
-
46
-
47
-
48
-
49
-
50
-
51
-
52
-
53
-
54
-
55
-
56
-
57
-
58
-
59
-
60
-
61
-
62
-
63
-
64
-
65
-
66
-
67
-
68
-
69
-
70
-
71
-
72
-
73
-
74
-
75
-
76
-
77
-
78
-
79
-
80
-
81
-
82
-
83
-
84
-
85
-
86
-
87
-
88
-
89
-
90
-
91
-
92
-
93
-
94
-
95
-
96
-
97
-
98
-
99
-
100
-
101
-
102
-
 103
103 -
 104
104 -
 105
105 -
 106
106 -
 107
107 -
 108
108 -
 109
109 -
 110
110 -
 111
111 -
 112
112 -
 113
113 -
114
-
115
-
116
-
117
-
118
-
119
-
120
-
121
-
122
-
123
-
124
-
125
-
126
-
127
-
128
-
129
-
130
-
131
-
132
-
133
-
134
-
135
-
136
-
137
-
138
-
139
-
140
-
141
-
142
-
143
-
144
-
145
-
146
-
147
-
148
-
149
-
150
-
151
-
152
-
153
-
154
-
155
-
156
-
157
-
158
-
159
-
160
-
161
-
162
-
163
-
164
-
165
-
166
-
167
-
168
-
169
-
170
-
171
-
172
-
173
-
174
-
175
-
176
-
177
-
178
-
179
-
180
-
181
-
182
-
183
-
184
-
185
-
186
-
187
-
188
-
189
-
190
-
191
-
192
-
193
-
194
-
195
-
196
-
197
-
198
-
199
-
200
-
201
-
202
-
203
-
204
-
205
-
206
-
207
-
208
-
209
-
210
-
211
-
212
-
213
-
214
-
215
-
216
-
217
-
218
-
219
-
220
-
221
-
222
-
223
-
224
-
225
-
226
-
227
-
228
-
229
-
230
-
231
-
232
-
233
-
234
-
235
-
236
-
237
-
238
-
239
-
240
-
241
-
242
-
243
-
244
-
245
-
246
-
247
-
248
-
249
-
250
-
251
-
252
-
253
-
254
-
255
-
256
-
257
-
258
-
259
-
260
 |
 |

108
1
Display the Live View image.
Press the <
A
> button.
The Live View image will appear on
the LCD monitor.
The Live View image will closely
reflect the brightness level of the
actual image you capture.
The image’s field of view is approx.
100%.
2
Focus the subject.
Before shooting, focus with AF or
manual focus (p.113-120).
When you press the shutter button
halfway, the camera will focus with
the current AF mode.
3
Take the picture.
Press the shutter button completely.
The picture will be taken and the
captured image is displayed on the
LCD monitor.
After the image review ends, the
camera will return to Live View
shooting automatically.
Press the <
A
> button to end the
Live View shooting.
A
Shooting with the LCD Monitor