Canon EOS Rebel T2i EOS REBEL T2i / EOS 550D Instruction Manual - Page 112
Menu Function Settings - firmware
 |
View all Canon EOS Rebel T2i manuals
Add to My Manuals
Save this manual to your list of manuals |
Page 112 highlights
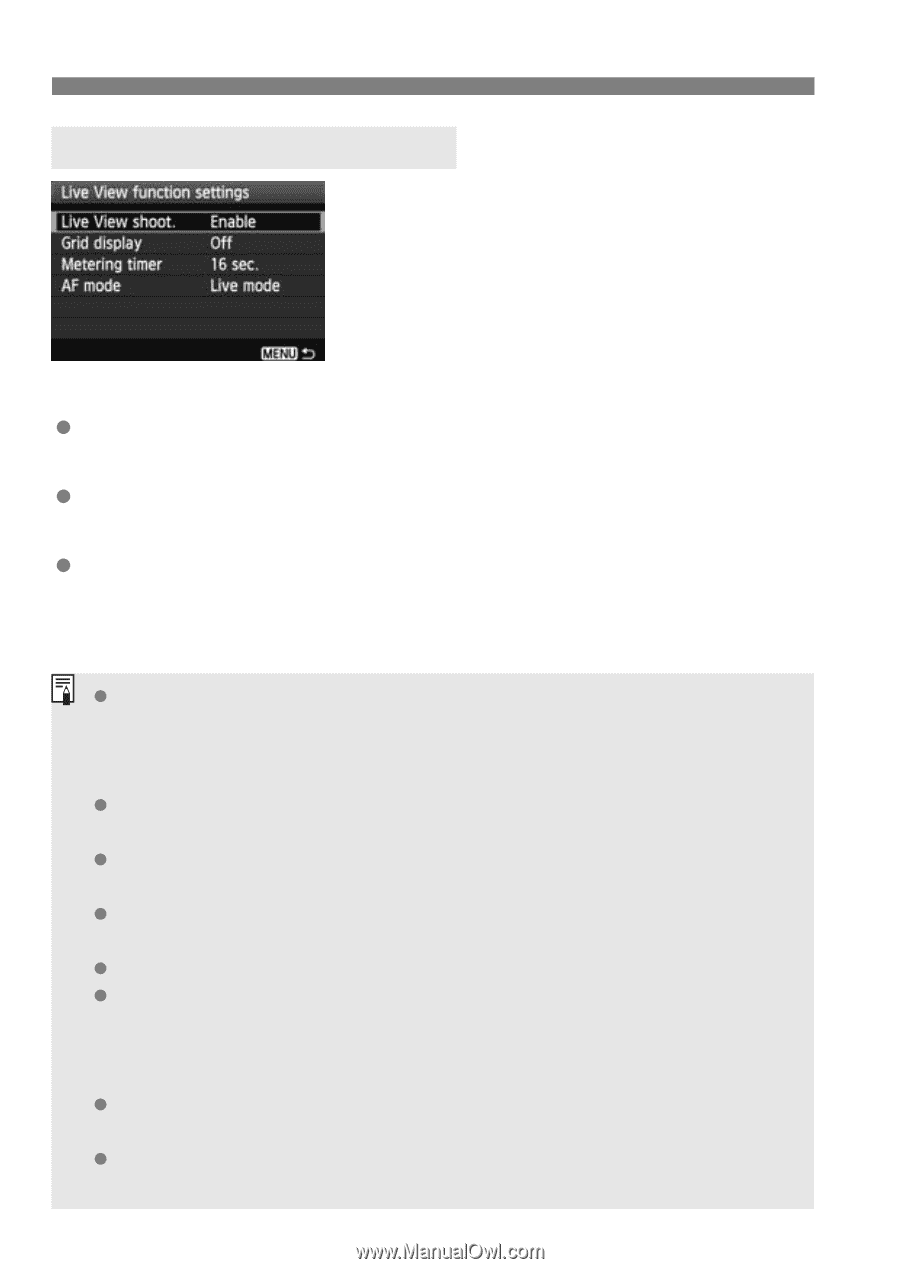
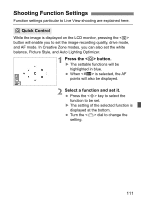
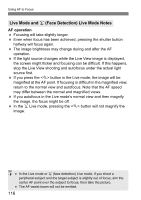
Shooting Function Settings 3 Menu Function Settings The menu options under the [6] tab's [Live View function settings] menu are explained below. The functions settable in this menu screen only apply during Live View shooting. These functions do not take effect during viewfinder shooting. Grid display With [Grid 1l] or [Grid 2m], you can display grid lines. Metering timer You can change how long the exposure setting is displayed (AE lock time). AF mode You can select [Live mode] (p.113), [u Live mode] (p.114), or [Quick mode] (p.118). Even while the Live View image is displayed, you can still set functions and execute playback . If you select [y Dust Delete Data], [6 Sensor cleaning], [7 Clear settings], or [7 Firmware Ver.], the Live View shooting will be terminated. The metering mode will be fixed to evaluative metering for Live View shooting. In Creative Zone modes, you can check the depth of field by pressing the depth-of-field preview button. During continuous shooting, the exposure set for the first shot will also be applied to subsequent shots. Using will be the same as using . If the camera is not operated for a prolonged period, the power will turn off automatically as set with [5 Auto power off] (p.139). If [5 Auto power off] is set to [Off], the Live View shooting will stop automatically after 30 min. (camera power remains on). With the AV cable (provided) or HDMI cable (sold separately), you can display the Live View image on a TV (p.167, 169). You can also use a remote controller (sold separately, p.204) for Live View shooting. 112
-
 1
1 -
2
-
3
-
4
-
5
-
6
-
7
-
8
-
9
-
10
-
11
-
12
-
13
-
14
-
15
-
16
-
17
-
18
-
19
-
20
-
21
-
22
-
23
-
24
-
25
-
26
-
27
-
28
-
29
-
30
-
31
-
32
-
33
-
34
-
35
-
36
-
37
-
38
-
39
-
40
-
41
-
42
-
43
-
44
-
45
-
46
-
47
-
48
-
49
-
50
-
51
-
52
-
53
-
54
-
55
-
56
-
57
-
58
-
59
-
60
-
61
-
62
-
63
-
64
-
65
-
66
-
67
-
68
-
69
-
70
-
71
-
72
-
73
-
74
-
75
-
76
-
77
-
78
-
79
-
80
-
81
-
82
-
83
-
84
-
85
-
86
-
87
-
88
-
89
-
90
-
91
-
92
-
93
-
94
-
95
-
96
-
97
-
98
-
99
-
100
-
101
-
102
-
103
-
104
-
105
-
106
-
 107
107 -
 108
108 -
 109
109 -
 110
110 -
 111
111 -
 112
112 -
 113
113 -
 114
114 -
 115
115 -
 116
116 -
 117
117 -
118
-
119
-
120
-
121
-
122
-
123
-
124
-
125
-
126
-
127
-
128
-
129
-
130
-
131
-
132
-
133
-
134
-
135
-
136
-
137
-
138
-
139
-
140
-
141
-
142
-
143
-
144
-
145
-
146
-
147
-
148
-
149
-
150
-
151
-
152
-
153
-
154
-
155
-
156
-
157
-
158
-
159
-
160
-
161
-
162
-
163
-
164
-
165
-
166
-
167
-
168
-
169
-
170
-
171
-
172
-
173
-
174
-
175
-
176
-
177
-
178
-
179
-
180
-
181
-
182
-
183
-
184
-
185
-
186
-
187
-
188
-
189
-
190
-
191
-
192
-
193
-
194
-
195
-
196
-
197
-
198
-
199
-
200
-
201
-
202
-
203
-
204
-
205
-
206
-
207
-
208
-
209
-
210
-
211
-
212
-
213
-
214
-
215
-
216
-
217
-
218
-
219
-
220
-
221
-
222
-
223
-
224
-
225
-
226
-
227
-
228
-
229
-
230
-
231
-
232
-
233
-
234
-
235
-
236
-
237
-
238
-
239
-
240
-
241
-
242
-
243
-
244
-
245
-
246
-
247
-
248
-
249
-
250
-
251
-
252
-
253
-
254
-
255
-
256
-
257
-
258
-
259
-
260
 |
 |