Canon EOS Rebel T2i EOS REBEL T2i / EOS 550D Instruction Manual - Page 55
Creative Auto Shooting
 |
View all Canon EOS Rebel T2i manuals
Add to My Manuals
Save this manual to your list of manuals |
Page 55 highlights
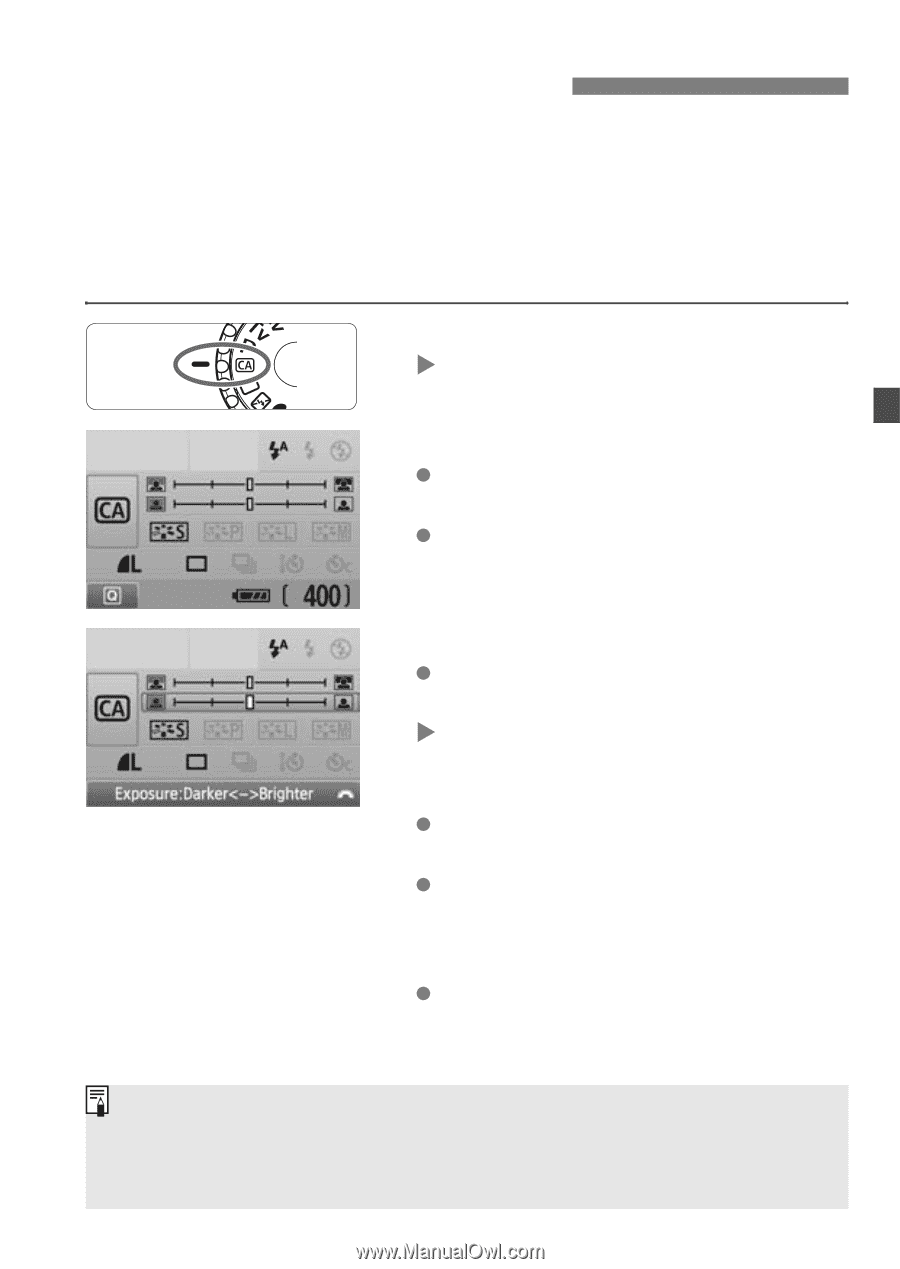
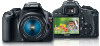
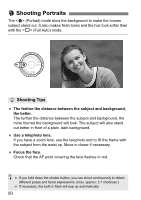
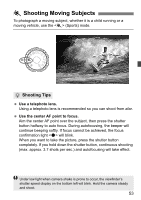
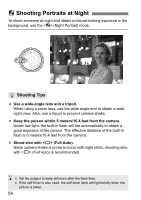
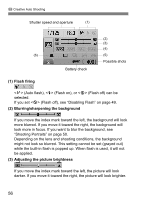
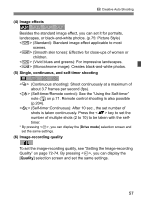
C Creative Auto Shooting Basic Zone modes except (Creative Auto) take care of everything, whereas the Creative Auto mode enables you to easily change the picture's brightness, depth of field, color tone (Picture Style), etc. The default settings are the same as the (Full Auto) mode. * CA stands for Creative Auto. 1 Set the Mode Dial to . X The Creative Auto screen appears on the LCD monitor. 2 Press the button. You can use the key to select the function (7). For details about each function, see page 56-57. 3 Set the desired setting. Press the key to select the function to be set. X A brief description of the selected function is displayed on the screen's bottom. Turn the dial to change the setting. Press the shutter button halfway to return to the screen in step 2. 4 Take the picture. Press the shutter button completely to take the picture. If you change the shooting mode or if the power turns off via auto power off (p.139) or by the power switch being set to , the Creative Auto settings will revert to the default. However, the image-recording quality, selftimer and remote control settings will be retained. 55
-
 1
1 -
2
-
3
-
4
-
5
-
6
-
7
-
8
-
9
-
10
-
11
-
12
-
13
-
14
-
15
-
16
-
17
-
18
-
19
-
20
-
21
-
22
-
23
-
24
-
25
-
26
-
27
-
28
-
29
-
30
-
31
-
32
-
33
-
34
-
35
-
36
-
37
-
38
-
39
-
40
-
41
-
42
-
43
-
44
-
45
-
46
-
47
-
48
-
49
-
 50
50 -
 51
51 -
 52
52 -
 53
53 -
 54
54 -
 55
55 -
 56
56 -
 57
57 -
 58
58 -
 59
59 -
 60
60 -
61
-
62
-
63
-
64
-
65
-
66
-
67
-
68
-
69
-
70
-
71
-
72
-
73
-
74
-
75
-
76
-
77
-
78
-
79
-
80
-
81
-
82
-
83
-
84
-
85
-
86
-
87
-
88
-
89
-
90
-
91
-
92
-
93
-
94
-
95
-
96
-
97
-
98
-
99
-
100
-
101
-
102
-
103
-
104
-
105
-
106
-
107
-
108
-
109
-
110
-
111
-
112
-
113
-
114
-
115
-
116
-
117
-
118
-
119
-
120
-
121
-
122
-
123
-
124
-
125
-
126
-
127
-
128
-
129
-
130
-
131
-
132
-
133
-
134
-
135
-
136
-
137
-
138
-
139
-
140
-
141
-
142
-
143
-
144
-
145
-
146
-
147
-
148
-
149
-
150
-
151
-
152
-
153
-
154
-
155
-
156
-
157
-
158
-
159
-
160
-
161
-
162
-
163
-
164
-
165
-
166
-
167
-
168
-
169
-
170
-
171
-
172
-
173
-
174
-
175
-
176
-
177
-
178
-
179
-
180
-
181
-
182
-
183
-
184
-
185
-
186
-
187
-
188
-
189
-
190
-
191
-
192
-
193
-
194
-
195
-
196
-
197
-
198
-
199
-
200
-
201
-
202
-
203
-
204
-
205
-
206
-
207
-
208
-
209
-
210
-
211
-
212
-
213
-
214
-
215
-
216
-
217
-
218
-
219
-
220
-
221
-
222
-
223
-
224
-
225
-
226
-
227
-
228
-
229
-
230
-
231
-
232
-
233
-
234
-
235
-
236
-
237
-
238
-
239
-
240
-
241
-
242
-
243
-
244
-
245
-
246
-
247
-
248
-
249
-
250
-
251
-
252
-
253
-
254
-
255
-
256
-
257
-
258
-
259
-
260
 |
 |