Canon EOS Rebel T2i EOS REBEL T2i / EOS 550D Instruction Manual - Page 87
Setting Exposure Compensation
 |
View all Canon EOS Rebel T2i manuals
Add to My Manuals
Save this manual to your list of manuals |
Page 87 highlights
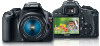
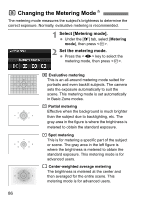
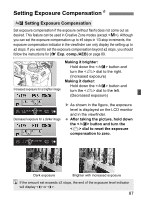
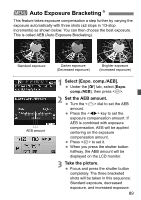
Setting Exposure CompensationN O Setting Exposure Compensation Set exposure compensation if the exposure (without flash) does not come out as desired. This feature can be used in Creative Zone modes (except ). Although you can set the exposure compensation up to ±5 stops in 1/3-stop increments, the exposure compensation indicator in the viewfinder can only display the setting up to ±2 stops. If you want to set the exposure compensation beyond ±2 stops, you should follow the instructions for [2 Exp. comp./AEB] on page 89. Increased exposure for a brighter image Making it brighter: Hold down the button and turn the dial to the right. (Increased exposure) Making it darker: Hold down the button and turn the dial to the left. (Decreased exposure) Decreased exposure for a darker image X As shown in the figure, the exposure level is displayed on the LCD monitor and in the viewfinder. After taking the picture, hold down the button and turn the dial to reset the exposure compensation to zero. Dark exposure Brighter with increased exposure If the amount set exceeds ±2 stops, the end of the exposure level indicator will display or . 87
-
 1
1 -
2
-
3
-
4
-
5
-
6
-
7
-
8
-
9
-
10
-
11
-
12
-
13
-
14
-
15
-
16
-
17
-
18
-
19
-
20
-
21
-
22
-
23
-
24
-
25
-
26
-
27
-
28
-
29
-
30
-
31
-
32
-
33
-
34
-
35
-
36
-
37
-
38
-
39
-
40
-
41
-
42
-
43
-
44
-
45
-
46
-
47
-
48
-
49
-
50
-
51
-
52
-
53
-
54
-
55
-
56
-
57
-
58
-
59
-
60
-
61
-
62
-
63
-
64
-
65
-
66
-
67
-
68
-
69
-
70
-
71
-
72
-
73
-
74
-
75
-
76
-
77
-
78
-
79
-
80
-
81
-
 82
82 -
 83
83 -
 84
84 -
 85
85 -
 86
86 -
 87
87 -
 88
88 -
 89
89 -
 90
90 -
 91
91 -
 92
92 -
93
-
94
-
95
-
96
-
97
-
98
-
99
-
100
-
101
-
102
-
103
-
104
-
105
-
106
-
107
-
108
-
109
-
110
-
111
-
112
-
113
-
114
-
115
-
116
-
117
-
118
-
119
-
120
-
121
-
122
-
123
-
124
-
125
-
126
-
127
-
128
-
129
-
130
-
131
-
132
-
133
-
134
-
135
-
136
-
137
-
138
-
139
-
140
-
141
-
142
-
143
-
144
-
145
-
146
-
147
-
148
-
149
-
150
-
151
-
152
-
153
-
154
-
155
-
156
-
157
-
158
-
159
-
160
-
161
-
162
-
163
-
164
-
165
-
166
-
167
-
168
-
169
-
170
-
171
-
172
-
173
-
174
-
175
-
176
-
177
-
178
-
179
-
180
-
181
-
182
-
183
-
184
-
185
-
186
-
187
-
188
-
189
-
190
-
191
-
192
-
193
-
194
-
195
-
196
-
197
-
198
-
199
-
200
-
201
-
202
-
203
-
204
-
205
-
206
-
207
-
208
-
209
-
210
-
211
-
212
-
213
-
214
-
215
-
216
-
217
-
218
-
219
-
220
-
221
-
222
-
223
-
224
-
225
-
226
-
227
-
228
-
229
-
230
-
231
-
232
-
233
-
234
-
235
-
236
-
237
-
238
-
239
-
240
-
241
-
242
-
243
-
244
-
245
-
246
-
247
-
248
-
249
-
250
-
251
-
252
-
253
-
254
-
255
-
256
-
257
-
258
-
259
-
260
 |
 |