Canon EOS Rebel T2i EOS REBEL T2i / EOS 550D Instruction Manual - Page 33
Attaching and Detaching a Lens - body
 |
View all Canon EOS Rebel T2i manuals
Add to My Manuals
Save this manual to your list of manuals |
Page 33 highlights
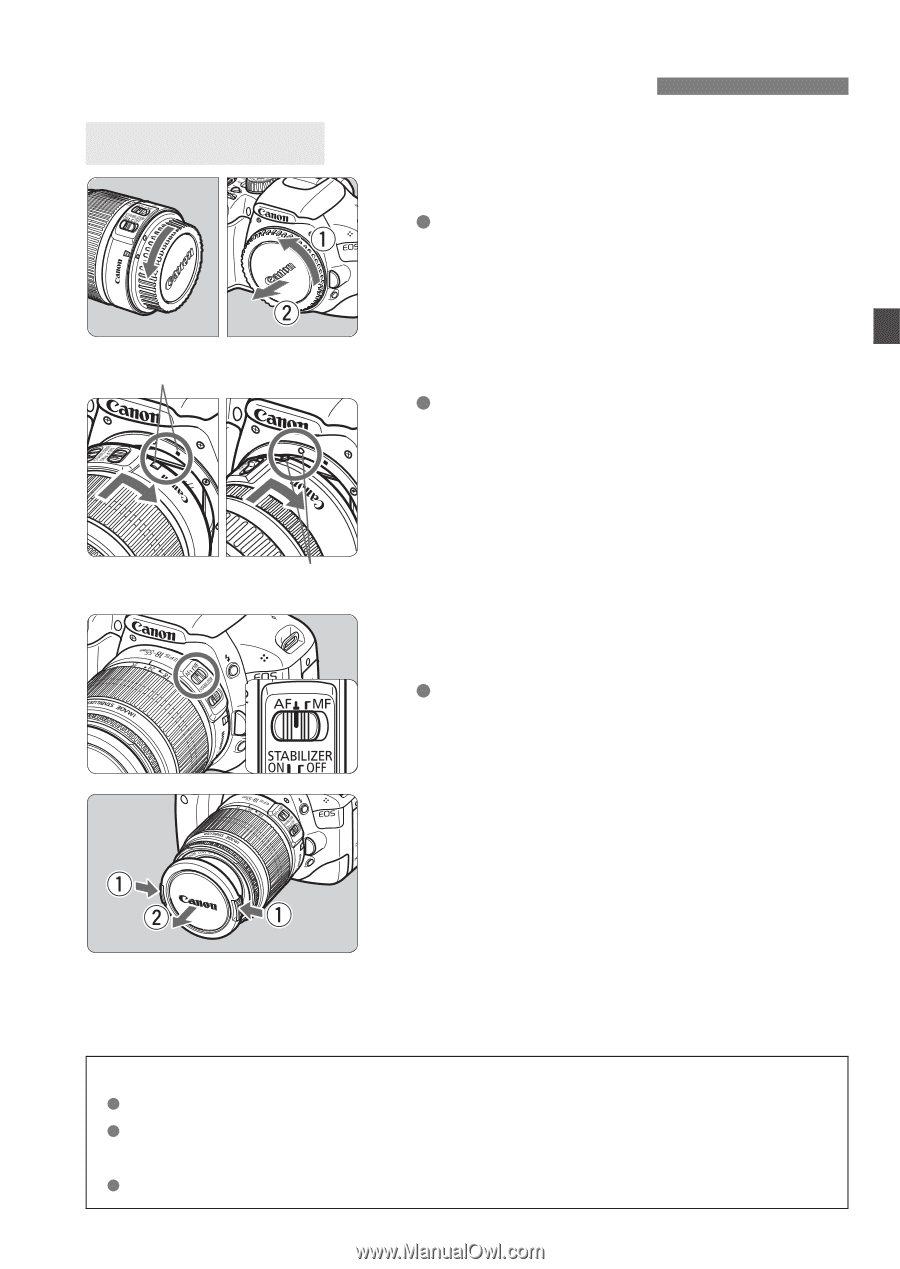
Attaching and Detaching a Lens Attaching a Lens 1 Remove the caps. Remove the rear lens cap and the body cap by turning them as shown by the arrows. White index 2 Attach the lens. Align the lens' red or white index with the camera's index matching the same color. Turn the lens as shown by the arrow until it snaps in place. Red index 3 On the lens, set the focus mode switch to (autofocus). If it is set to (manual focus), autofocus will not operate. 4 Remove the front lens cap. Minimizing Dust When changing lenses, do it in a place with minimal dust. When storing the camera without a lens attached, be sure to attach the body cap to the camera. Remove dust on the body cap before attaching it. 33
-
 1
1 -
2
-
3
-
4
-
5
-
6
-
7
-
8
-
9
-
10
-
11
-
12
-
13
-
14
-
15
-
16
-
17
-
18
-
19
-
20
-
21
-
22
-
23
-
24
-
25
-
26
-
27
-
 28
28 -
 29
29 -
 30
30 -
 31
31 -
 32
32 -
 33
33 -
 34
34 -
 35
35 -
 36
36 -
 37
37 -
 38
38 -
39
-
40
-
41
-
42
-
43
-
44
-
45
-
46
-
47
-
48
-
49
-
50
-
51
-
52
-
53
-
54
-
55
-
56
-
57
-
58
-
59
-
60
-
61
-
62
-
63
-
64
-
65
-
66
-
67
-
68
-
69
-
70
-
71
-
72
-
73
-
74
-
75
-
76
-
77
-
78
-
79
-
80
-
81
-
82
-
83
-
84
-
85
-
86
-
87
-
88
-
89
-
90
-
91
-
92
-
93
-
94
-
95
-
96
-
97
-
98
-
99
-
100
-
101
-
102
-
103
-
104
-
105
-
106
-
107
-
108
-
109
-
110
-
111
-
112
-
113
-
114
-
115
-
116
-
117
-
118
-
119
-
120
-
121
-
122
-
123
-
124
-
125
-
126
-
127
-
128
-
129
-
130
-
131
-
132
-
133
-
134
-
135
-
136
-
137
-
138
-
139
-
140
-
141
-
142
-
143
-
144
-
145
-
146
-
147
-
148
-
149
-
150
-
151
-
152
-
153
-
154
-
155
-
156
-
157
-
158
-
159
-
160
-
161
-
162
-
163
-
164
-
165
-
166
-
167
-
168
-
169
-
170
-
171
-
172
-
173
-
174
-
175
-
176
-
177
-
178
-
179
-
180
-
181
-
182
-
183
-
184
-
185
-
186
-
187
-
188
-
189
-
190
-
191
-
192
-
193
-
194
-
195
-
196
-
197
-
198
-
199
-
200
-
201
-
202
-
203
-
204
-
205
-
206
-
207
-
208
-
209
-
210
-
211
-
212
-
213
-
214
-
215
-
216
-
217
-
218
-
219
-
220
-
221
-
222
-
223
-
224
-
225
-
226
-
227
-
228
-
229
-
230
-
231
-
232
-
233
-
234
-
235
-
236
-
237
-
238
-
239
-
240
-
241
-
242
-
243
-
244
-
245
-
246
-
247
-
248
-
249
-
250
-
251
-
252
-
253
-
254
-
255
-
256
-
257
-
258
-
259
-
260
 |
 |
33
1
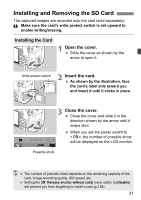
Remove the caps.
Remove the rear lens cap and the
body cap by turning them as shown
by the arrows.
2
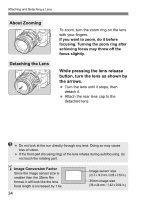
Attach the lens.
Align the lens’ red or white index with
the camera’s index matching the
same color. Turn the lens as shown
by the arrow until it snaps in place.
3
On the lens, set the focus mode
switch to <AF> (autofocus).
If it is set to <
MF
> (manual focus),
autofocus will not operate.
4
Remove the front lens cap.
Attaching and Detaching a Lens
Attaching a Lens
White index
Red index
Minimizing Dust
When changing lenses, do it in a place with minimal dust.
When storing the camera without a lens attached, be sure to attach the
body cap to the camera.
Remove dust on the body cap before attaching it.