Canon FS21 FS20/FS21/FS22/FS200 Instruction Manual - Page 60
Photos
 |
UPC - 705105064819
View all Canon FS21 manuals
Add to My Manuals
Save this manual to your list of manuals |
Page 60 highlights
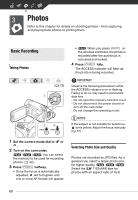
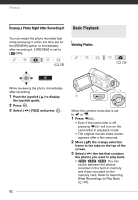
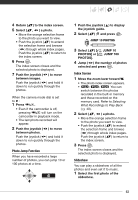
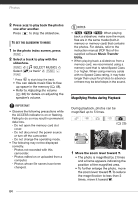
Photos Refer to this chapter for details on shooting photos - from capturing and playing back photos to printing them. Basic Recording Taking Photos ( 25) • When you press PHOTO on the wireless controller, the photo is recorded after the autofocus is activated and locked. 4 Press PHOTO fully. The ACCESS indicator will flash as the photo is being recorded. IMPORTANT Observe the following precautions while the ACCESS indicator is on or flashing. Failing to do so may result in permanent data loss. - Do not open the memory card slot cover. - Do not disconnect the power source or turn off the camcorder. - Do not change the operating mode. NOTES If the subject is not suitable for autofocus, turns yellow. Adjust the focus manually ( 51). 1 Set the camera mode dial to or . 2 Turn on the camcorder. / / You can select the memory to be used for recording photos ( 32). 3 Press PHOTO halfway. • Once the focus is automatically adjusted, will turn green and one or more AF frames will appear. Selecting Photo Size and Quality Photos are recorded as JPG files. As a general rule, select a larger photo size for higher quality. / / Select the [LW 1152x648] size for photos with an aspect ratio of 16:9. 60
-
 1
1 -
2
-
3
-
4
-
5
-
6
-
7
-
8
-
9
-
10
-
11
-
12
-
13
-
14
-
15
-
16
-
17
-
18
-
19
-
20
-
21
-
22
-
23
-
24
-
25
-
26
-
27
-
28
-
29
-
30
-
31
-
32
-
33
-
34
-
35
-
36
-
37
-
38
-
39
-
40
-
41
-
42
-
43
-
44
-
45
-
46
-
47
-
48
-
49
-
50
-
51
-
52
-
53
-
54
-
 55
55 -
 56
56 -
 57
57 -
 58
58 -
 59
59 -
 60
60 -
 61
61 -
 62
62 -
 63
63 -
 64
64 -
 65
65 -
66
-
67
-
68
-
69
-
70
-
71
-
72
-
73
-
74
-
75
-
76
-
77
-
78
-
79
-
80
-
81
-
82
-
83
-
84
-
85
-
86
-
87
-
88
-
89
-
90
-
91
-
92
-
93
-
94
-
95
-
96
-
97
-
98
-
99
-
100
-
101
-
102
-
103
-
104
-
105
-
106
-
107
-
108
-
109
-
110
-
111
-
112
-
113
-
114
-
115
-
116
-
117
-
118
-
119
-
120
-
121
-
122
-
123
 |
 |