Canon PIXMA MX922 User Manual - Page 103
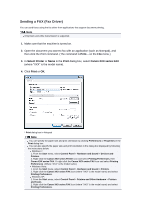
Set Recipient, Send FAX, Recipient Name, Select Recipient from Address, Set as Recipient, Important
 |
View all Canon PIXMA MX922 manuals
Add to My Manuals
Save this manual to your list of manuals |
Page 103 highlights
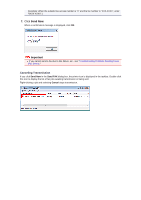
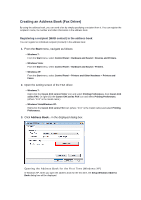
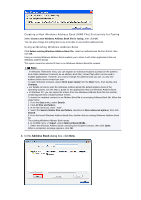
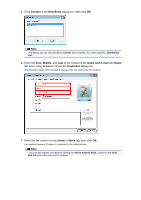
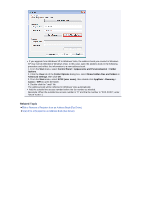
5. Click Display Address Book... in Set Recipient in the Send FAX dialog box. 6. Select a recipient from Recipient Name in the Select Recipient from Address Book dialog box, then click Set as Recipient. The selected recipient is reflected in Recipient in the Send FAX dialog box. Important You cannot specify a recipient if there is no recipient registered in the address book. Register the recipient in the address book and reopen the address book. For details on how to register recipients in the address book, see "Creating an Address Book (Fax Driver)." If the recipient's fax/telephone number is entered incorrectly or the registered fax/telephone number is incorrect, the fax may be sent to an unexpected recipient. When sending an important fax, it is recommended that you send it after confirming the entered information and recipient's status. Note You can also specify Recipient by entering a recipient as follows: Enter the Recipient Name and Fax Number in Direct Entry in the Send FAX dialog box, then click Set as Recipient. For details on valid characters, see "General Notes (Fax Driver)." You can send faxes even if only the Fax Number is entered. You can register the recipient you entered to the address book by clicking Add to Address Book.... For details on how to register recipients in the address book, see "Creating an Address Book (Fax Driver)." Add the outside line access number before the fax number as needed.
-
 1
1 -
2
-
3
-
4
-
5
-
6
-
7
-
8
-
9
-
10
-
11
-
12
-
13
-
14
-
15
-
16
-
17
-
18
-
19
-
20
-
21
-
22
-
23
-
24
-
25
-
26
-
27
-
28
-
29
-
30
-
31
-
32
-
33
-
34
-
35
-
36
-
37
-
38
-
39
-
40
-
41
-
42
-
43
-
44
-
45
-
46
-
47
-
48
-
49
-
50
-
51
-
52
-
53
-
54
-
55
-
56
-
57
-
58
-
59
-
60
-
61
-
62
-
63
-
64
-
65
-
66
-
67
-
68
-
69
-
70
-
71
-
72
-
73
-
74
-
75
-
76
-
77
-
78
-
79
-
80
-
81
-
82
-
83
-
84
-
85
-
86
-
87
-
88
-
89
-
90
-
91
-
92
-
93
-
94
-
95
-
96
-
97
-
 98
98 -
 99
99 -
 100
100 -
 101
101 -
 102
102 -
 103
103 -
 104
104 -
 105
105 -
 106
106 -
 107
107 -
 108
108 -
109
-
110
-
111
-
112
-
113
-
114
-
115
-
116
 |
 |
