Canon PIXMA MX922 User Manual - Page 107
Contact, New Entry, First, Middle, Name and E-mail, Properties
 |
View all Canon PIXMA MX922 manuals
Add to My Manuals
Save this manual to your list of manuals |
Page 107 highlights
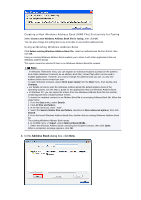
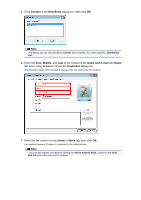
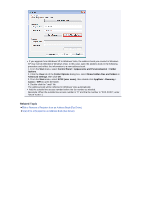
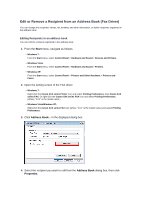
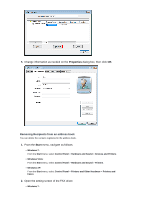
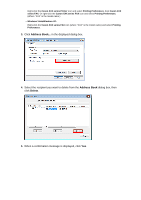
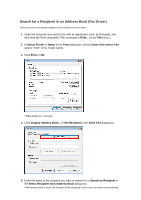
5. Click Contact in the New Entry dialog box, then click OK. Note For faxing, you can only specify the Contact (one recipient). You cannot specify a Distribution List. 6. Enter the First, Middle, and Last of the contact in the Name and E-mail tab (Name tab when using Windows XP) on the Properties dialog box. The recipient's name will be printed at the top of the fax received by the recipient. 7. Enter the fax number on the Home or Work tab, then click OK. An individual recipient (Contact) is registered in the address book. Note You can also register a recipient by clicking the Add to Address Book... button on the Send FAX dialog box after entering the recipient.
-
 1
1 -
2
-
3
-
4
-
5
-
6
-
7
-
8
-
9
-
10
-
11
-
12
-
13
-
14
-
15
-
16
-
17
-
18
-
19
-
20
-
21
-
22
-
23
-
24
-
25
-
26
-
27
-
28
-
29
-
30
-
31
-
32
-
33
-
34
-
35
-
36
-
37
-
38
-
39
-
40
-
41
-
42
-
43
-
44
-
45
-
46
-
47
-
48
-
49
-
50
-
51
-
52
-
53
-
54
-
55
-
56
-
57
-
58
-
59
-
60
-
61
-
62
-
63
-
64
-
65
-
66
-
67
-
68
-
69
-
70
-
71
-
72
-
73
-
74
-
75
-
76
-
77
-
78
-
79
-
80
-
81
-
82
-
83
-
84
-
85
-
86
-
87
-
88
-
89
-
90
-
91
-
92
-
93
-
94
-
95
-
96
-
97
-
98
-
99
-
100
-
101
-
 102
102 -
 103
103 -
 104
104 -
 105
105 -
 106
106 -
 107
107 -
 108
108 -
 109
109 -
 110
110 -
 111
111 -
 112
112 -
113
-
114
-
115
-
116
 |
 |

5.
Click
Contact
in the
New Entry
dialog box, then click
OK
.
Note
For faxing, you can only specify the
Contact
(one recipient). You cannot specify a
Distribution
List
.
6.
Enter the
First
,
Middle
, and
Last
of the contact in the
Name and E-mail
tab (
Name
tab when using Windows XP) on the
Properties
dialog box.
The recipient's name will be printed at the top of the fax received by the recipient.
7.
Enter the fax number on the
Home
or
Work
tab, then click
OK
.
An individual recipient (Contact) is registered in the address book.
Note
You can also register a recipient by clicking the
Add to Address Book...
button on the
Send
FAX
dialog box after entering the recipient.