Canon PIXMA mini260 Photo Printing Guide - Page 5
Before Printing, Printer Parts and Their Functions - photo printer
 |
View all Canon PIXMA mini260 manuals
Add to My Manuals
Save this manual to your list of manuals |
Page 5 highlights
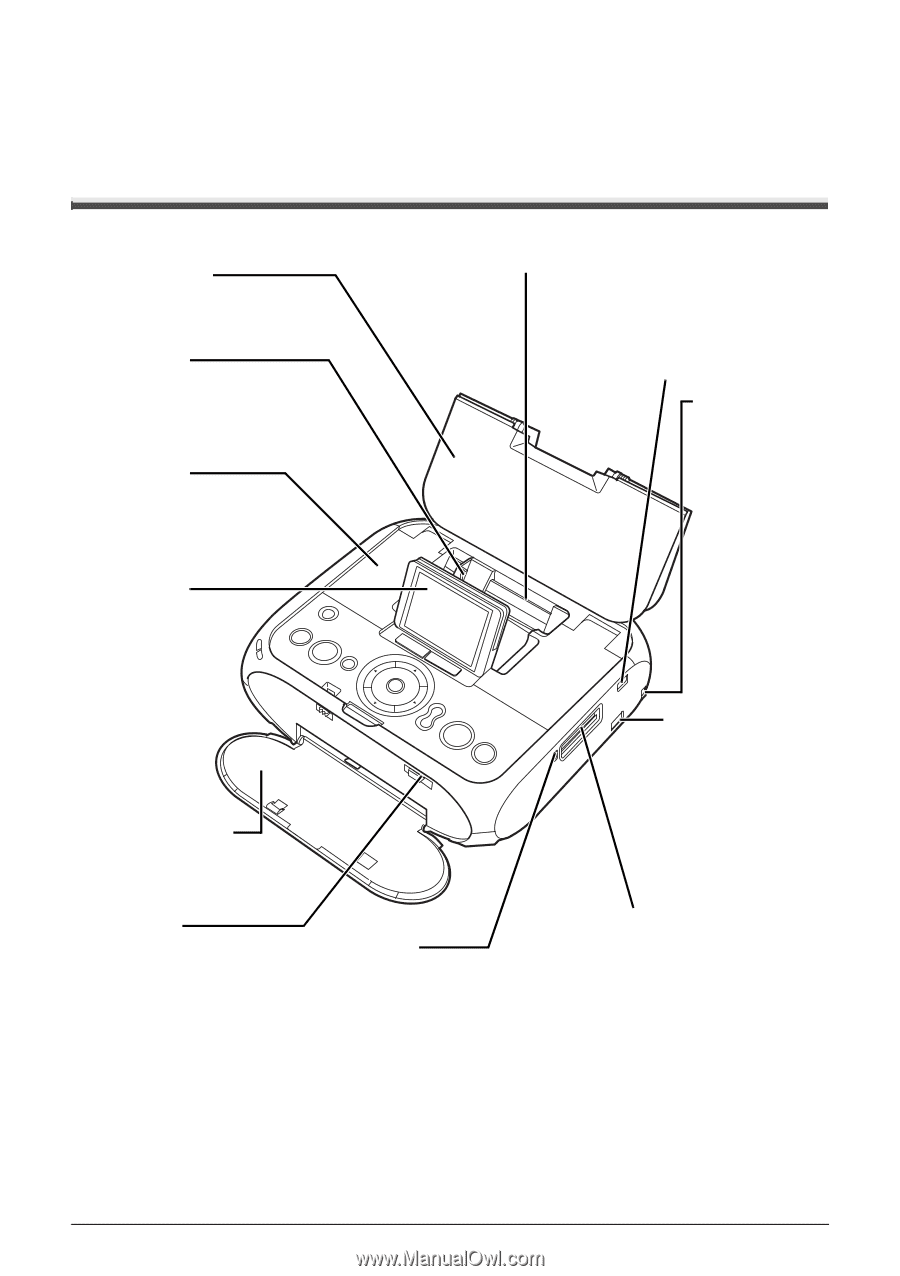
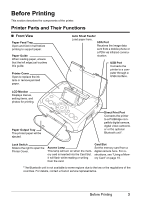
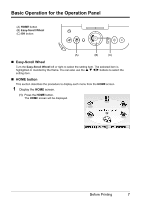
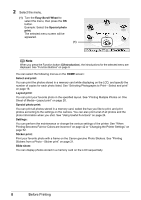
Before Printing This section describes the components of the printer. Printer Parts and Their Functions Front View Paper Feed Tray Open and fold in half before printing to support paper. Paper Guide When loading paper, ensure that the left edge just touches this guide. Printer Cover Open to replace the ink tank or remove jammed paper. Auto Sheet Feeder Load paper here. IrDA Port Receives the image data sent from a mobile phone or a PDA via infrared communication. USB Port Connects the printer to a computer through a USB interface. LCD Monitor Displays menus, setting items, and photos for printing. Paper Output Tray The printed paper will be ejected. Direct Print Port Connects the printer to a PictBridge compatible digital camera, digital video camcorder or the optional Bluetooth unit*. Lock Switch Slide to the right to open the Printer Cover. Access Lamp This lamp will turn on when the memory card is inserted into the Card Slot. It will flash while reading or writing from the card. Card Slot Set the memory card from a digital camera here. For instructions, see "Using a Memory Card" on page 15. *The Bluetooth unit is not available to some regions due to the law or the regulations of the countries. For details, contact a Canon service representative. Before Printing 3
-
 1
1 -
 2
2 -
 3
3 -
 4
4 -
 5
5 -
 6
6 -
 7
7 -
 8
8 -
 9
9 -
 10
10 -
 11
11 -
12
-
13
-
14
-
15
-
16
-
17
-
18
-
19
-
20
-
21
-
22
-
23
-
24
-
25
-
26
-
27
-
28
-
29
-
30
-
31
-
32
-
33
-
34
-
35
-
36
-
37
-
38
-
39
-
40
-
41
-
42
-
43
-
44
-
45
-
46
-
47
-
48
-
49
-
50
-
51
-
52
-
53
-
54
-
55
-
56
-
57
-
58
-
59
-
60
-
61
-
62
-
63
-
64
-
65
-
66
-
67
-
68
-
69
-
70
-
71
-
72
-
73
-
74
-
75
-
76
-
77
-
78
-
79
-
80
-
81
-
82
-
83
-
84
-
85
-
86
-
87
-
88
-
89
-
90
-
91
-
92
 |
 |