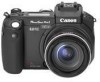
Canon Pro1 PowerShot Pro1 Camera User Guide - Page 101
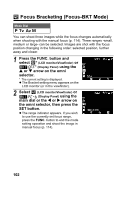
Press the FUNC. button or click the main dial.
 |
UPC - 013803034899
View all Canon Pro1 manuals
Add to My Manuals
Save this manual to your list of manuals |
Page 101 highlights
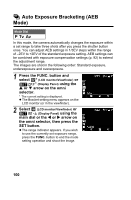
Shooting - Selecting Particular Effects In this screen, select the item you wish to set using the S or T arrow on the omni selector and set it using the W or X arrow on the omni selector. Contrast z Select from - (Weak), 0 (Neutral) and + (Strong). z This function allows you to adjust the degree of brightness. Sharpness z Select from - (Weak), 0 (Neutral) and + (Strong). z This function allows you to adjust how sharply outlines are defined. Saturation z Select from - (Low), 0 (Neutral) and + (High). z This function allows you to adjust the color depth. You can shoot the image right after selecting settings by pressing the shutter button. The menu displays again after the shot, allowing you to change the settings easily. 3 Press the FUNC. button or click the main dial. z The white balance cannot be set when mode is selected. (Sepia) or (B/W) 97
-
 1
1 -
2
-
3
-
4
-
5
-
6
-
7
-
8
-
9
-
10
-
11
-
12
-
13
-
14
-
15
-
16
-
17
-
18
-
19
-
20
-
21
-
22
-
23
-
24
-
25
-
26
-
27
-
28
-
29
-
30
-
31
-
32
-
33
-
34
-
35
-
36
-
37
-
38
-
39
-
40
-
41
-
42
-
43
-
44
-
45
-
46
-
47
-
48
-
49
-
50
-
51
-
52
-
53
-
54
-
55
-
56
-
57
-
58
-
59
-
60
-
61
-
62
-
63
-
64
-
65
-
66
-
67
-
68
-
69
-
70
-
71
-
72
-
73
-
74
-
75
-
76
-
77
-
78
-
79
-
80
-
81
-
82
-
83
-
84
-
85
-
86
-
87
-
88
-
89
-
90
-
91
-
92
-
93
-
94
-
95
-
 96
96 -
 97
97 -
 98
98 -
 99
99 -
 100
100 -
 101
101 -
 102
102 -
 103
103 -
 104
104 -
 105
105 -
 106
106 -
107
-
108
-
109
-
110
-
111
-
112
-
113
-
114
-
115
-
116
-
117
-
118
-
119
-
120
-
121
-
122
-
123
-
124
-
125
-
126
-
127
-
128
-
129
-
130
-
131
-
132
-
133
-
134
-
135
-
136
-
137
-
138
-
139
-
140
-
141
-
142
-
143
-
144
-
145
-
146
-
147
-
148
-
149
-
150
-
151
-
152
-
153
-
154
-
155
-
156
-
157
-
158
-
159
-
160
-
161
-
162
-
163
-
164
-
165
-
166
-
167
-
168
-
169
-
170
-
171
-
172
-
173
-
174
-
175
-
176
-
177
-
178
-
179
-
180
-
181
-
182
-
183
-
184
-
185
-
186
-
187
-
188
-
189
-
190
-
191
-
192
-
193
-
194
-
195
-
196
-
197
-
198
-
199
-
200
-
201
-
202
-
203
-
204
-
205
-
206
-
207
 |
 |
