Canon Pro1 PowerShot Pro1 Camera User Guide - Page 59
Changing the Recording Format Right after, Shooting
 |
UPC - 013803034899
View all Canon Pro1 manuals
Add to My Manuals
Save this manual to your list of manuals |
Page 59 highlights
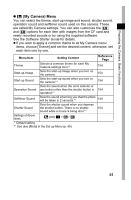
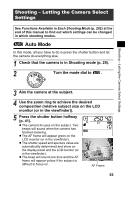
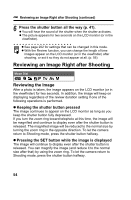
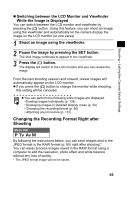
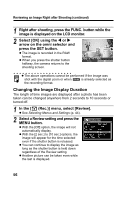
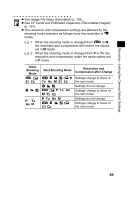
Shooting - Letting the Camera Select Settings z Switching between the LCD Monitor and Viewfinder While the Image is Displayed You can switch between the LCD monitor and viewfinder by pressing the button. Using this feature, you can shoot an image using the viewfinder and automatically let the camera display the image on the LCD monitor (or vice versa). 1 Shoot an image using the viewfinder. 2 Pause the image by pressing the SET button. The shot image continues to appear in the viewfinder. 3 Press the button. The display will switch to the LCD monitor and you can review the image. From the next shooting session and onward, review images will automatically appear on the LCD monitor. z If you press the button to change the monitor while shooting, this setting will be canceled. z You can perform the following while images are displayed. • Erasing images individually (p. 138) • Displaying images in Detailed Display mode (p. 34) • Changing the recording format (p. 60) • Attaching sound memos (p. 131) Changing the Recording Format Right after Shooting Mode Dial By following the instructions below, you can save images shot in the JPEG format in the RAW format (p. 60) right after shooting.* You can easily process images saved in the RAW format using a computer to edit the resolution, photo effect and white balance without any loss of quality. * The JPEG format image will not be saved. 55
-
 1
1 -
2
-
3
-
4
-
5
-
6
-
7
-
8
-
9
-
10
-
11
-
12
-
13
-
14
-
15
-
16
-
17
-
18
-
19
-
20
-
21
-
22
-
23
-
24
-
25
-
26
-
27
-
28
-
29
-
30
-
31
-
32
-
33
-
34
-
35
-
36
-
37
-
38
-
39
-
40
-
41
-
42
-
43
-
44
-
45
-
46
-
47
-
48
-
49
-
50
-
51
-
52
-
53
-
 54
54 -
 55
55 -
 56
56 -
 57
57 -
 58
58 -
 59
59 -
 60
60 -
 61
61 -
 62
62 -
 63
63 -
 64
64 -
65
-
66
-
67
-
68
-
69
-
70
-
71
-
72
-
73
-
74
-
75
-
76
-
77
-
78
-
79
-
80
-
81
-
82
-
83
-
84
-
85
-
86
-
87
-
88
-
89
-
90
-
91
-
92
-
93
-
94
-
95
-
96
-
97
-
98
-
99
-
100
-
101
-
102
-
103
-
104
-
105
-
106
-
107
-
108
-
109
-
110
-
111
-
112
-
113
-
114
-
115
-
116
-
117
-
118
-
119
-
120
-
121
-
122
-
123
-
124
-
125
-
126
-
127
-
128
-
129
-
130
-
131
-
132
-
133
-
134
-
135
-
136
-
137
-
138
-
139
-
140
-
141
-
142
-
143
-
144
-
145
-
146
-
147
-
148
-
149
-
150
-
151
-
152
-
153
-
154
-
155
-
156
-
157
-
158
-
159
-
160
-
161
-
162
-
163
-
164
-
165
-
166
-
167
-
168
-
169
-
170
-
171
-
172
-
173
-
174
-
175
-
176
-
177
-
178
-
179
-
180
-
181
-
182
-
183
-
184
-
185
-
186
-
187
-
188
-
189
-
190
-
191
-
192
-
193
-
194
-
195
-
196
-
197
-
198
-
199
-
200
-
201
-
202
-
203
-
204
-
205
-
206
-
207
 |
 |
