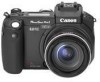
Canon Pro1 PowerShot Pro1 Camera User Guide - Page 95
Select the [Center] or [AF Point]
 |
UPC - 013803034899
View all Canon Pro1 manuals
Add to My Manuals
Save this manual to your list of manuals |
Page 95 highlights
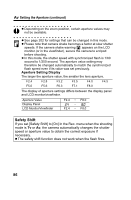
Shooting - Selecting Particular Effects 1 Press the button to select the metering mode. z Each press of the button changes the metering mode as follows. (Evaluative Metering) (Center-Weighted Averaging) (Spot AE Point) z The icon of the currently selected light metering mode appears on the display panel and LCD monitor (or in the viewfinder). If you have selected (Spot AE Point), go to step 2. If you have selected (Evaluative Metering) or (Center- Weighted Averaging), shoot the image. 2 In the [ (Rec.)] menu, select [Spot AE Point]. z See Selecting Menus and Settings (p. 44). 3 Select the [Center] or [AF Point] option, then press the MENU button. z When [Spot AE Point] is set to [Center], the spot AE point frame appears at the center of the LCD monitor (or viewfinder). When [Spot AE Point] is set to [AF Point], it appears inside the AF frame. e.g. Center Spot AE Point Frame 91
-
 1
1 -
2
-
3
-
4
-
5
-
6
-
7
-
8
-
9
-
10
-
11
-
12
-
13
-
14
-
15
-
16
-
17
-
18
-
19
-
20
-
21
-
22
-
23
-
24
-
25
-
26
-
27
-
28
-
29
-
30
-
31
-
32
-
33
-
34
-
35
-
36
-
37
-
38
-
39
-
40
-
41
-
42
-
43
-
44
-
45
-
46
-
47
-
48
-
49
-
50
-
51
-
52
-
53
-
54
-
55
-
56
-
57
-
58
-
59
-
60
-
61
-
62
-
63
-
64
-
65
-
66
-
67
-
68
-
69
-
70
-
71
-
72
-
73
-
74
-
75
-
76
-
77
-
78
-
79
-
80
-
81
-
82
-
83
-
84
-
85
-
86
-
87
-
88
-
89
-
 90
90 -
 91
91 -
 92
92 -
 93
93 -
 94
94 -
 95
95 -
 96
96 -
 97
97 -
 98
98 -
 99
99 -
 100
100 -
101
-
102
-
103
-
104
-
105
-
106
-
107
-
108
-
109
-
110
-
111
-
112
-
113
-
114
-
115
-
116
-
117
-
118
-
119
-
120
-
121
-
122
-
123
-
124
-
125
-
126
-
127
-
128
-
129
-
130
-
131
-
132
-
133
-
134
-
135
-
136
-
137
-
138
-
139
-
140
-
141
-
142
-
143
-
144
-
145
-
146
-
147
-
148
-
149
-
150
-
151
-
152
-
153
-
154
-
155
-
156
-
157
-
158
-
159
-
160
-
161
-
162
-
163
-
164
-
165
-
166
-
167
-
168
-
169
-
170
-
171
-
172
-
173
-
174
-
175
-
176
-
177
-
178
-
179
-
180
-
181
-
182
-
183
-
184
-
185
-
186
-
187
-
188
-
189
-
190
-
191
-
192
-
193
-
194
-
195
-
196
-
197
-
198
-
199
-
200
-
201
-
202
-
203
-
204
-
205
-
206
-
207
 |
 |
