Canon Pro1 PowerShot Pro1 Camera User Guide - Page 39
Information Displayed on the LCD Monitor, Viewfinder - review
 |
UPC - 013803034899
View all Canon Pro1 manuals
Add to My Manuals
Save this manual to your list of manuals |
Page 39 highlights
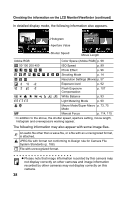
Preparing the Camera, Basic Functions Information Displayed on the LCD Monitor/ Viewfinder The LCD monitor displays information in Shooting or Playback mode, such as the camera settings, remaining image capacity and shooting date/time. z Shooting Mode The information appears for approximately 6 seconds when you operate the camera (such as making a change in shooting settings) even if the LCD monitor/viewfinder is set to No Information. (Sometimes no information appears depending on the camera setting at that time.) z A slow shutter speed has likely been selected because of insufficient lighting if the camera shake icon appears after metering preparations are complete. Set the flash to (On) or (Auto), or affix the camera to a tripod to shoot. z After you take a photo by fully pressing the shutter button, the image displays on the LCD monitor for approximately two seconds (or the review duration you set from 2 to 10 seconds). If you press the SET button while the image is displayed, it will continue to display (p. 54). z You can check the brightness of the image during the image review after shooting using the histogram (p. 39), a graph which allows you to judge the brightness of the recorded image and other information appearing with the image. You can adjust the exposure according to the results, then shoot again if necessary. (If no histogram appears, press the INFO. button.) 35
-
 1
1 -
2
-
3
-
4
-
5
-
6
-
7
-
8
-
9
-
10
-
11
-
12
-
13
-
14
-
15
-
16
-
17
-
18
-
19
-
20
-
21
-
22
-
23
-
24
-
25
-
26
-
27
-
28
-
29
-
30
-
31
-
32
-
33
-
 34
34 -
 35
35 -
 36
36 -
 37
37 -
 38
38 -
 39
39 -
 40
40 -
 41
41 -
 42
42 -
 43
43 -
 44
44 -
45
-
46
-
47
-
48
-
49
-
50
-
51
-
52
-
53
-
54
-
55
-
56
-
57
-
58
-
59
-
60
-
61
-
62
-
63
-
64
-
65
-
66
-
67
-
68
-
69
-
70
-
71
-
72
-
73
-
74
-
75
-
76
-
77
-
78
-
79
-
80
-
81
-
82
-
83
-
84
-
85
-
86
-
87
-
88
-
89
-
90
-
91
-
92
-
93
-
94
-
95
-
96
-
97
-
98
-
99
-
100
-
101
-
102
-
103
-
104
-
105
-
106
-
107
-
108
-
109
-
110
-
111
-
112
-
113
-
114
-
115
-
116
-
117
-
118
-
119
-
120
-
121
-
122
-
123
-
124
-
125
-
126
-
127
-
128
-
129
-
130
-
131
-
132
-
133
-
134
-
135
-
136
-
137
-
138
-
139
-
140
-
141
-
142
-
143
-
144
-
145
-
146
-
147
-
148
-
149
-
150
-
151
-
152
-
153
-
154
-
155
-
156
-
157
-
158
-
159
-
160
-
161
-
162
-
163
-
164
-
165
-
166
-
167
-
168
-
169
-
170
-
171
-
172
-
173
-
174
-
175
-
176
-
177
-
178
-
179
-
180
-
181
-
182
-
183
-
184
-
185
-
186
-
187
-
188
-
189
-
190
-
191
-
192
-
193
-
194
-
195
-
196
-
197
-
198
-
199
-
200
-
201
-
202
-
203
-
204
-
205
-
206
-
207
 |
 |
