Canon Pro1 PowerShot Pro1 Camera User Guide - Page 87
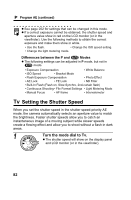
Turn the main dial and select a, shutter speed., Shoot the image.
 |
UPC - 013803034899
View all Canon Pro1 manuals
Add to My Manuals
Save this manual to your list of manuals |
Page 87 highlights
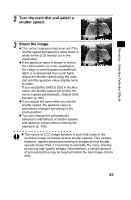
Shooting - Selecting Particular Effects 2 Turn the main dial and select a shutter speed. 3 Shoot the image. z The correct exposure has been set if the shutter speed and aperture value show in white on the LCD monitor (or in the viewfinder). z If the aperture value is shown in red on the LCD monitor (or in the viewfinder), the image is underexposed (insufficient light) or overexposed (too much light). Adjust the shutter speed using the main dial until the aperture value display turns to white. If you set [Safety Shift] to [On] in the Rec. menu, the shutter speed will shift to the correct speed automatically. (Safety Shift function (p. 86)) z If you adjust the zoom after you set the shutter speed, the aperture value is sometimes changed according to the zoom position. z You can change the automatically selected combinations of shutter speeds and aperture values without altering the exposure (p. 105). z The nature of CCD image sensors is such that noise in the recorded image increases at slow shutter speeds. This camera, however, applies special processing to images shot at shutter speeds slower than 1.3 seconds to eliminate the noise, thereby producing high-quality images. Nevertheless, a certain amount of processing time may be required before the next image can be shot. 83
-
 1
1 -
2
-
3
-
4
-
5
-
6
-
7
-
8
-
9
-
10
-
11
-
12
-
13
-
14
-
15
-
16
-
17
-
18
-
19
-
20
-
21
-
22
-
23
-
24
-
25
-
26
-
27
-
28
-
29
-
30
-
31
-
32
-
33
-
34
-
35
-
36
-
37
-
38
-
39
-
40
-
41
-
42
-
43
-
44
-
45
-
46
-
47
-
48
-
49
-
50
-
51
-
52
-
53
-
54
-
55
-
56
-
57
-
58
-
59
-
60
-
61
-
62
-
63
-
64
-
65
-
66
-
67
-
68
-
69
-
70
-
71
-
72
-
73
-
74
-
75
-
76
-
77
-
78
-
79
-
80
-
81
-
 82
82 -
 83
83 -
 84
84 -
 85
85 -
 86
86 -
 87
87 -
 88
88 -
 89
89 -
 90
90 -
 91
91 -
 92
92 -
93
-
94
-
95
-
96
-
97
-
98
-
99
-
100
-
101
-
102
-
103
-
104
-
105
-
106
-
107
-
108
-
109
-
110
-
111
-
112
-
113
-
114
-
115
-
116
-
117
-
118
-
119
-
120
-
121
-
122
-
123
-
124
-
125
-
126
-
127
-
128
-
129
-
130
-
131
-
132
-
133
-
134
-
135
-
136
-
137
-
138
-
139
-
140
-
141
-
142
-
143
-
144
-
145
-
146
-
147
-
148
-
149
-
150
-
151
-
152
-
153
-
154
-
155
-
156
-
157
-
158
-
159
-
160
-
161
-
162
-
163
-
164
-
165
-
166
-
167
-
168
-
169
-
170
-
171
-
172
-
173
-
174
-
175
-
176
-
177
-
178
-
179
-
180
-
181
-
182
-
183
-
184
-
185
-
186
-
187
-
188
-
189
-
190
-
191
-
192
-
193
-
194
-
195
-
196
-
197
-
198
-
199
-
200
-
201
-
202
-
203
-
204
-
205
-
206
-
207
 |
 |
